Project Setup
When beginning the project, I first established a clear and organized folder structure within Unreal Engine to maintain consistency and facilitate iteration throughout the development process. Proper organization is critical in technical demonstrations, especially when experimenting with multiple systems such as fluid simulation, materials, and blueprints.
To achieve this, I created a master directory named “WaterSystem”. This folder acts as the core container for all assets related to the project — including Blueprints, Materials, Meshes, Textures, and any associated Code or Data Assets. Centralizing these elements ensures that all files related to the water simulation system are easily accessible and logically grouped, avoiding confusion during testing and revisions.
Within the “WaterSystem” folder, I implemented a versioned progression layout. Each stage of development is represented by its own subfolder, named sequentially as “LV_01”, “LV_02”, and so forth.
- LV_01 contains the initial prototype and the foundational setup where basic water parameters and wave simulation tests are conducted.
- LV_02 and subsequent levels represent significant updates or refinements to the system, allowing me to preserve earlier versions for comparison and being able to see progression.
Each “LV_N” folder contains two key subfolders:
- Blueprints – storing all the logic-based assets such as water behaviour controllers, buoyancy test actors, and environmental interaction systems.
- Materials – containing shaders, surface materials, and visual effects related to the appearance and movement of water.
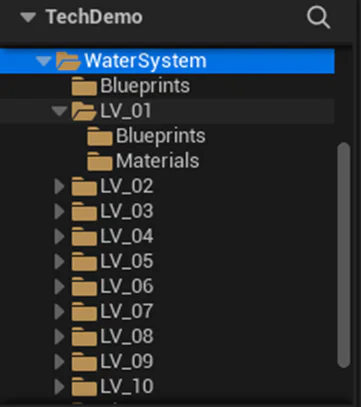
Alongside these folders is a Level in which the blueprints are used, and the techniques are displayed.
This modular structure enables a clear development timeline, showing how each iteration builds upon the last. Additionally, each level within the sequence features an on-screen text display, providing a summary of the technical focus for that stage. For example, “Wave Simulation Prototype” or “Buoyancy and Interaction Test”. This ensures that anyone reviewing the project can quickly identify the purpose and progress of each version without having to open or analyse the underlying blueprints.
Overall, this setup not only promotes clean project organization but also supports a methodical approach to testing and evaluation, allowing me to document and compare results from different simulation methods effectively. Establishing this workflow early on was essential for maintaining clarity and control as the complexity of the water system evolved.
LV_01
I started off by creating a new basic level within Unreal Engine 5 to serve as my initial test environment for my water simulations, then removed the floor mesh provided in the level, leaving me with an empty scene that would serve as a clean workspace for my testing.
The first step in building the water system was to create a blueprint actor, which would function as the container for the water object. This blueprint was named “BP_Water_01” for clarity. Inside this blueprint I added a static mesh component, initially using UE’s default plane mesh to visualize the water’s surface.
Next, I created the first water material called “M_Water_01”, designed to handle the visual and dynamic displacement of the water surface. To construct this material, I followed guidance from GPU Gems from Nvidia, which outlines the mathematic principles behind wave simulation.
I specifically used their Sine Wave equation for a simplistic starting point in my project.
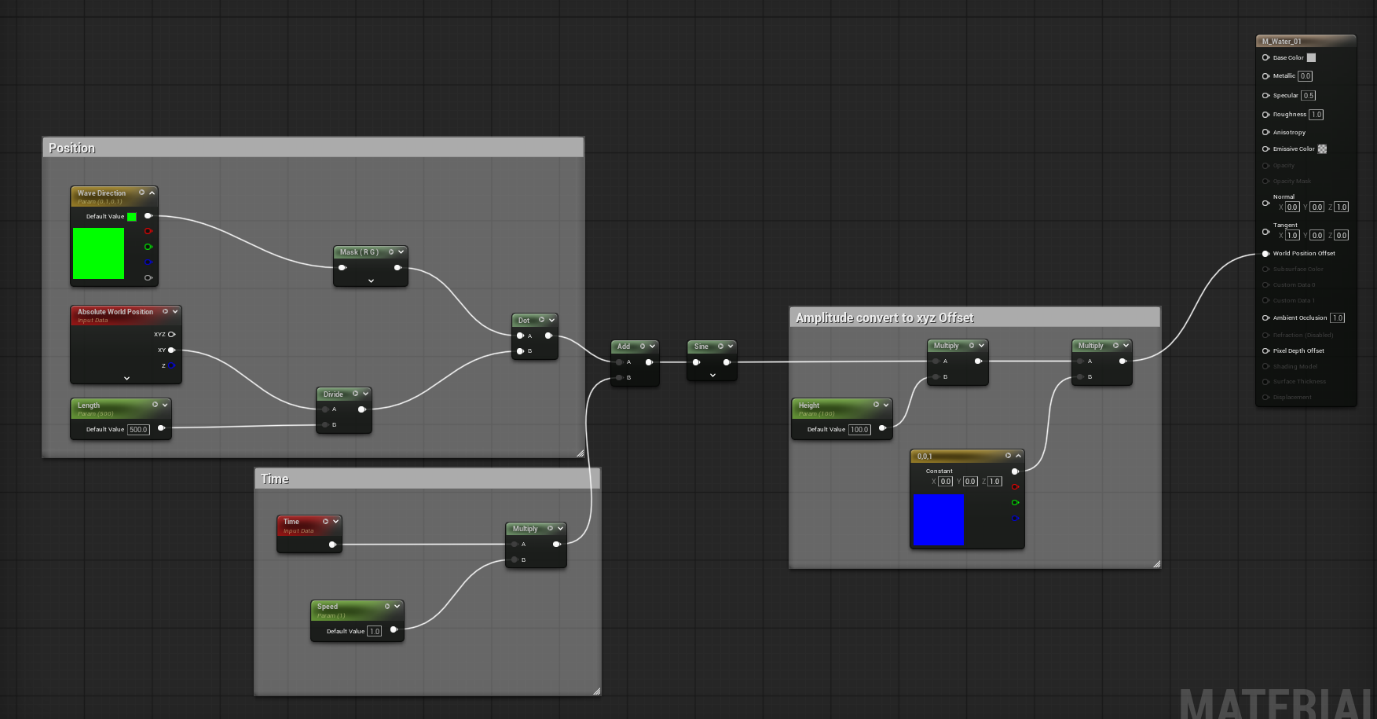
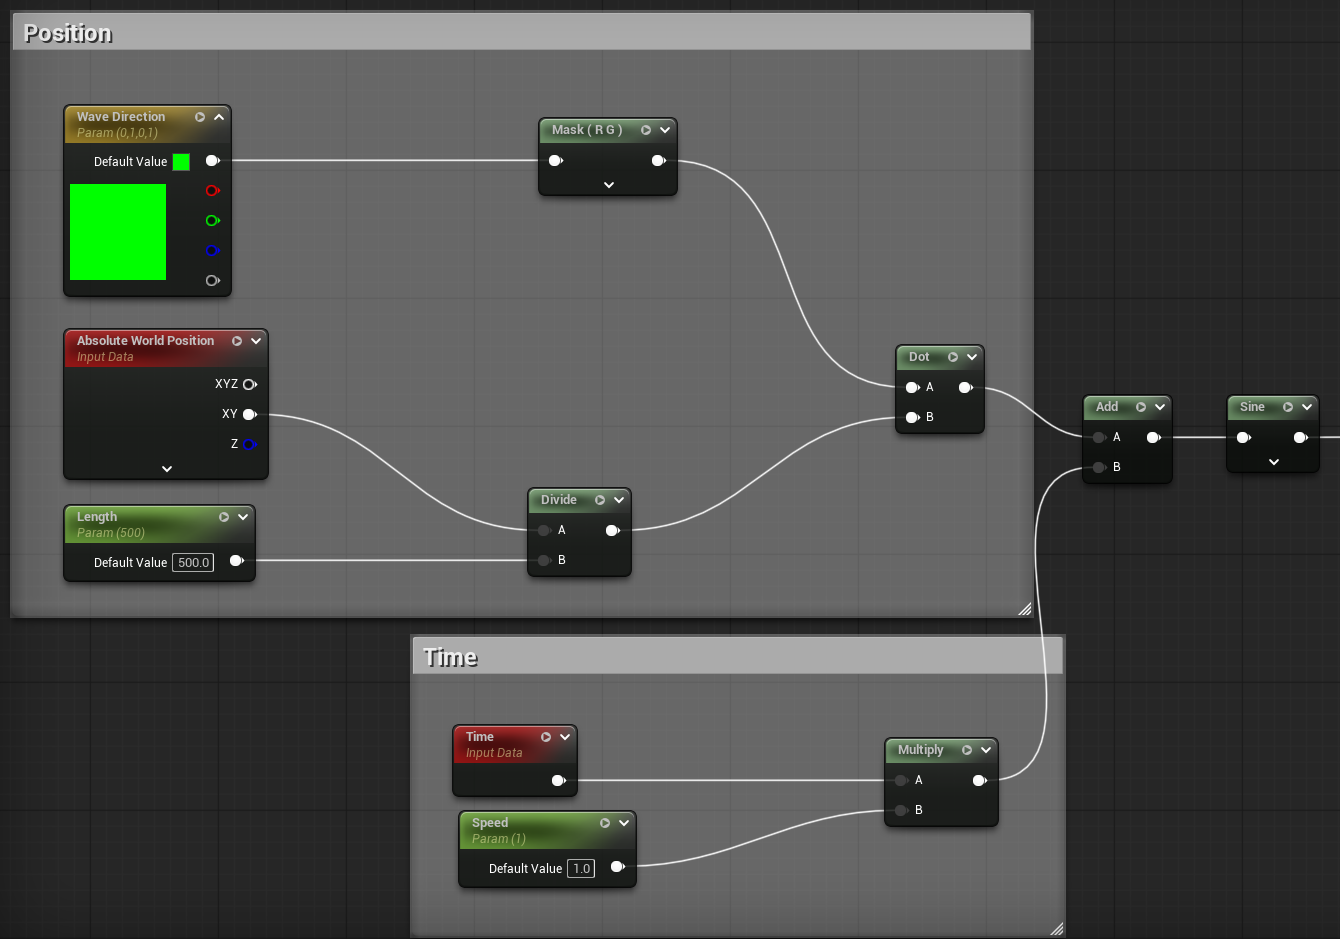
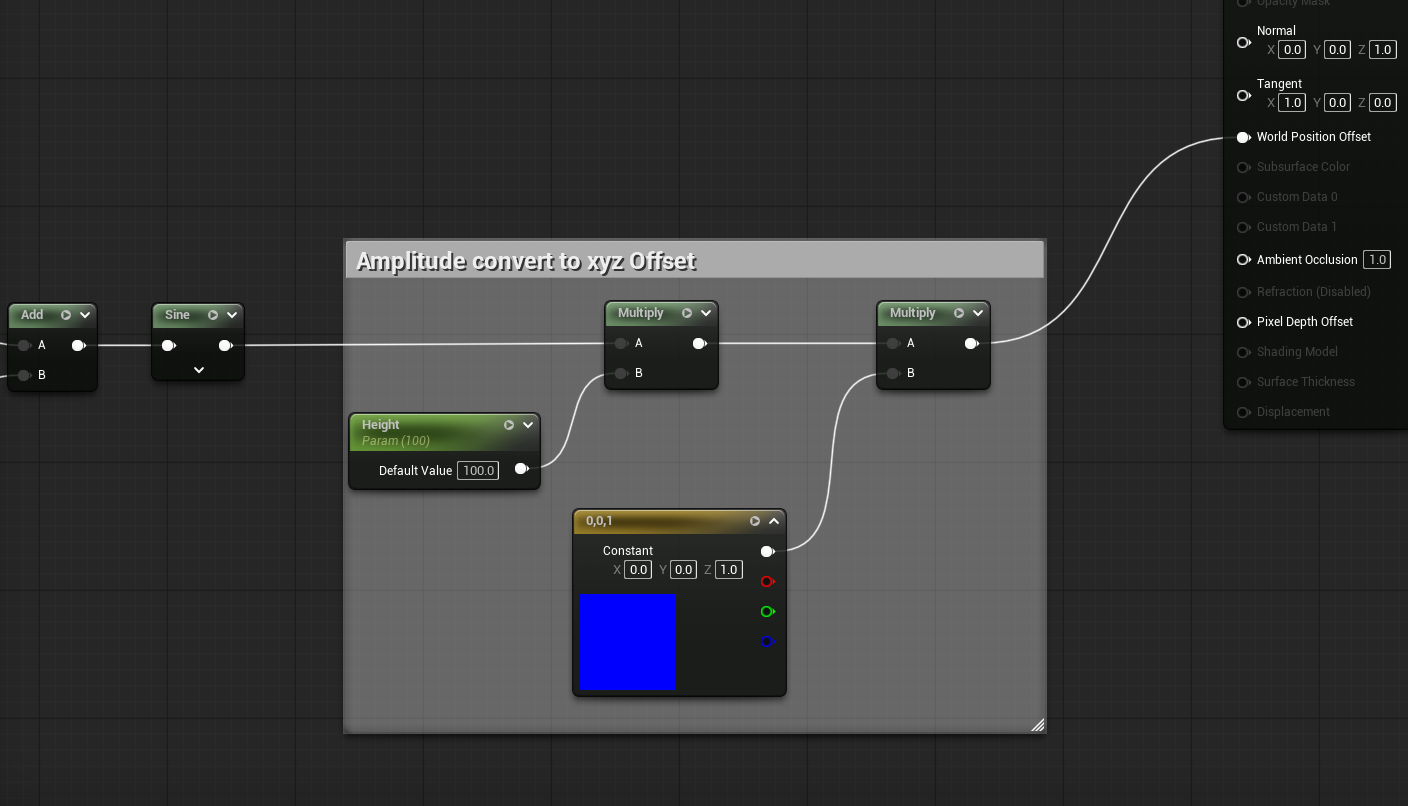
This was referenced from GPU Gems (Finch and Worlds, 2004, chapter 1.2):
- Wavelength (L): the crest-to-crest distance between waves in world space. Wavelength L relates to frequency w as w = 2/L.
- Amplitude (A): the height from the water plane to the wave crest.
-
Speed (S): the distance the crest moves forward per second. It is convenient to express speed as phase-constant
 where = S × 2/L.
- Direction (D ): the horizontal vector perpendicular to the wave front along which the crest travels.
Then the state of each wave as a function of horizontal position (x, y) and time (t) is defined as:

This equation was implemented using the World Position Offset within the material editor. This technique dynamically modifies the position of the water mesh vertices in real-time, producing the illusion of a moving wave across the mesh.
However, I came across an issue as soon as I started testing this out. The default plane mesh that UE uses only contains 4 vertices, which is insufficient for the method I am trying to use. As a result, when the sine wave offset is applied the surface appears flat and the edges move up and down.
To solve this, I used the modelling mode in UE to create a custom plane mesh, which I then subdivided 100. By doing this I increased the vertex count of the mesh, allowing each vertex to respond independently to the World Position Offset calculations. This change makes it so that the water mesh is actually looking like waves instead of just a moving plane mesh.
To take this further I created a material instance derived from “M_Water_01”. I did this to be able to do real-time adjustments of the wave parameters without the need to recompile the master material each time I made a change. This greatly improved the speed at which I can edit the parameters to get more realistic looking waves.
Within this instance, I exposed the parameters defined by the GPU Gems, Amplitude, Wavelength, Speed, and Direction.
LV_02
For my next step I changed the wave generation method from Sine Waves to a more advanced Gerstner wave model. While Sine waves do implement wave movement, Gerstner waves are more effective as they apply both vertical and horizontal movement. For this I used Unreal Engines built in Gerstner Wave function to create my first more complex waves. I used this new function in a new material called “M_Water_02” to give me more control over how the waves would look, by having more parameters that can be used to specify how the waves will behave.
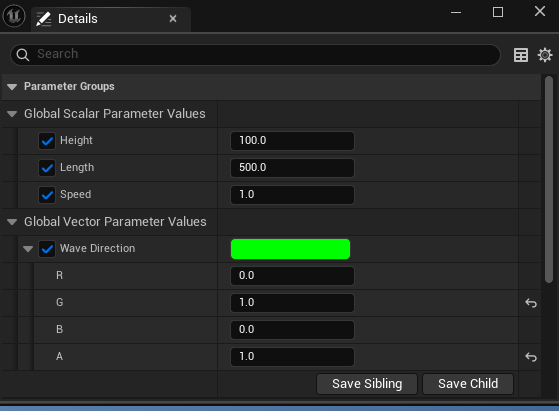
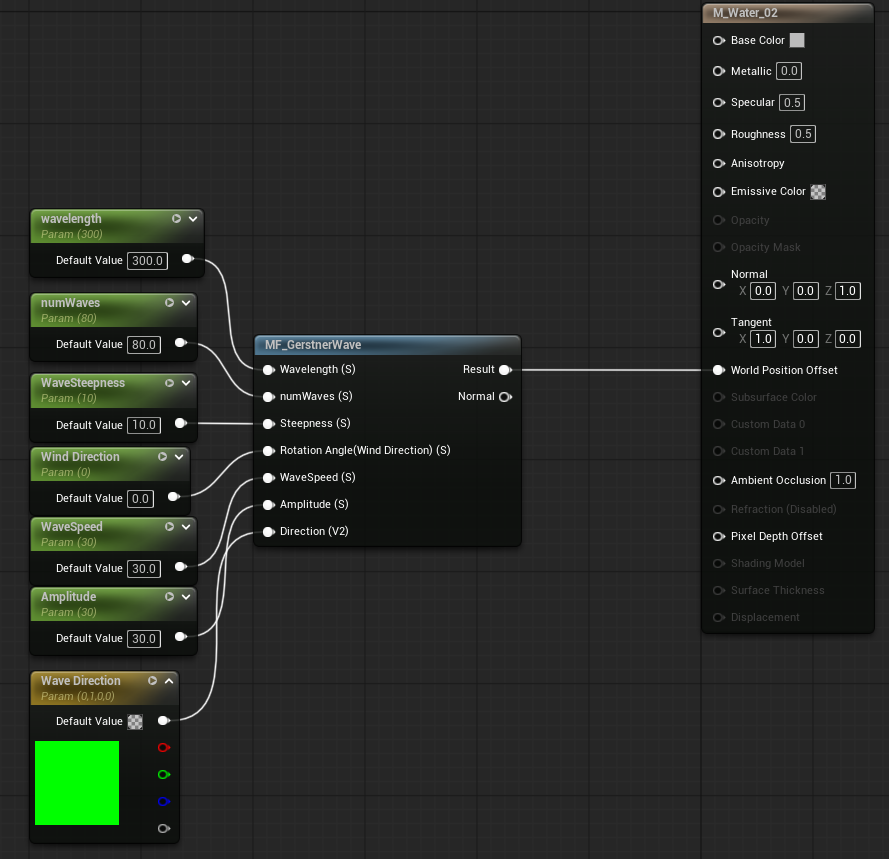
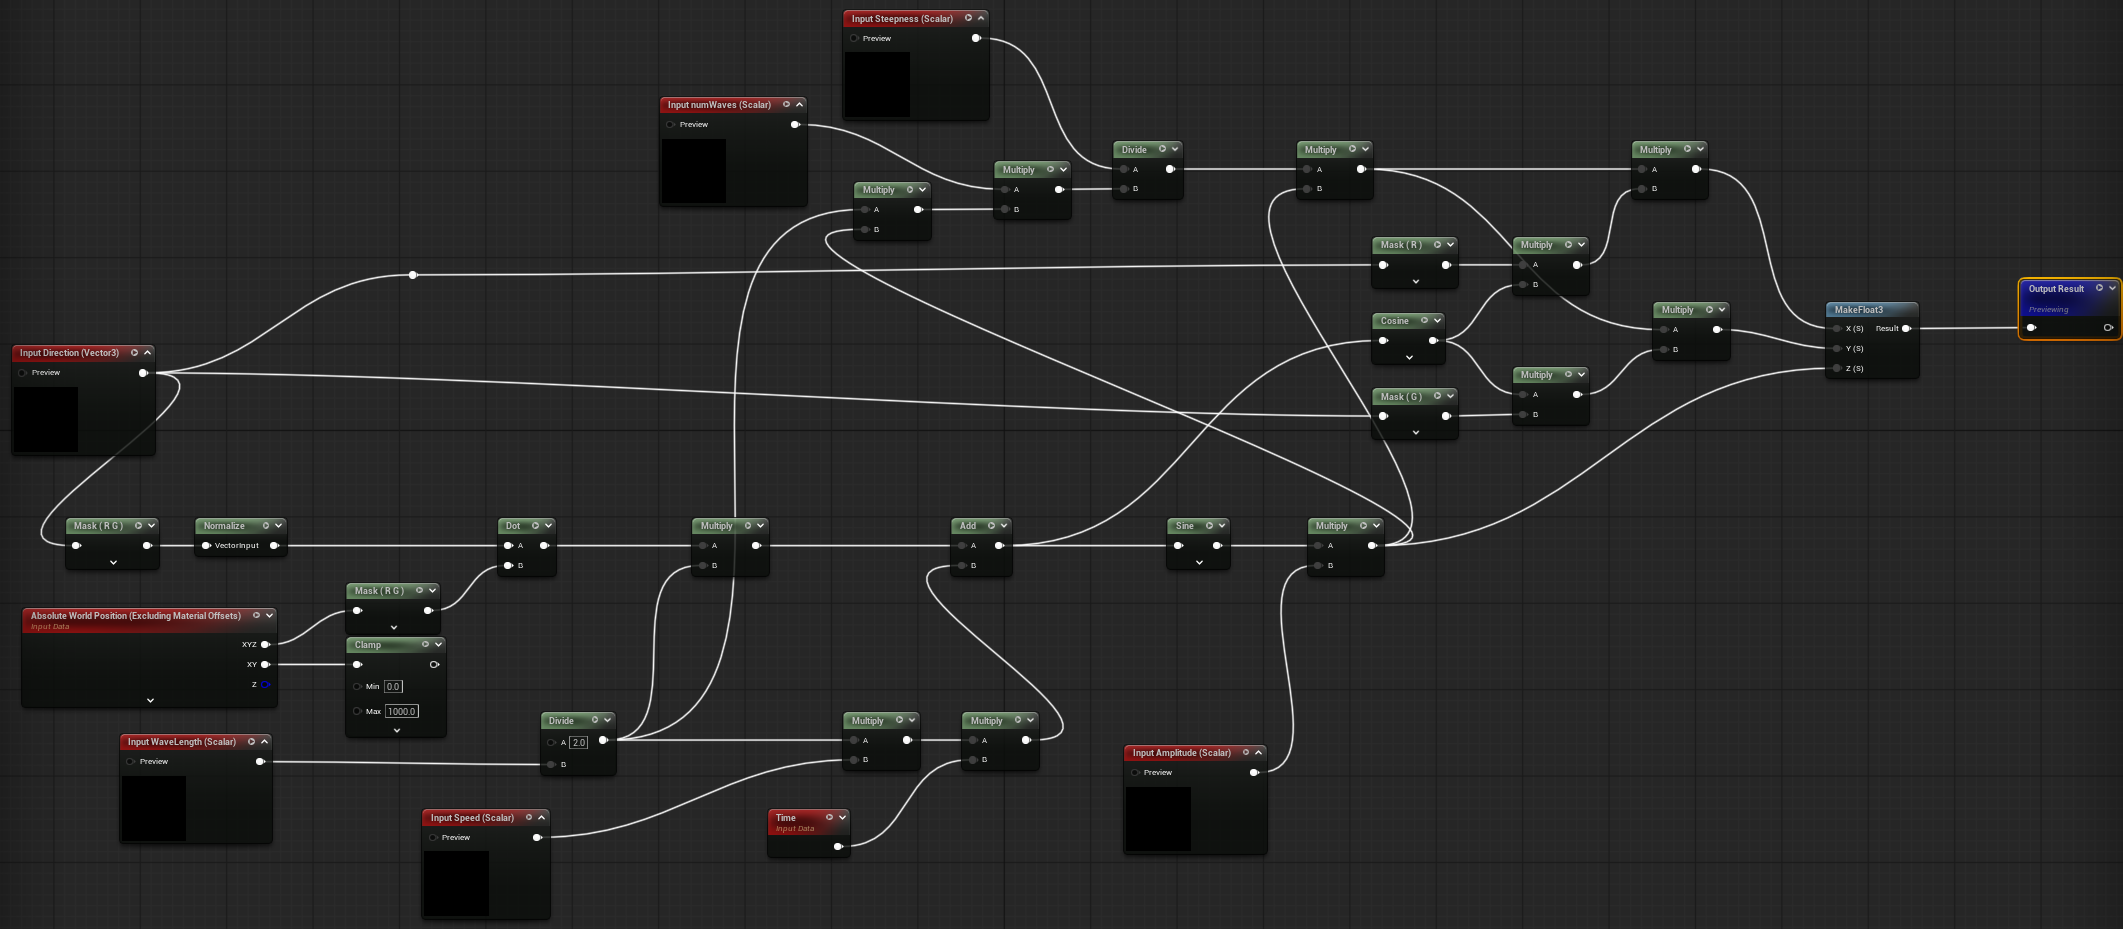
The function ends with making a vector 3 float from all the calculations using the parameters in the image.
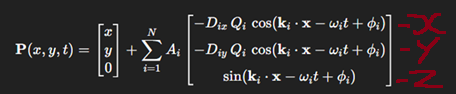
I also created a material instance for this Gerstner wave water material to be able to control the waves without having to recompile.
As with the previous level, I created a corresponding material instance which enables me to adjust the wave parameters without recompiling the master material. This material instance exposes parameters such as: Amplitude, Wave Speed, Wind Direction, Wave Steepness, numWaves & Wavelength.
LV_03
For the 3rd level of development, I began working on the buoyancy system. I decided to implement this feature early in the project rather than waiting until later stages, as integrating a working buoyancy system into a complex wave simulation can quickly become challenging. This way I could ensure I had a working system that I could tweak to get working again later, instead of going through with no progress.
To keep the setup as simple as possible during my initial testing, I reverted to using Level 1’s Material with the simple Sine Wave. This allowed for me to focus on making the buoyancy functional without having to deal with additional complexity introduced by the Gerstner Waves.
I then created a new blueprint called “BP_Buoy_01” and added a simple cube mesh to it. Next, I added the Niagara component to the cube mesh as a child.
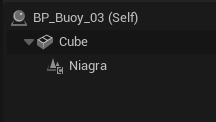
To handle the water surface data, I implemented a Niagara Readback System. This approach utilizes Unreal Engine’s Niagara particle system to send and receive simulation data, such as the vertical displacement of the water’s surface.
Within the blueprint I created an array of Vector positions which I called “Pontoons”. Each pontoon represents a point on the object where buoyancy forces are tested and applied. These pontoons are meant to function like real buoyancy locations, as if I would attach balloons onto the side of an object.
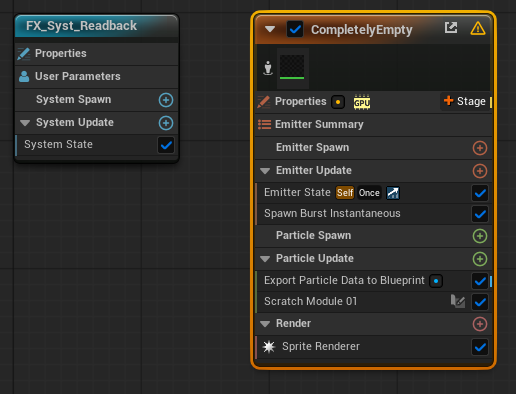


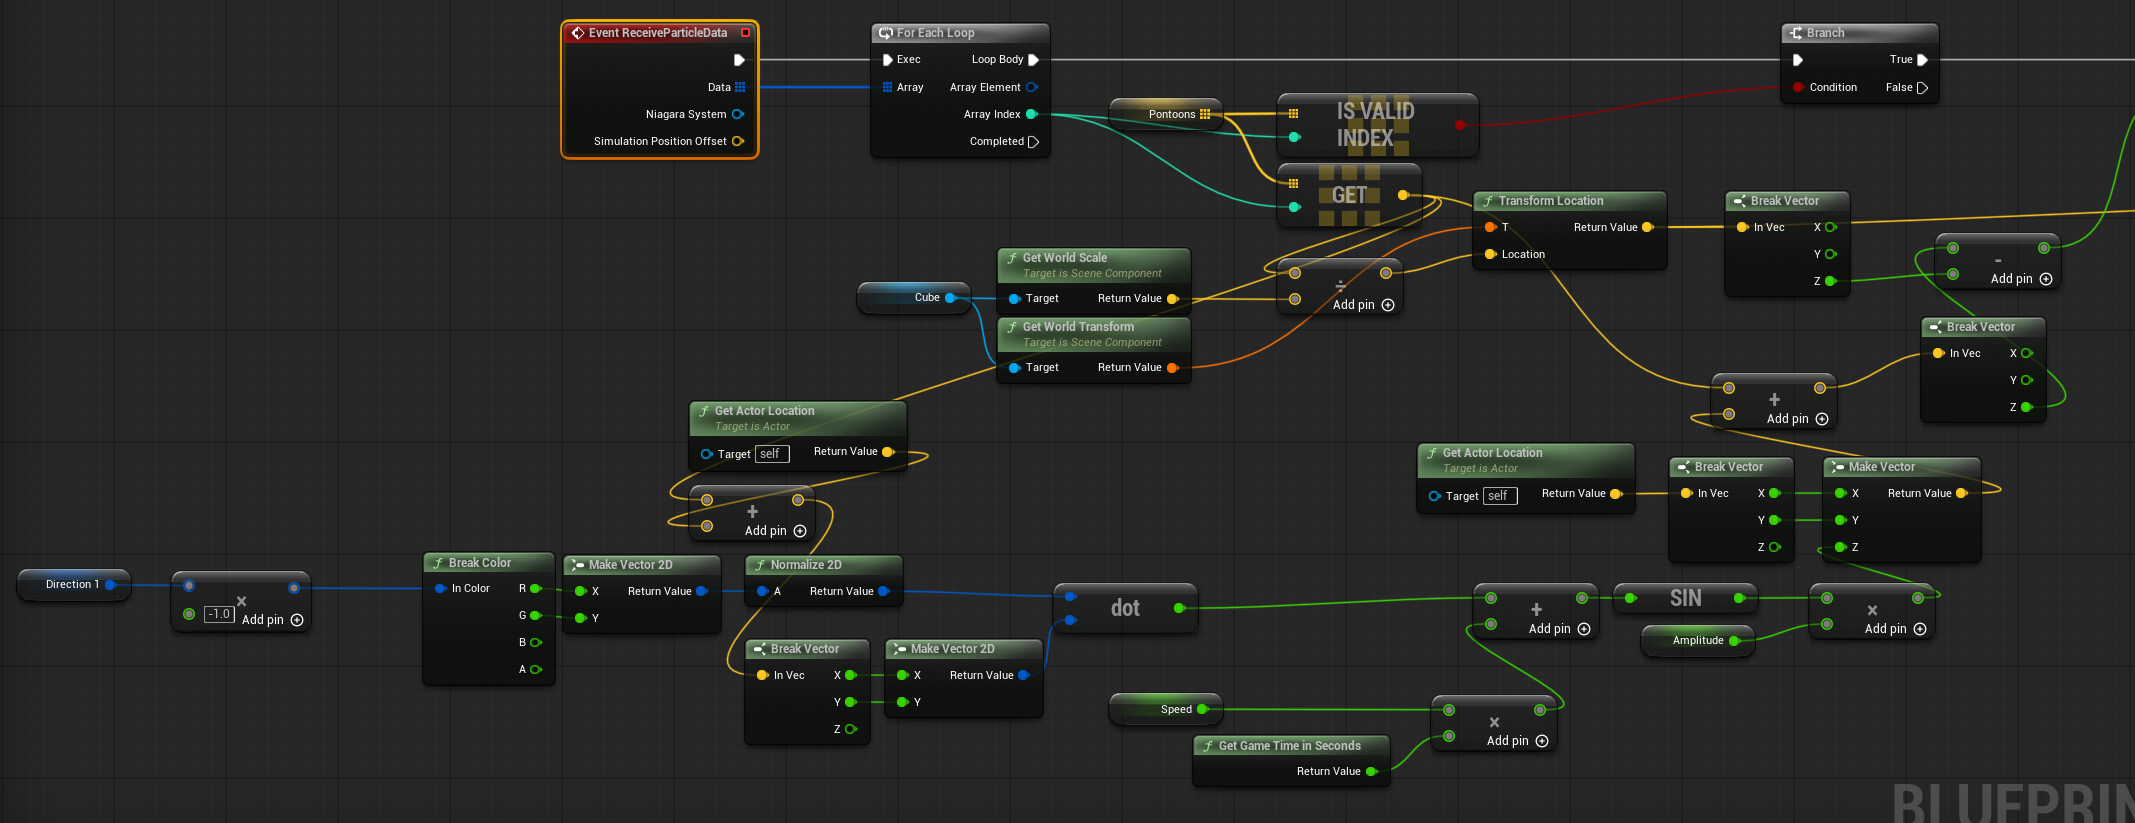
After this I copied all of the Material Instances parameters and put them into variables I could use in the blueprint, this would ensure that any changes made to the Material Instance would be synced with the buoyancy blueprint.

I then used the same calculations as in the Material M_Water_01 to ensure that the water calculations, and buoyancy calculations are trying to do the same thing. This is done for each pontoon location, and the location of the pontoons are compared to the location of the water surface.
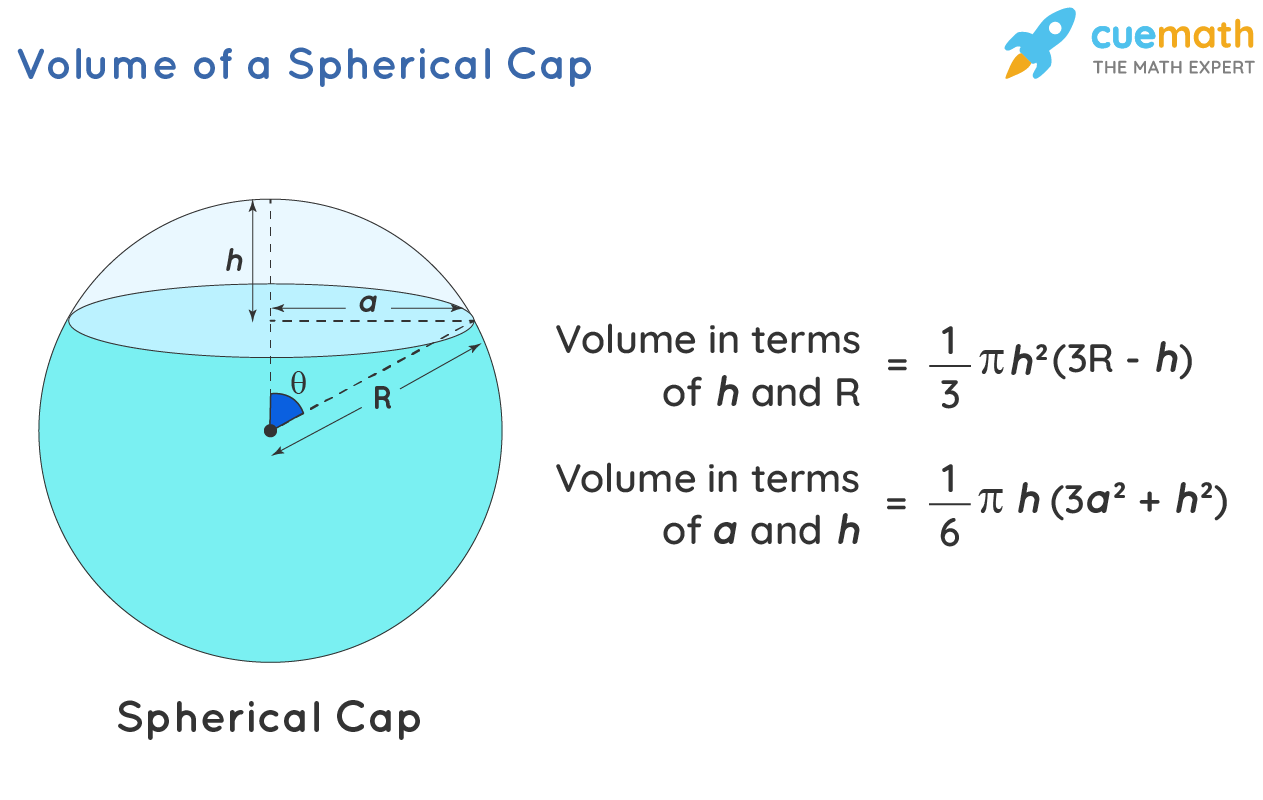
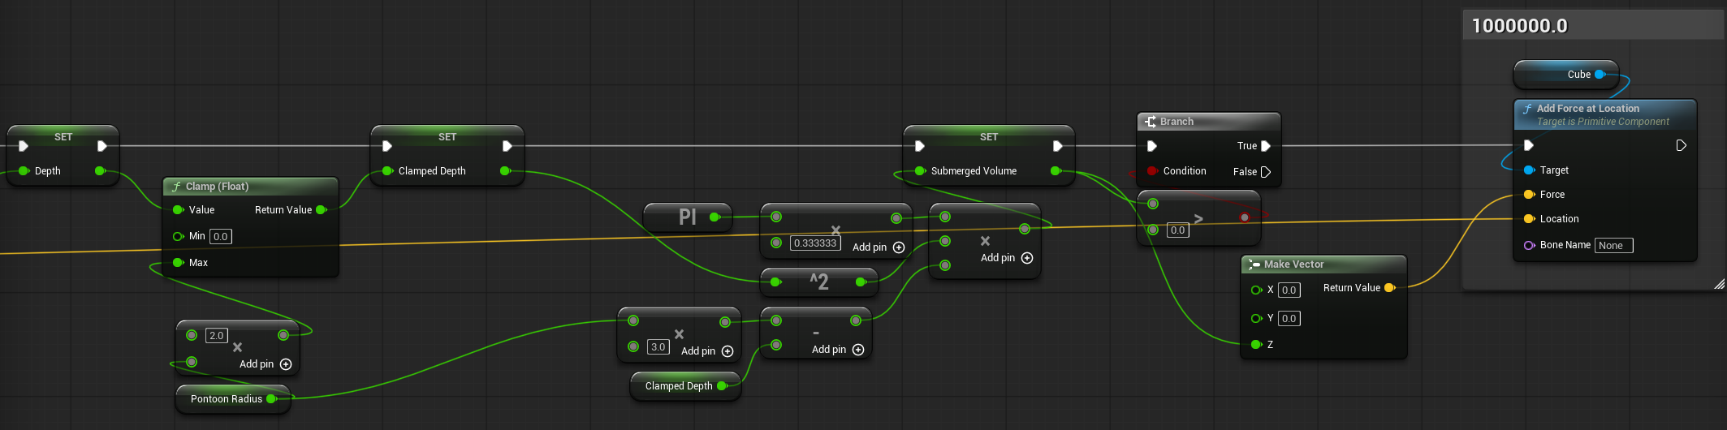
Then I used this formula to find out how much of the volume of the Pontoon Sphere is being displaced under the water, and then I change this into force to be applied at its location. Where h is how deep under the water the pontoon is, and R is the radius of the pontoon.
This is how it ended up looking with a few other meshes added to the mix as well.
LV_04
In level 04 I moved onto integrating the buoyancy system with the more advanced Gerstner wave simulation developed in Level 02. Transitioning to Gerstner waves introduces a new layer of complexity, as these waves involve both vertical and horizontal displacement.
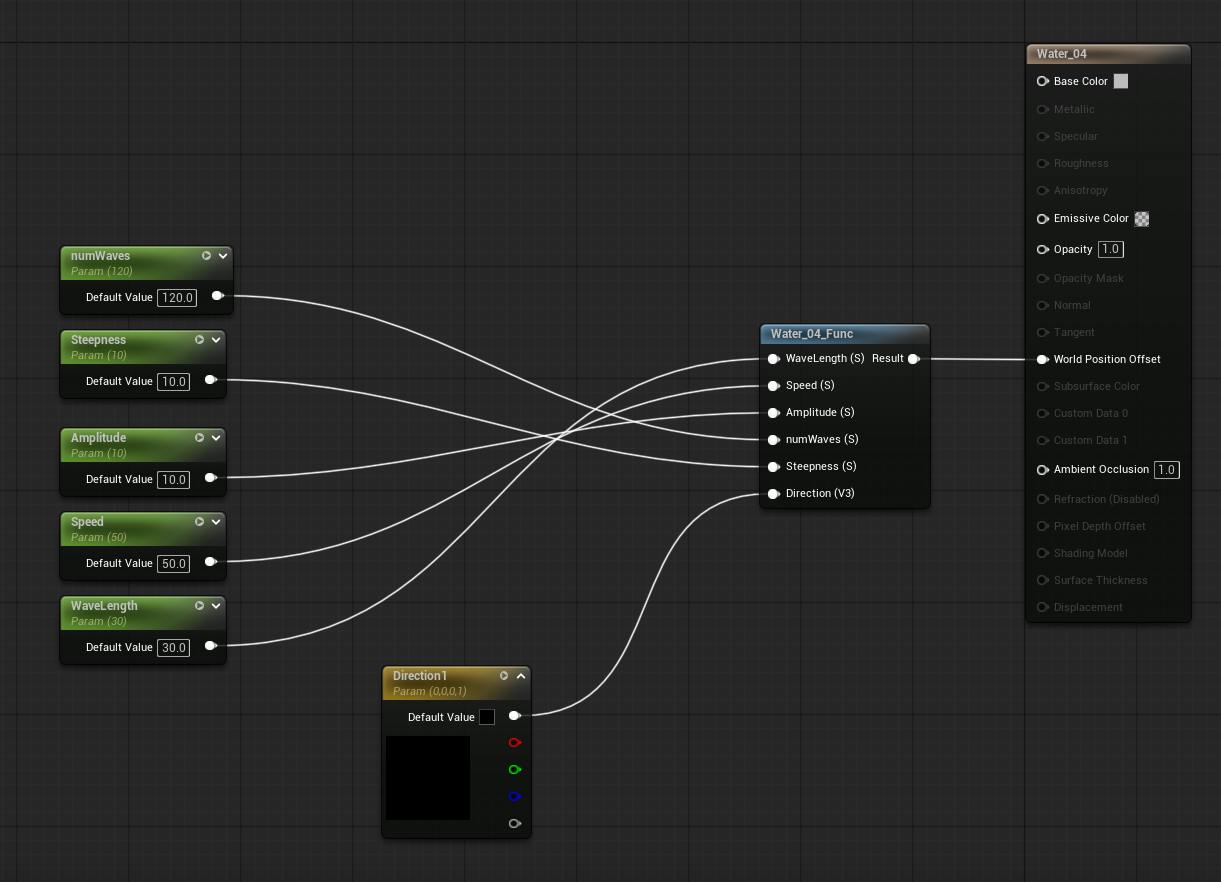
To begin this process, I started developing a custom Gerstner wave function as a Material Function that could be put into any material called “Water_04_Func”. This function takes in parameters and outputs the calculated world space displacement for a given position and time.
The Blueprint for the buoyancy object did not have to change as its logic was still the same, however this would have to change in the future to account for multiple Gerstner waves.
LV_05
In Level 5, I wanted to shift my focus from purely physics simulations to improving the visual fidelity of the waters surface. To do this, I created a new material called “M_Water_05”, which the goal of achieving a more realistic appearance to the water. To do this I used the Pixel Depth node to implement a colour gradient that changes based on the perceived depth of the water’s surface and included some code that would affect the normals of the water with a scrolling texture.
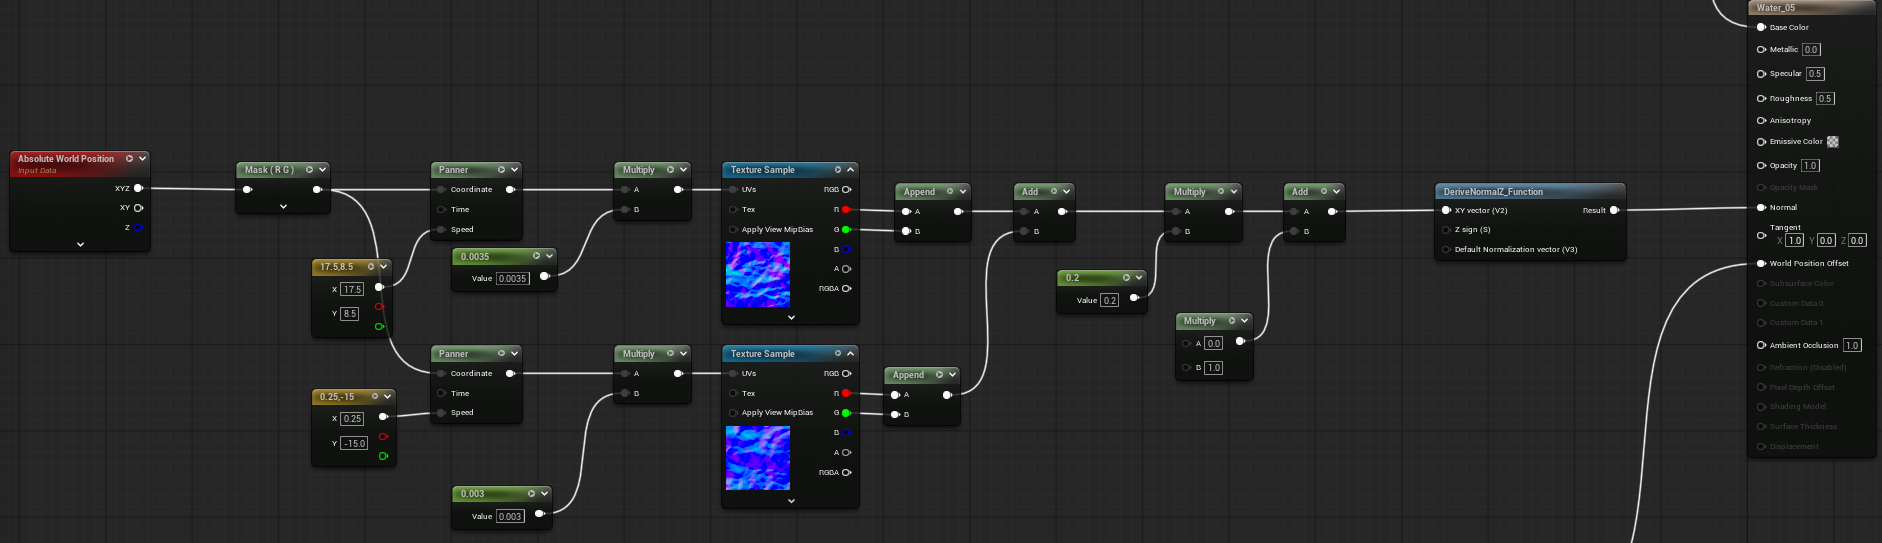
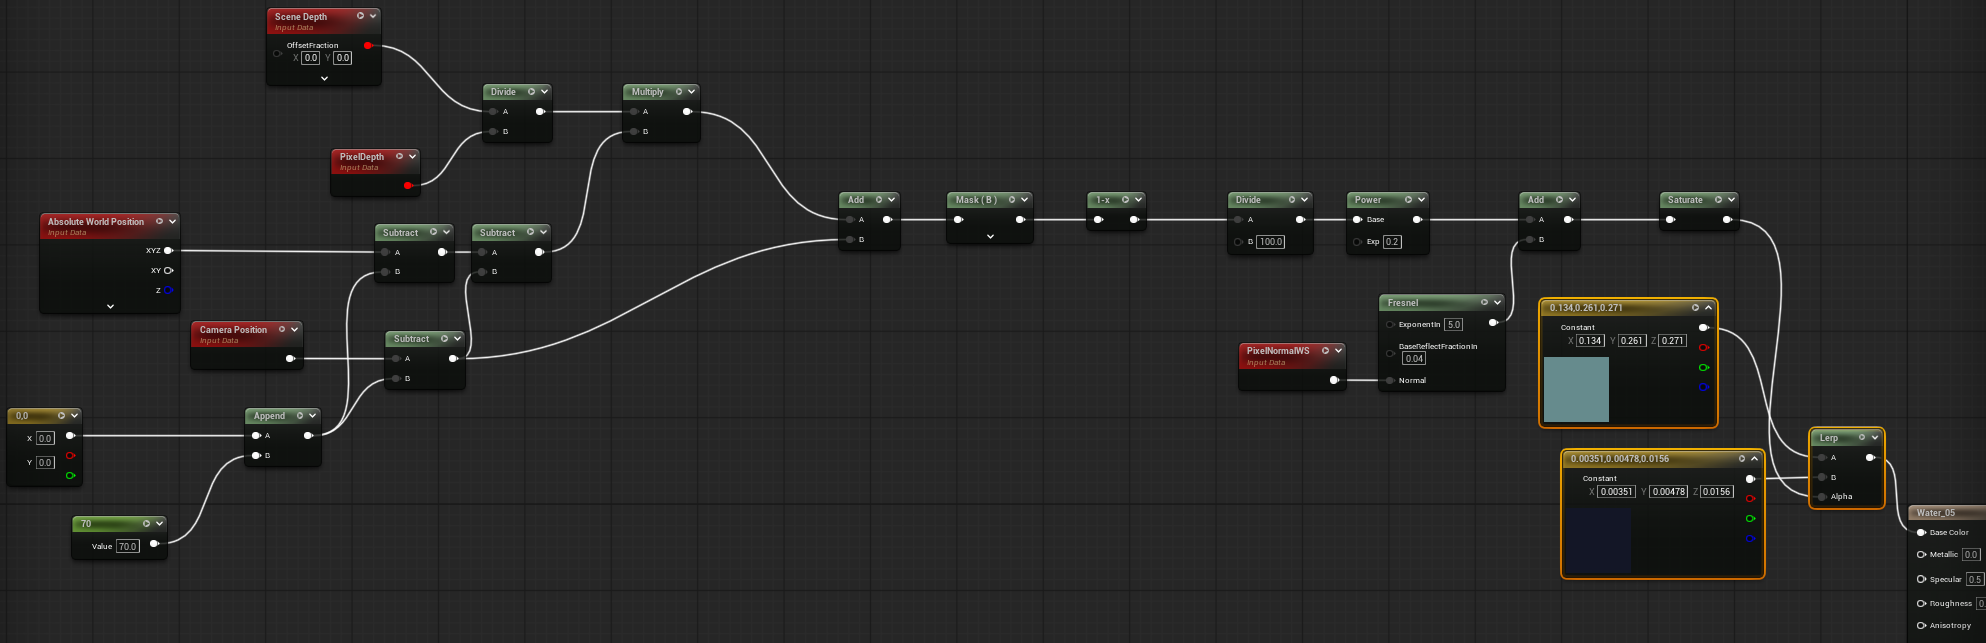
The result was a significant improvement in the visual quality of the water, with a distinct colour variation between the troughs and peaks of the water.
However, while the water was looking better, I found out that something I had not noticed in the previous iteration of the water, was that visual holes were appearing in the water mesh. This becomes more obvious depending on the number of parameters I mess around with.
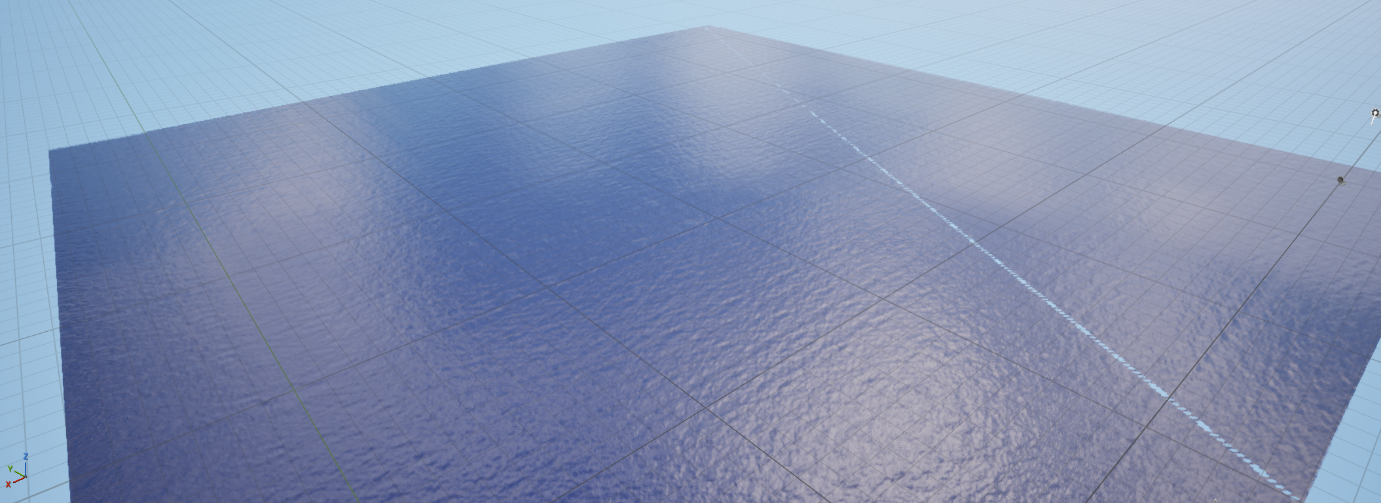
Furthermore, if I add any more Gerstner waves to the formula, the buoyancy objects no longer follow the wave surface, as they are only able to calculate based on 1 wave currently. I shall work on fixing this in the future levels.
LV_06
For Level 06 I decided to experiment with UE’s Single Layer Water shading model to further enhance the realism and visual depth of the water’s surface.
By switching the material to use Single Layer Water shading model I am able to take advantage of UE’s build in water rendering pipeline. This system is specifically designed to handle the unique optical properties of water.
To implement this, I created a new material called “M_Water_06” and set its shading model to Single Layer Water and used the Single Layer Water material node. This node gives me access to the inputs “Scattering Coefficients”, “Absorption Coefficients”, “PhaseG”, and “Colour Scale Behind Water”.
I created some vector parameters to control how the water would react to depth and colours such as:
- Water Scattering Colour – Which controls the colour of the light reflecting at the surface of the water
- Water Absorption – The colour that is absorbed the deeper into the water you go.
This allows for a more realistic water shader when trying to view objects below the waters surface, especially when they get deeper under the surface.
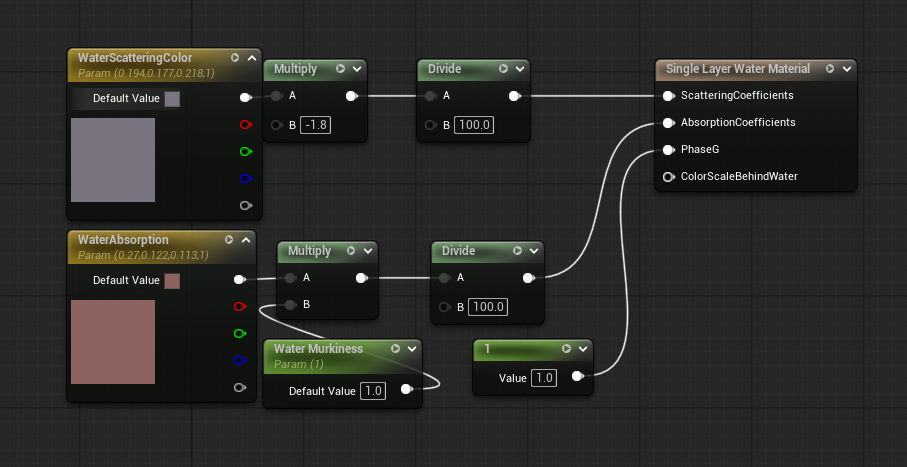
This was done by following a tutorial by PrismaticaDev (2021)
In addition to updating the water shader model, I also revisited the wave formula to address the visual artifacts that had began appearing in earlier versions of the water system. These artifacts were visual tearing or holes in the waters surface, which I assume were caused by an incorrect calculation on the vertices by the Gerstner Wave formula I was using.
To fix this problem, I created a new custom function that followed the Gerstner Wave formula more precisely.
By doing this I was able to gain a greater understanding of how this formula functioned, and I was able to separate the X/Y/Z components into easier to understand areas.
Furthermore, I began testing using multiple Gerstner Waves added together to create more realistic moving waves.
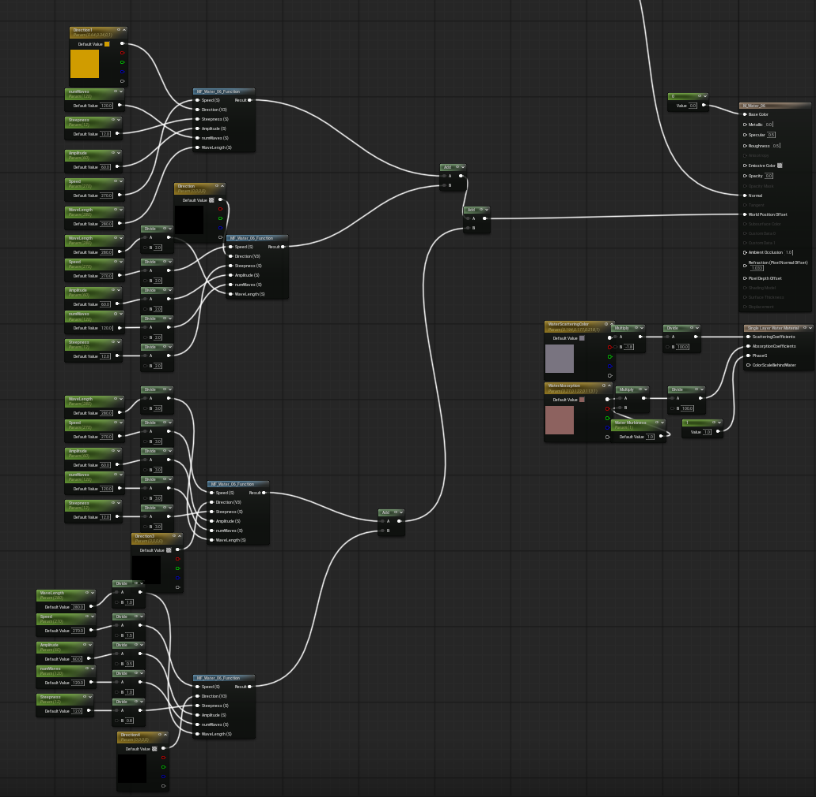
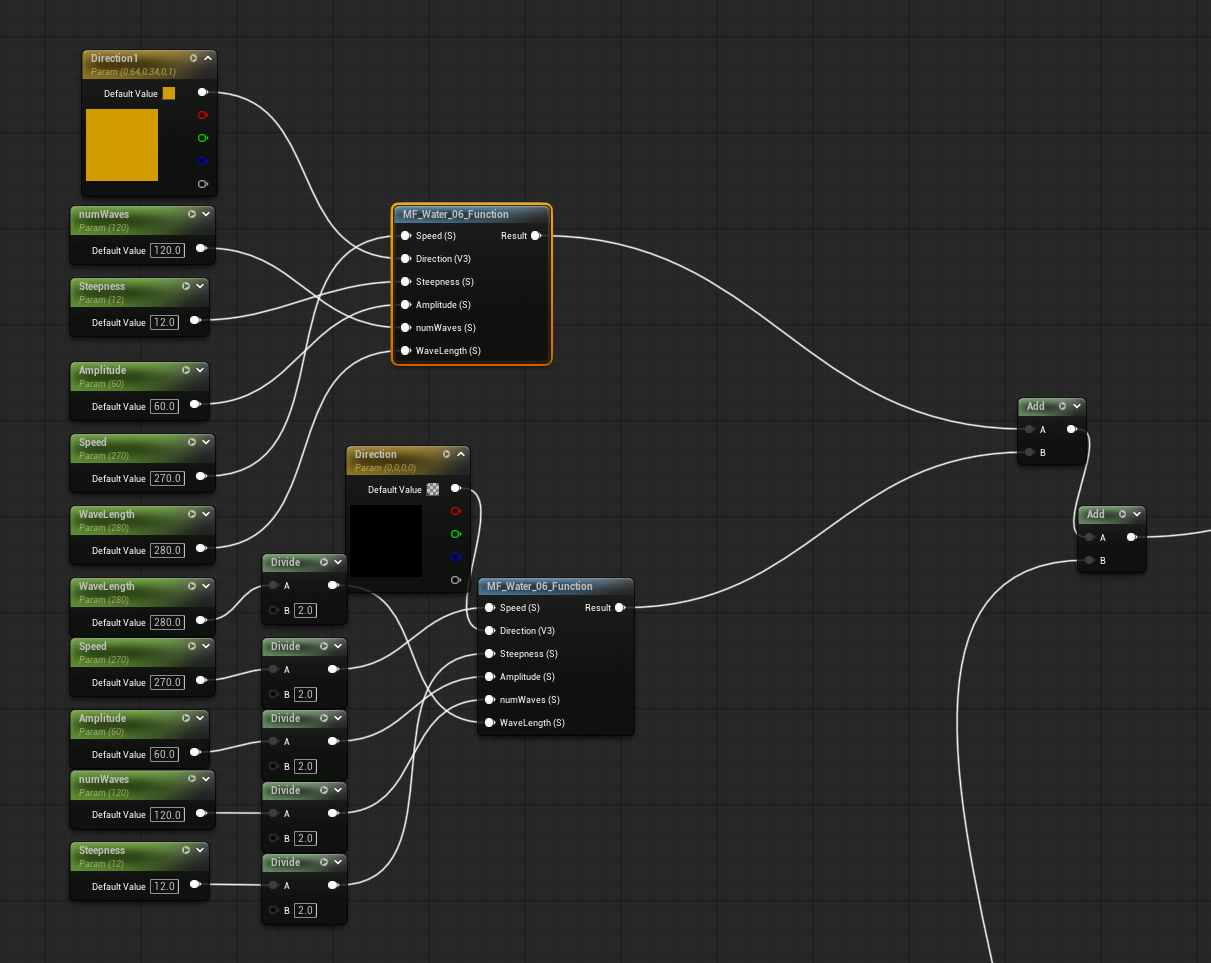
This is the end result of this levels work.
LV_07
In level 7 I made a lot of progress, so let’s get started.
I began by wanting to change how I could generate the waves, so I created a Material Parameter Collection called “MPC_Water_07”. This would allow me to have a generated set of variables that the Buoyancy actors, and the Water Materials can both pull from. The reason why I am creating this MPC is because I can address its variables on construction and randomly assign variables to it.
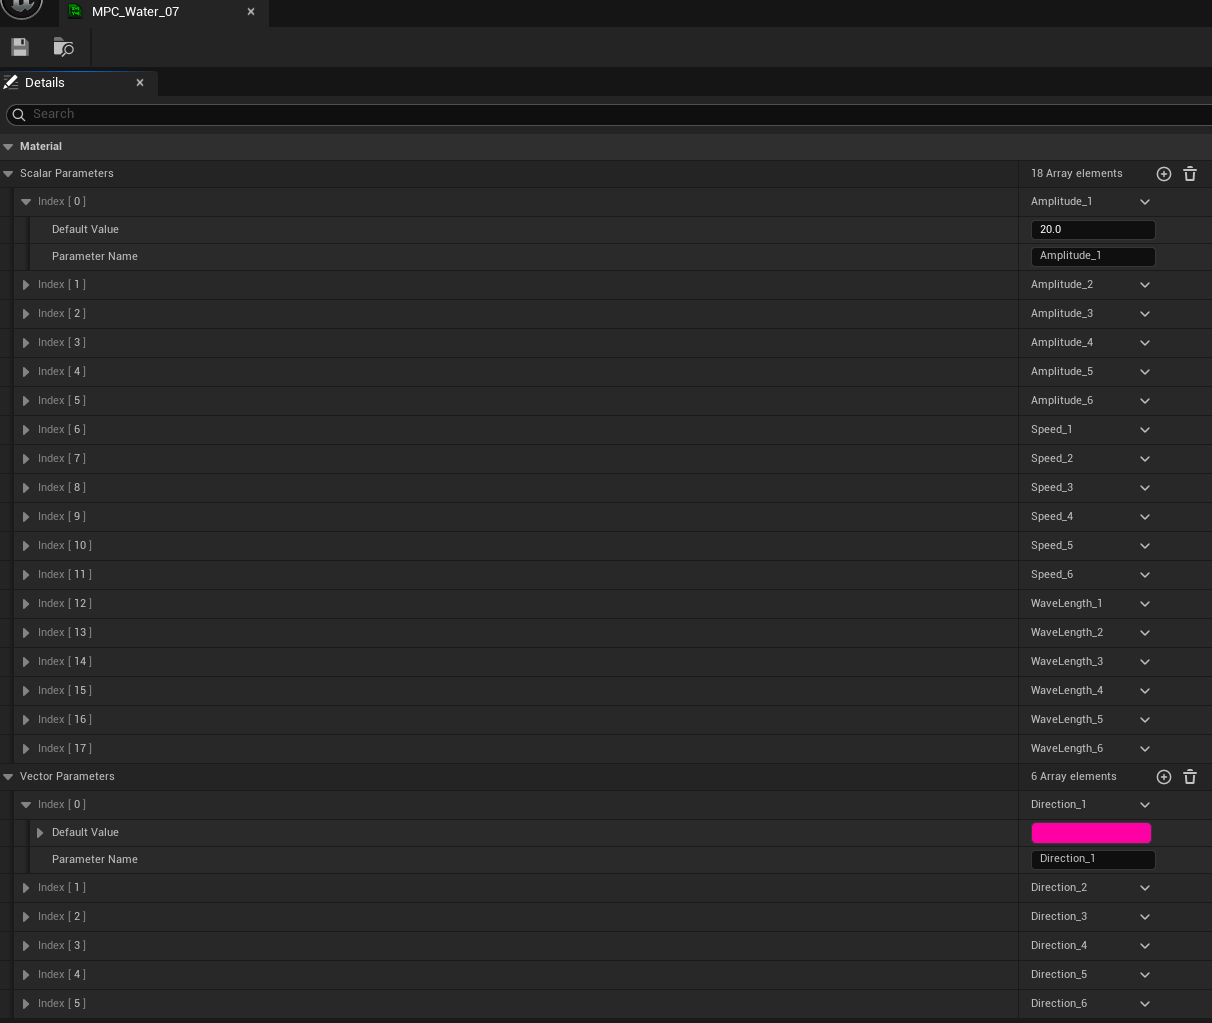
I do this by creating a function in the construction script of the “BP_Water_07” actor.
This function checks if the Boolean “Random Waves” is True or False. If True, it will run the “Randomize Waves” script and then will set the bool to false. This Boolean is exposed on spawn, and its default is false. By doing this I have essentially created a button on the blueprint that will randomize the waves every time its clicked, while also doing this when the editor has not even started the game yet.
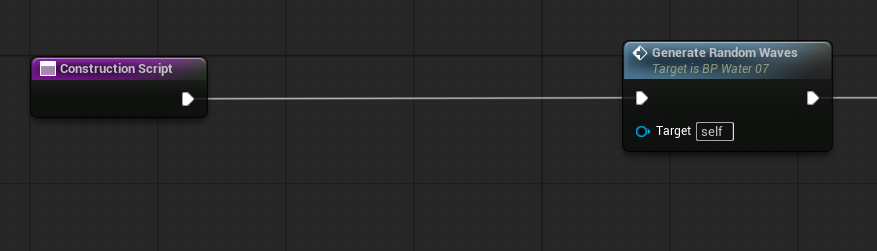
The Randomize waves script accesses the parameters in the MPC and randomly assigns them a value every time the Bool is turned to true, this assigns the variables 6 times, simulating 6 different waves that will be combined. This is done for the Parameters: Amplitude, Speed, Wavelength & Direction.
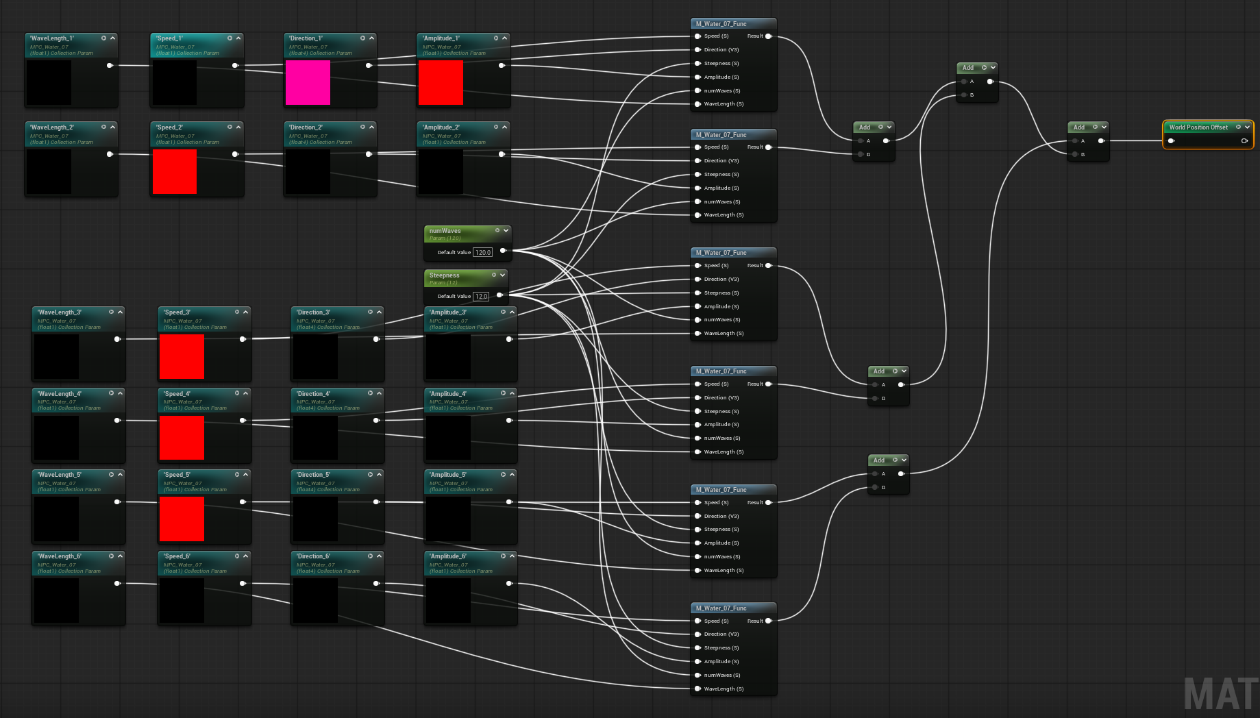
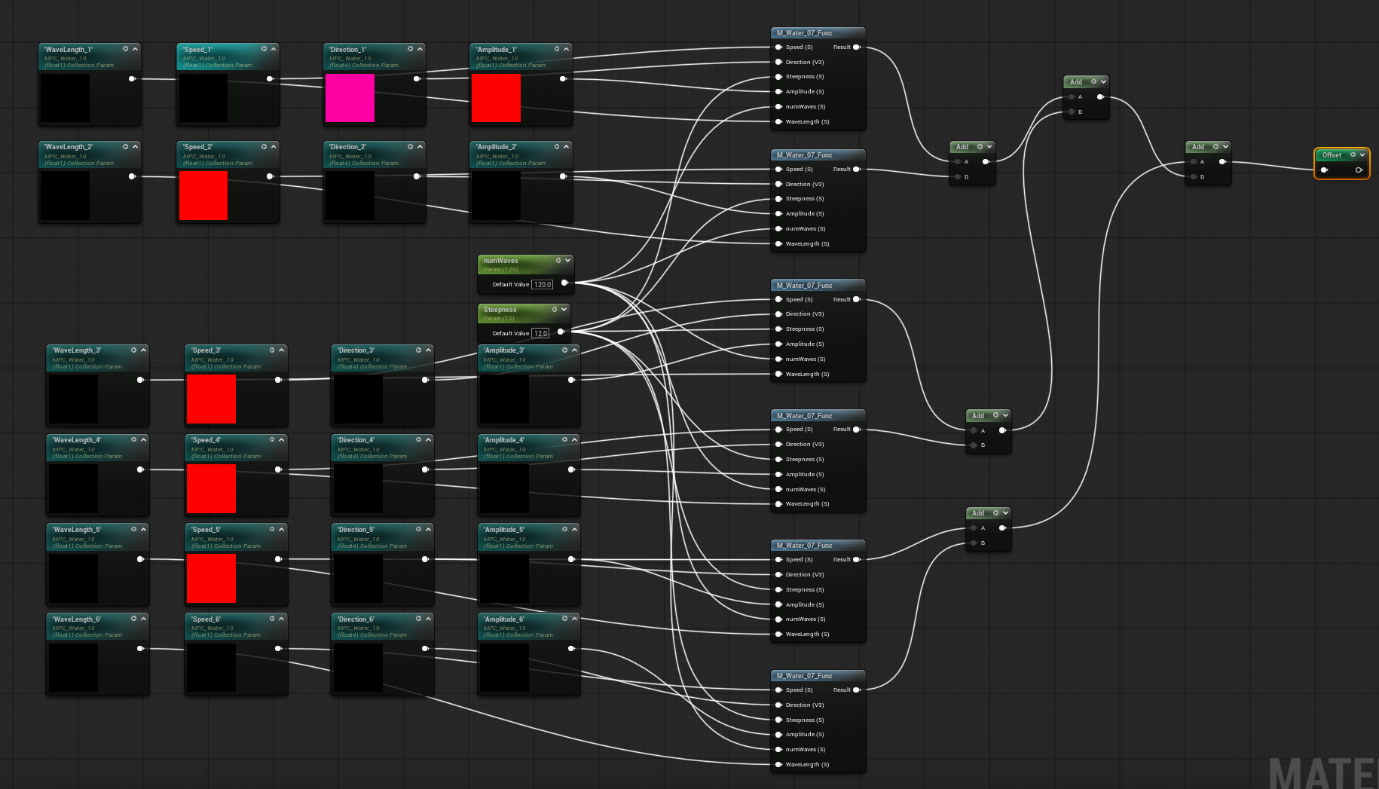
The MPC is also accessed by the new “MAT_Water_07” and used by 6 Gerstner Functions to create 6 different waves, these are then combined and then used for the World Offset.
As you can now see, when I have the Water Blueprint selected, I now have access to the Boolean “Randomize waves”, and when this button is clicked, the waves change to random parameters.
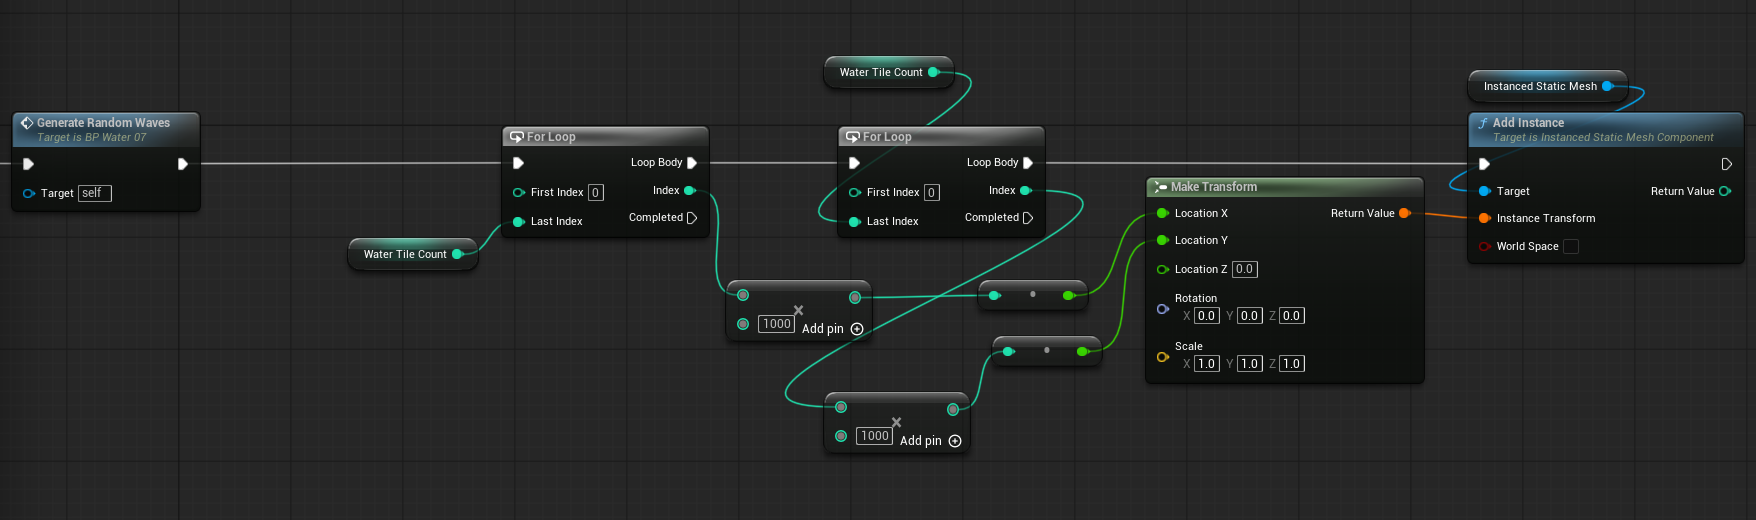
Furthermore, in this level I decided to focus on the scalability and performance of the water surface by making the mesh instanced. To do so I made a function that runs after the randomize wave’s function. This function takes an input value for the desired size of the water grid and uses it as the loop length and then creates that many tiles in each direction.
In addition to changing how the water works, I also worked some more on the Buoy Blueprint Logic, as the buoyancy of the previous levels would not work with the current multiple waves.
Old Logic of Buoys with multiple Gerstner Waves:
To fix this I created a quick solution in the Buoyancy actor by converting some of the logic from previous versions into a macro.
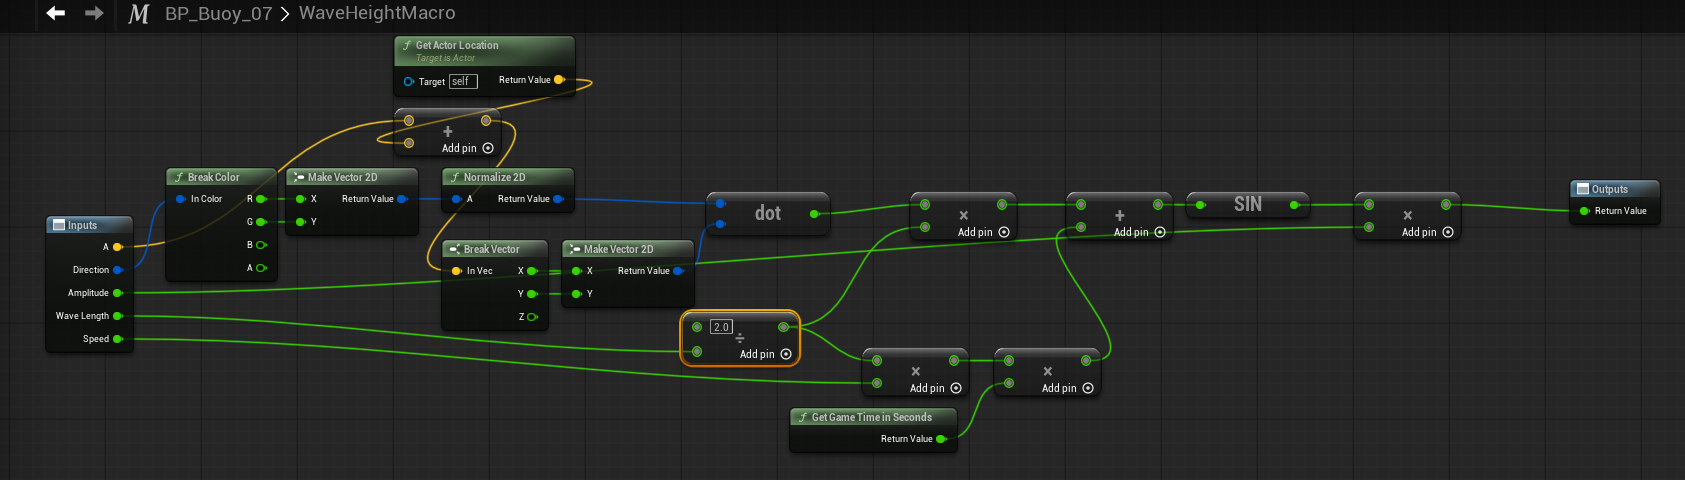
Then I used this macro to combine 6 wave inputs where the previous logic would be for the wave height of 1 wave.
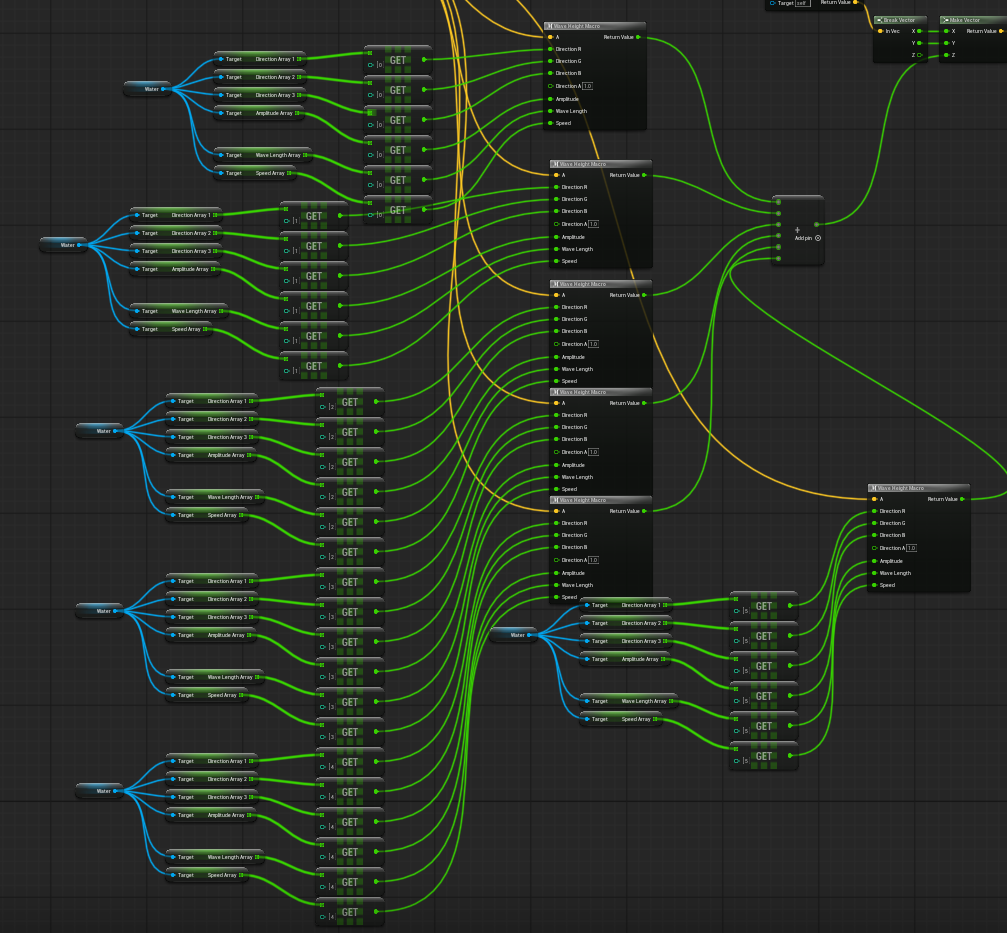
This means that the buoy actors will now follow the height of all the waves accurately.
And finally, to finish off the added logic to the Buoy Actors, I developed a way to check if the actors where completely out of the water. I did this because I use the Linear and Angular dampening to ensure that the force being applied to the actors does not fling them around too much. This code checks if all Buoyancy points are out of the water, and if they are changes the Angular and Linear dampening to 1. This means that if the actor is out of the water they will fall at a normal speed, towards the water, instead of slowly to the water.
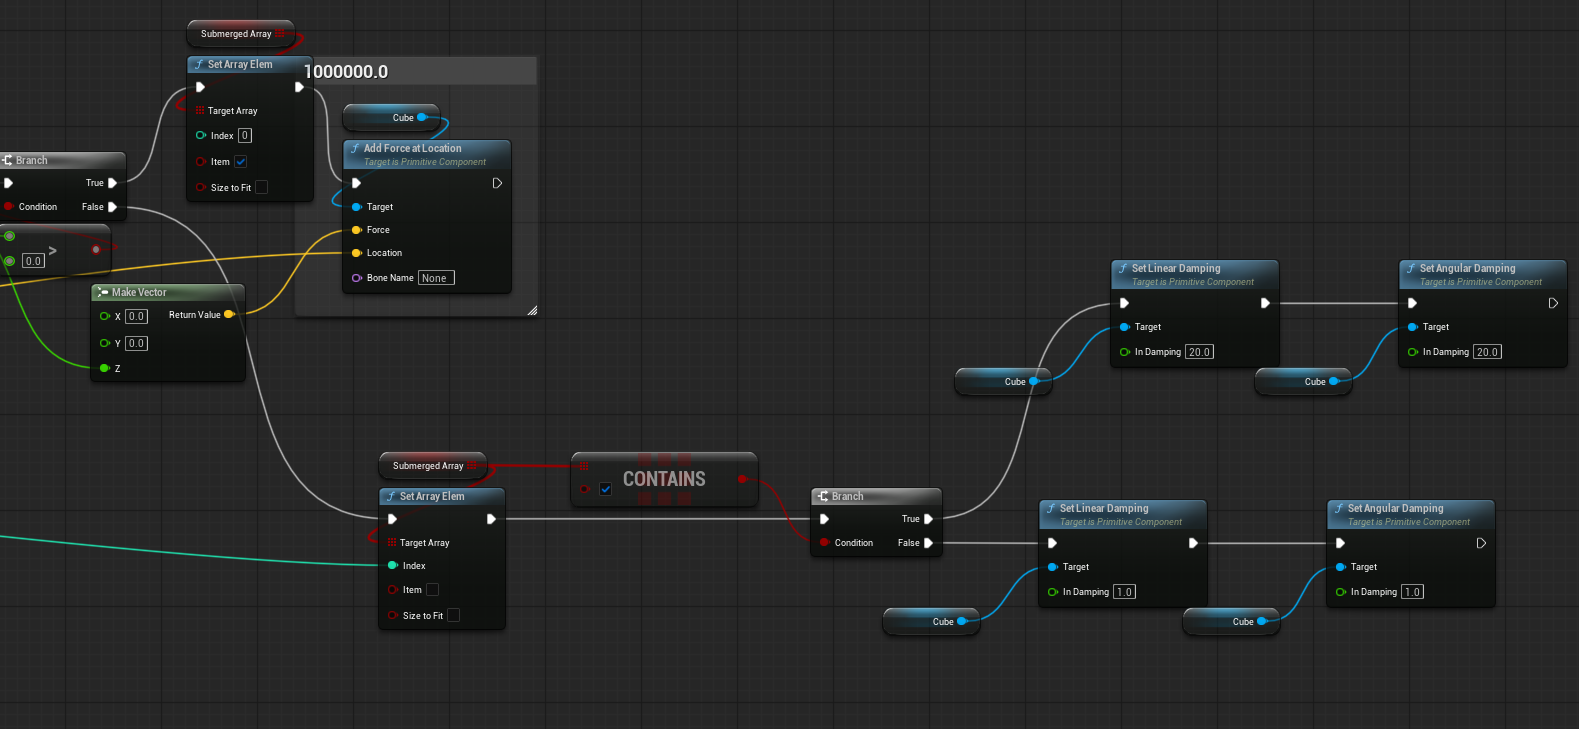
Due to all the changes to the water, this comes with an additional benefit, which I didn’t realise till later. When I randomize the waves of the water, the buoys automatically adjust to the new water height.
LV_08
In level 8 I tweaked the water tile generation blueprint code to make it so that the water tiles would generate from the middle, instead of from the corner. In earlier versions the tiling began placement at the actor’s origin point and expanded outward along the positive axes. By modifying this I made it so that the centre of the water actor now represents the centre of the water mesh grid as well. This makes it a lot easier to align the water into areas that you would want the water, instead of trying to line it up with it expanding from a corner.
Old Logic
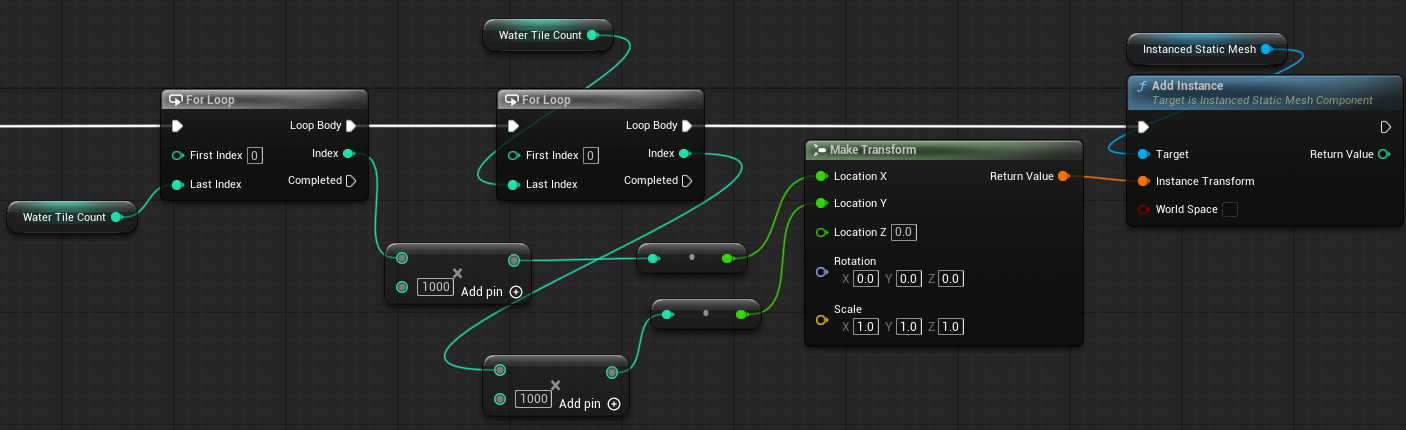
New Logic
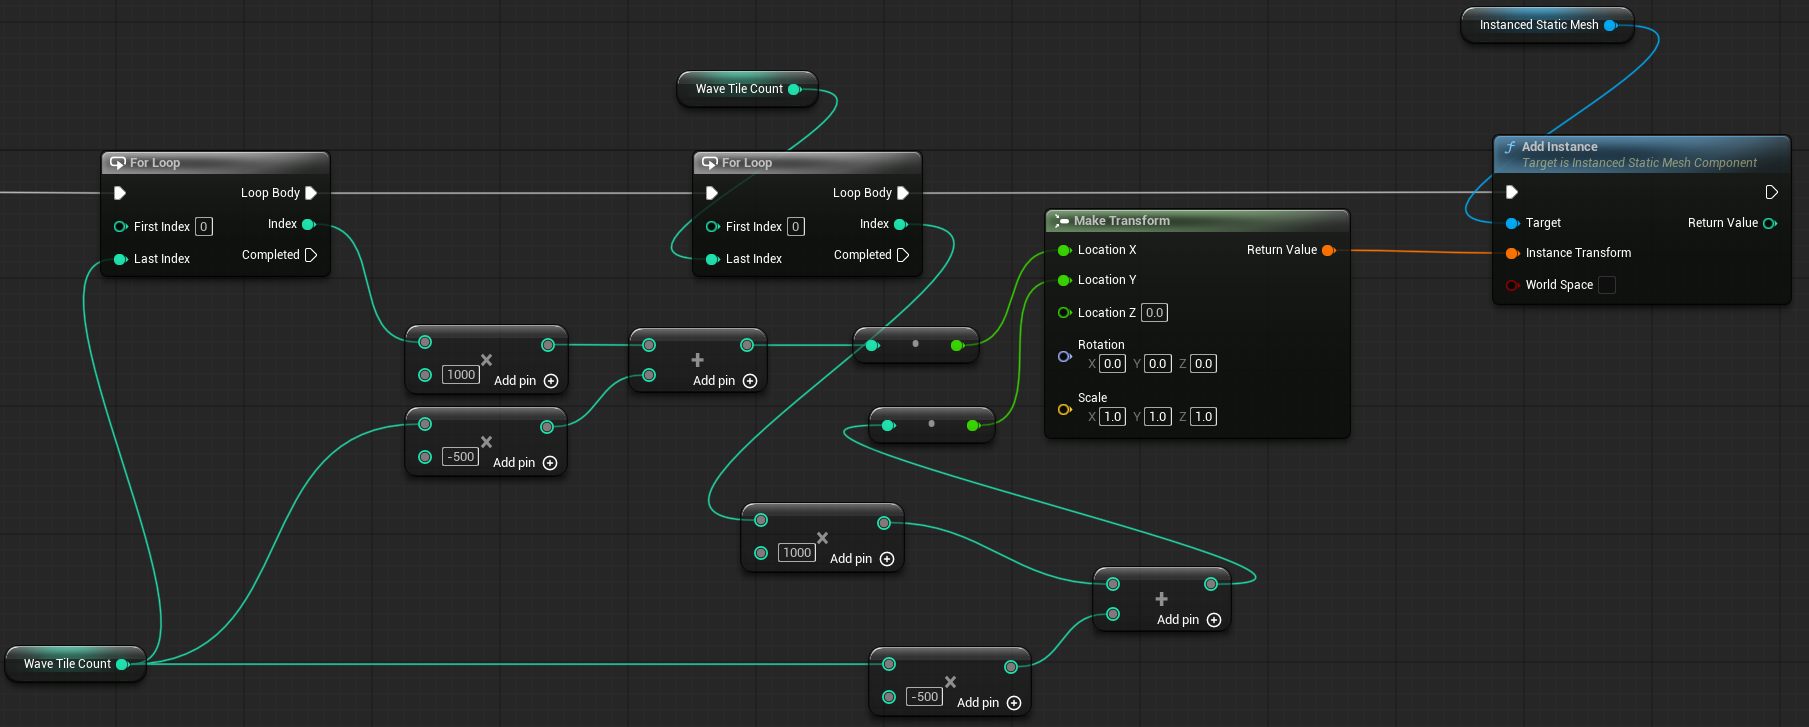
Next, I moved the buoyancy logic to a custom blueprint actor component called “BPC_Buoyancy_08”. This would contain all the logic for where the pontoons are, and how they apply their force to the mesh they are applied to. In addition to this, it would make the logic modular and reusable.
By moving this functionality into a dedicated component, I achieved a more modular system design allowing any actor to be able to me made buoyant simply by attaching the BPC component without duplicating code or rebuilding the buoyancy logic from scratch.
This BPC is then applied to the “BP_Buoy_08”
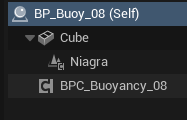
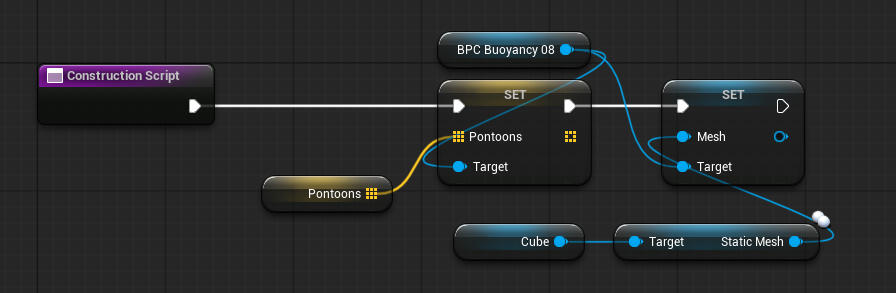
This means that all the variables that are used in the Buoy actor need to be passed to the BPC component otherwise it wont know about the pontoons or the mesh.
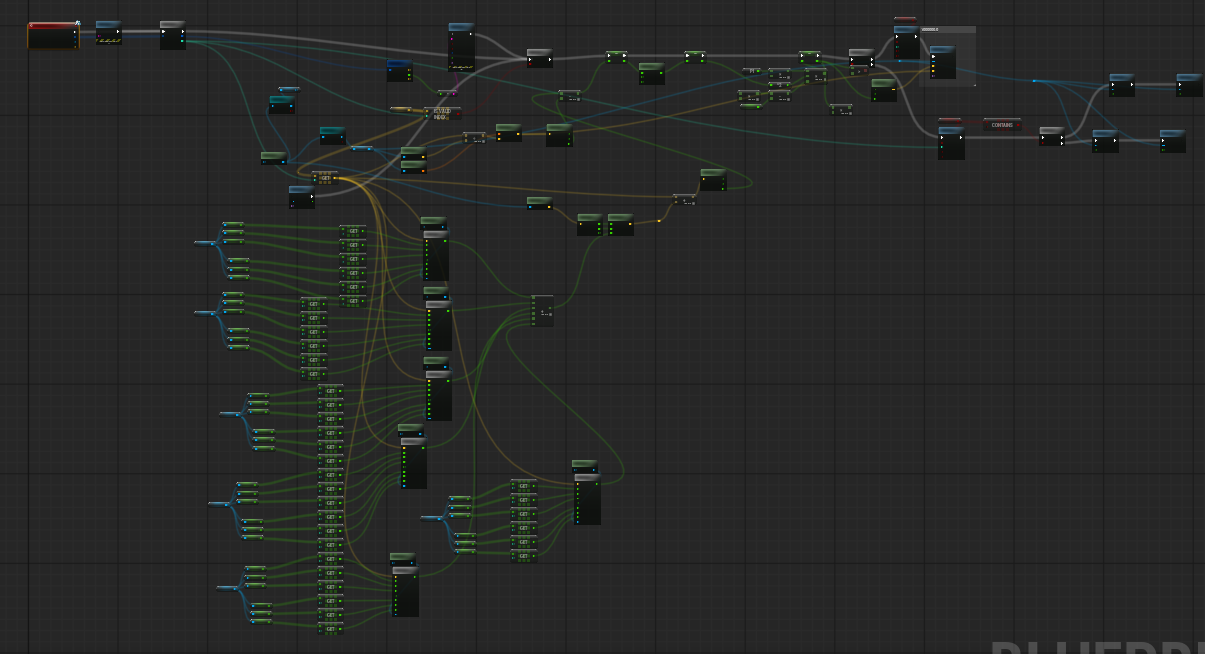
So now all of this logic is now stored in the BPC and can be used on any actor.
LV_09
In this level I implemented a First Person Character. This was used to allow direct player interaction with the environment and to provide an intuitive way to test the new buoyancy system in real time. This approach allowed me to test each actor to ensure they would react appropriately to being given the BPC.
To achieve this, I created a First-Person Actor with the ability to fire a line trace that occurs when the player presses the “F” key. When the trace successfully hits a component that is simulating physics, a sequence of events occurs:
- The system attaches the Niagara Particle System to the hit mesh
- The BPC_Buoyancy_09 component is attached to the mesh
- A set of Pontoons is passed to the BPC
- The BPC is initialised
- The objects material color is changed to indicate a success
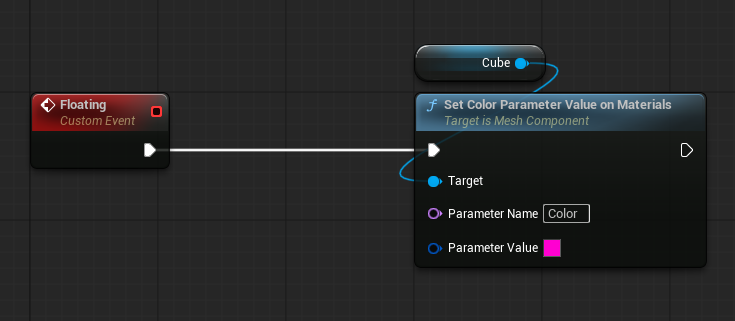
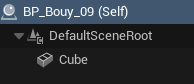
In this level the BP_Buoy_09 actor no longer includes the Buoyancy Component by default. Instead its just a mesh with minimal logic, containing only a color changing function when activated. This allows for testing when the First Person Actor hits it with a line trace and attaches the BPC during runtime.
Additionally, sine this is the first level where the player could move freely and observe the environment from multiple angles I made a minor but important change to the Water Material. I enabled the “Two-Sided Material” option within the Material to ensure that the water surface remains visible when viewed from below. Without this the water would appear invisible from below the waters surface.
LV_10
For level 10 I finally decided to simplify the Buoyancy wave system in the BPC
Component due to it looking like this:
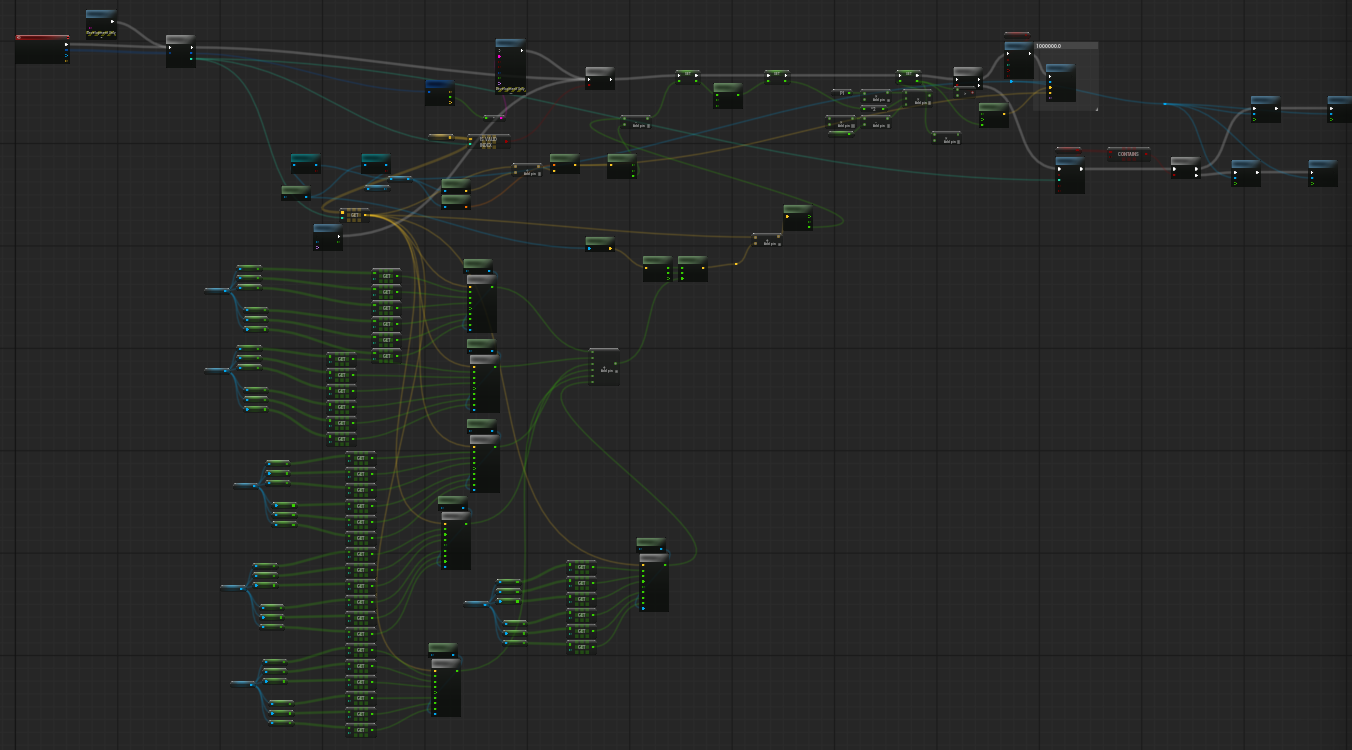
Due to each wave having to be calculated on its own, it takes a long time to test and to plug in every wave. This means it’s not very modular for the number of waves.
As such I decided to create a macro where I could create a loop that would loop through the number of waves, and this is what I came up with:
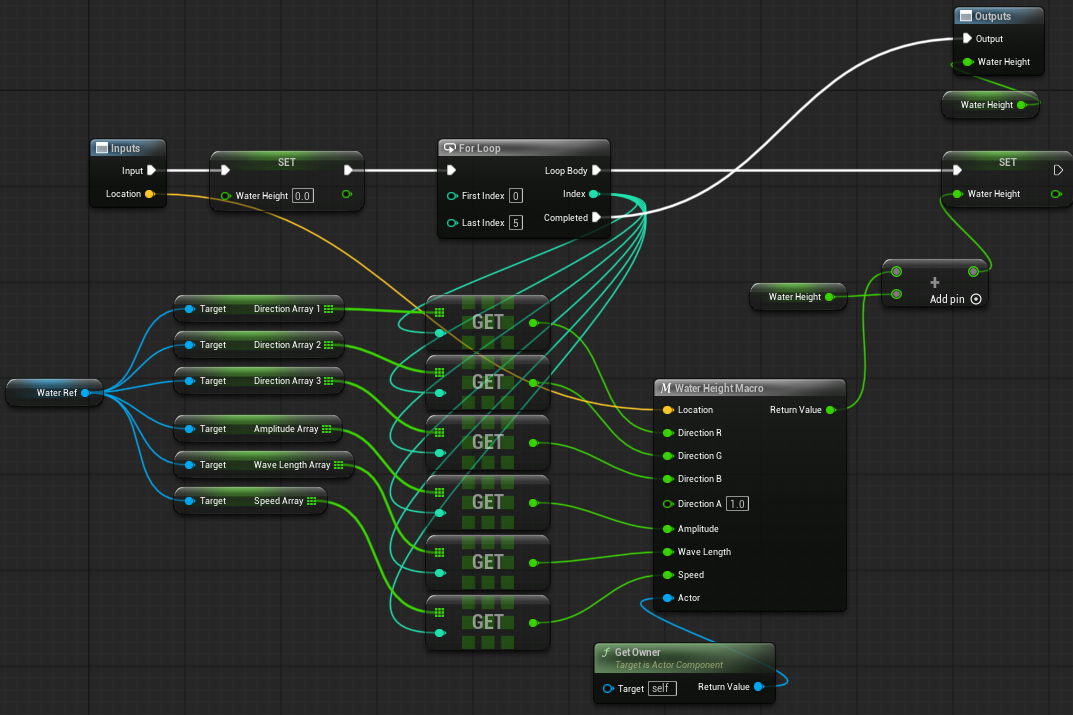
This macro uses the old macro that calculates the wave height, but instead of plugging each wave in individually, it loops through them all and adds up the wave height and outputs it.
This makes the new logic look like this instead:
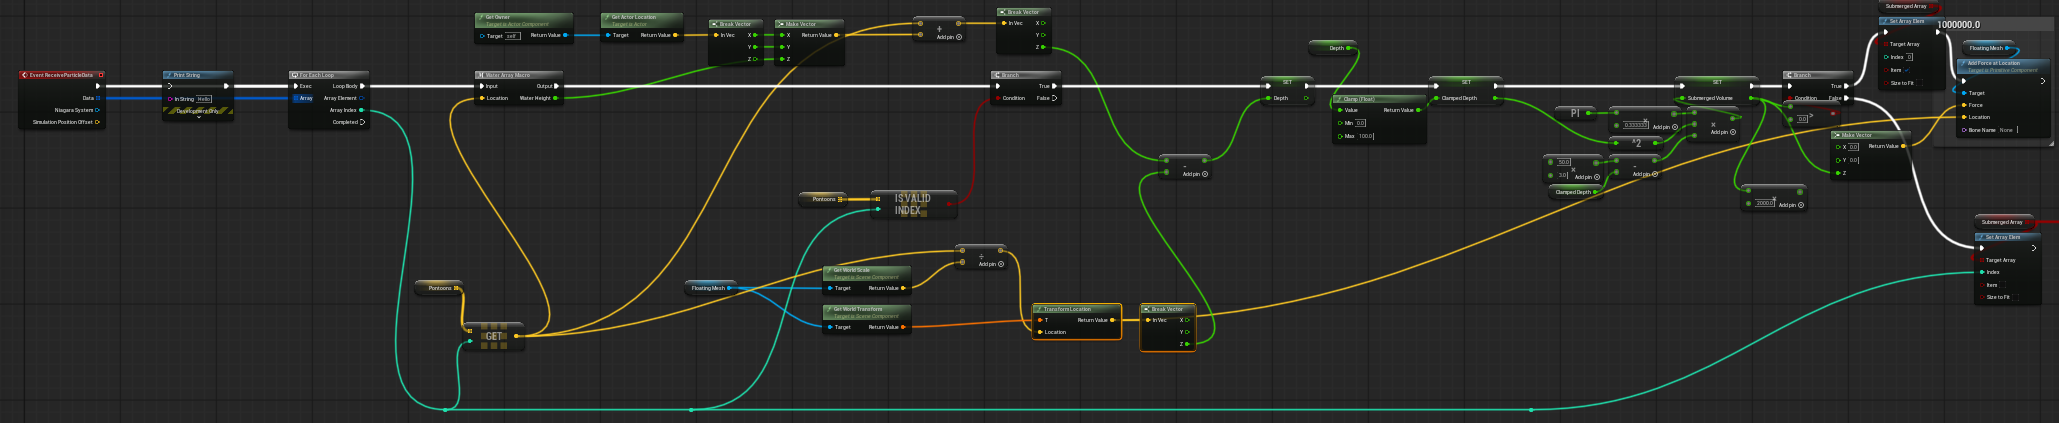
And this is all due to the fact of one macro here:
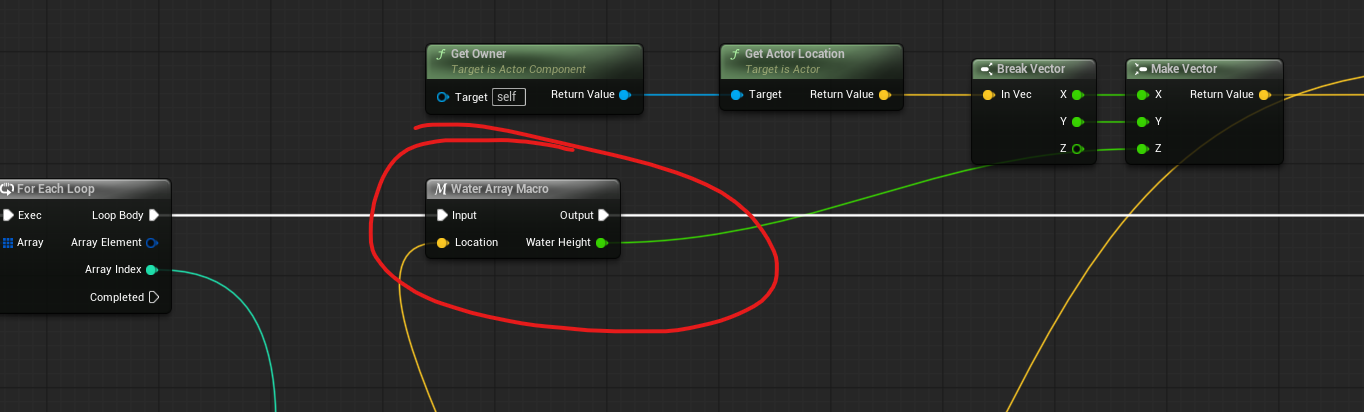
I also decided to add a ship model from Fab to the game as this would allow me to test how the ship would interact with the water. I did this by making a copy of BP_Buoy_10 and renaming it BP_Ship. This BP has the same Buoyancy component as the BP_Buoy and works the same way. I created some Pontoon locations on the boat and tested it in the water.
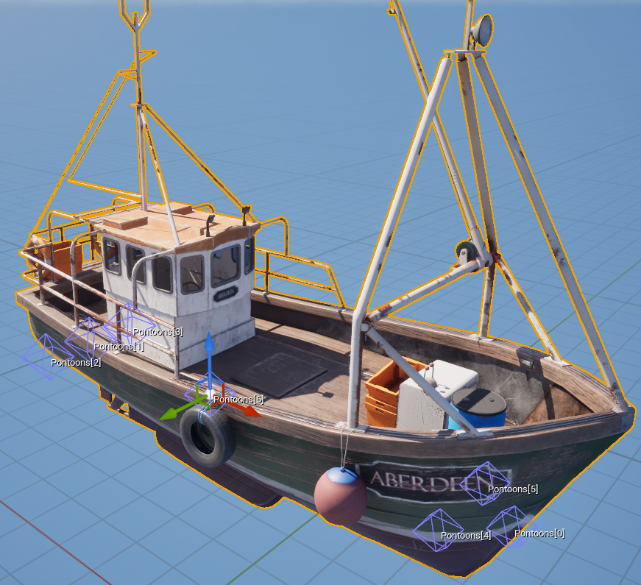
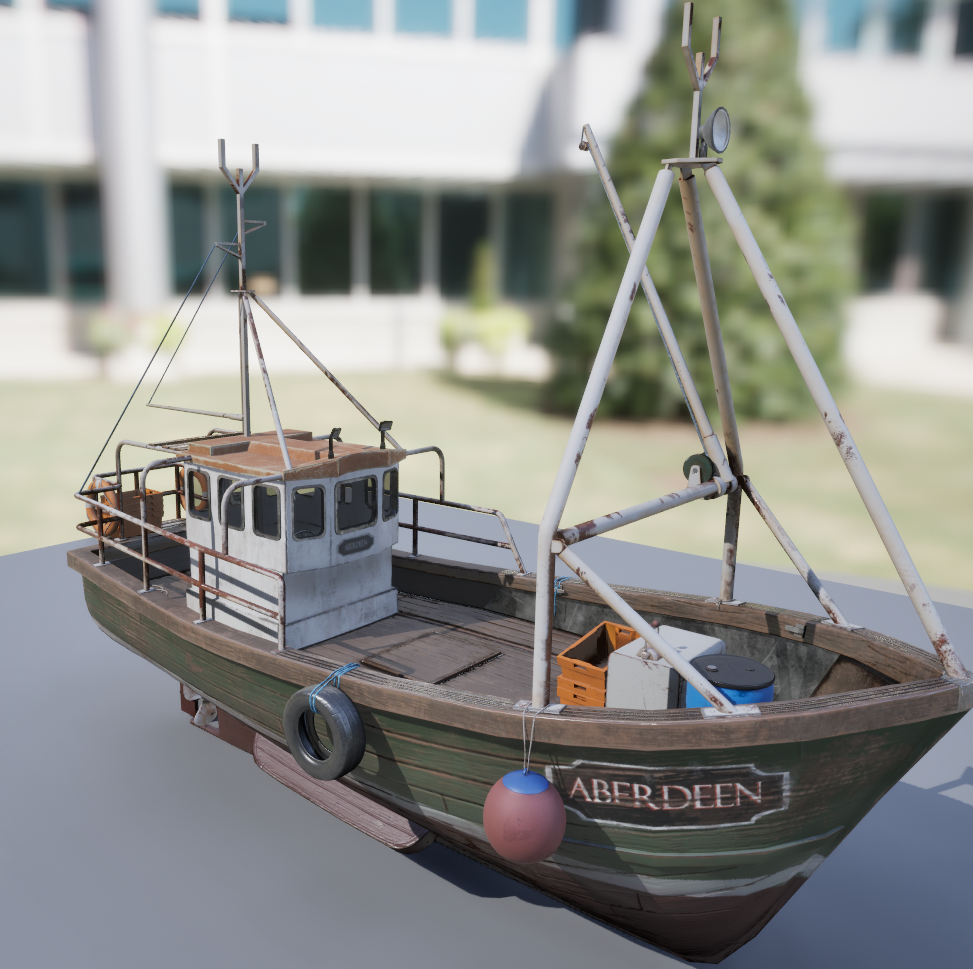
After this I wanted to try implementing Multiplayer functionality to the game. This would require me to replicate the wave parameters being used to calculate the wave height and have me update the wave time manually as the base time is from each client, which would make it out of sync.
The parameters that replicated were: AmplitudeArray, SpeedArray, WaveLengthArray, DirectionArray1, DirectionArray2, DirectionArray3, WaterHeight and WaterTime.
I also had to make the variable WaterTime be run on tick to keep a proper time keeping for when new players join, this makes the water material keep the same time basis.
As you can see here though, even this is not enough. While it is close to almost working, the client is slightly behind, evident by the water coming and going in patterns on the server, before it appears on the client, or by the ship being rocking upwards on the server, while pointing down on the client.
To fix this I went into the water blueprint and enabled “Replicates” in its class defaults. This is how it looks after this minor but important change.
Taking it Further
If I had more time on this project I would have liked to have made it so the wave amount was a variable that could be changed, and have it linked between the Buoyancy Component and the Water Material, however this would have needed an overhaul of how the Water Material works, and this is not in my time allocation.
This is due to the fact that just like in the BPC, the waves in the Water Material all had to be hooked up manually and as such this approach is not very scalable or modular.
I would have also liked to have been able to make an underwater shader to make it look differently under the water, instead of being completely clear as shown when I was doing the runtime buoyancy testing with the first-person actor.
Extra Testing
Some testing that I was doing on the side that didn’t make it into the main levels was me trying to create my own editor tool, which would be used similarly to the landscape editor tool, except I would use it on my water mesh to create dips or rises in certain areas of the water.
I used the Scriptable Tools Plugin along with the Geometry Scripting plugin.
First, I started off by creating a dynamically generated mesh as this is what the Geometry Scripting plugin required to be able to edit its vertices.
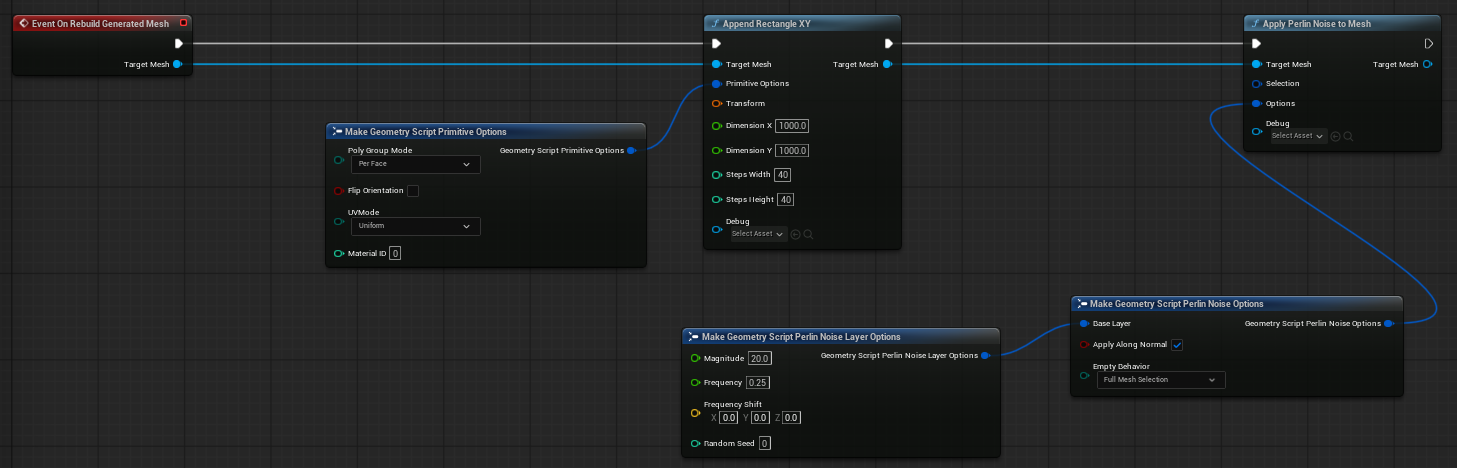
I used this to test if the water material I had would play nice with the edited vertices and this is the result.
This showed me that the wireframe mesh of the dynamically generated rectangle was affecting the base offset of the wave generation, which is exactly what I wanted.
Next, I began work on creating a tool that would work like the landscape tool, this is an example of the landscape tool:
I created a few tools from the Scriptable Tools Plugin that would allow me to create my own editor tool and made a line trace when I clicked with it. This line trace would detect if there was a dynamic mesh and get the closest vertex from that mesh and offset its height upwards. However, this did not work properly and while it did get a vertex from that mesh, it was not the closest one. This is as far as I got with this testing, and this is why its not in the main levels.
LV_11
At this stage in the project, I am beginning the transition from a purely technical demonstration of the wave systems I have created to developing a functional gameplay loop. While the previous iterations of the project focused on isolated technical features, I am now introducing gameplay mechanics that will keep the player engaged and contribute towards a complete playable experience.
To guide the development of the game and prevent scope creep, I first established a clear set of target features for the final build. Defining these objectives allows me to focus development on systems that work together to create a cohesive gameplay experience.
- Artifacts that function as collectible loot.
- Artifacts that do not float independently.
- Buoyant objects that float naturally on the water's surface.
- A connection system between floating objects and artifacts.
- Procedurally generated dungeons or underwater locations where loot is generated.
- Underwater locations indicated by bubbles on the water's surface or birds flying overhead.
- Procedurally generated underwater terrain.
- Surface-level locations such as oil rigs, abandoned ships, and AI-controlled enemy vessels.
- Underwater fog and blue-tinted lighting to improve atmosphere.
Overview Level
In addition to the core gameplay levels, I created an Overview Level to act as a dedicated showcase environment for each feature developed throughout the project. Rather than constantly switching between individual levels to demonstrate new functionality, this overview provides a single location where every implemented system can be viewed and tested independently.
This approach reflects common industry practices, where developers maintain dedicated demonstration or showcase levels to review features in a controlled and easily accessible environment. By separating feature demonstrations from the main gameplay experience, it becomes easier to evaluate individual systems, identify issues, and present technical work without the distractions of the full game.
Creating this level will also allow me to present my work more effectively to potential employers, providing a clear demonstration of each implemented feature and the progression of the project's technical development.
Buoyancy Debug Visualisation
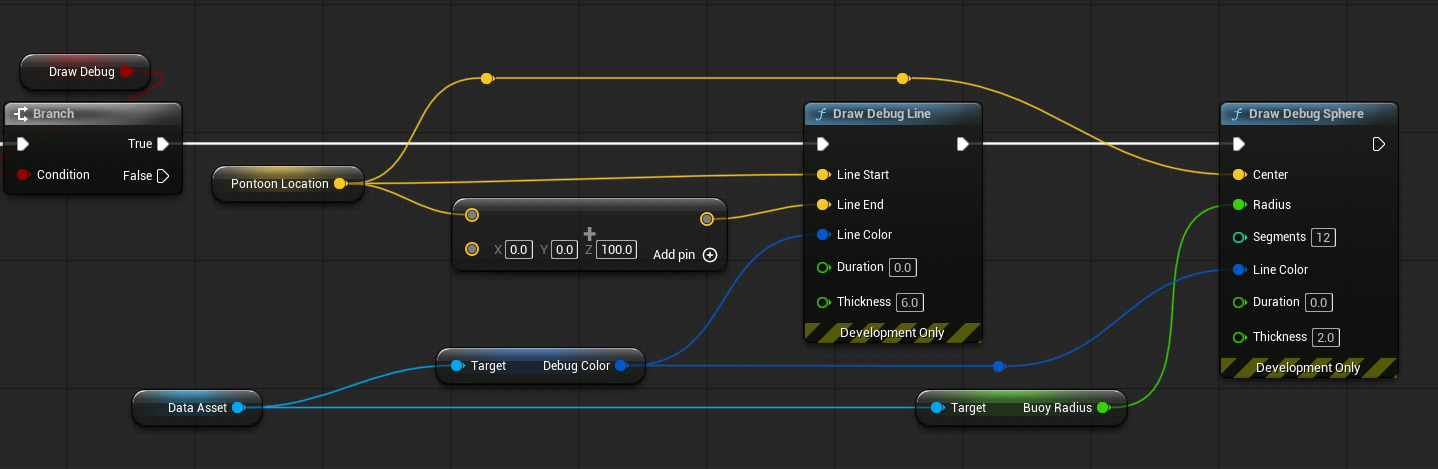
The first feature I decided to implement was a visual debugging tool for the buoyancy system.
In earlier versions of the project, buoyancy relied on the 3D gizmo locations displayed when selecting a buoyant object within the Unreal Engine editor. While functional, this approach became increasingly impractical when testing multiple buoyant objects simultaneously, making it more difficult to diagnose issues related to buoyancy behaviour and force distribution.
To address this, I introduced a visualisation system that renders each buoyancy point directly within the game world. This provides an immediate representation of both the size of each buoy and its position relative to the object to which it is attached, allowing the buoyancy setup to be inspected during gameplay rather than only within the editor.
Each buoy is visualised according to its radius. Larger buoys represent a greater displacement volume when submerged, resulting in a stronger upward buoyant force being applied. This visual representation directly reflects the underlying calculations performed by the custom buoyancy component, making it significantly easier to verify that each buoy is behaving as intended and to identify any configuration errors during development.
Connection Between Buoy and Object
Following the implementation of the Buoyancy Debug Visualisation System, the next step was to establish a method for physically connecting buoyant objects to non-buoyant objects. This mechanic forms a core aspect of the intended gameplay, as it provides the means for the player to recover underwater loot by attaching it to floating buoys and allowing it to be lifted to the surface.
To prototype this system, I created a temporary actor that allowed me to experiment with different connection methods before deciding on a permanent implementation.
Within this actor, I first created a physics-simulated sphere that represents the object the buoy must lift. I then added a Cable Component, positioning its starting point on the sphere to provide a visual representation of the connection between the two objects.
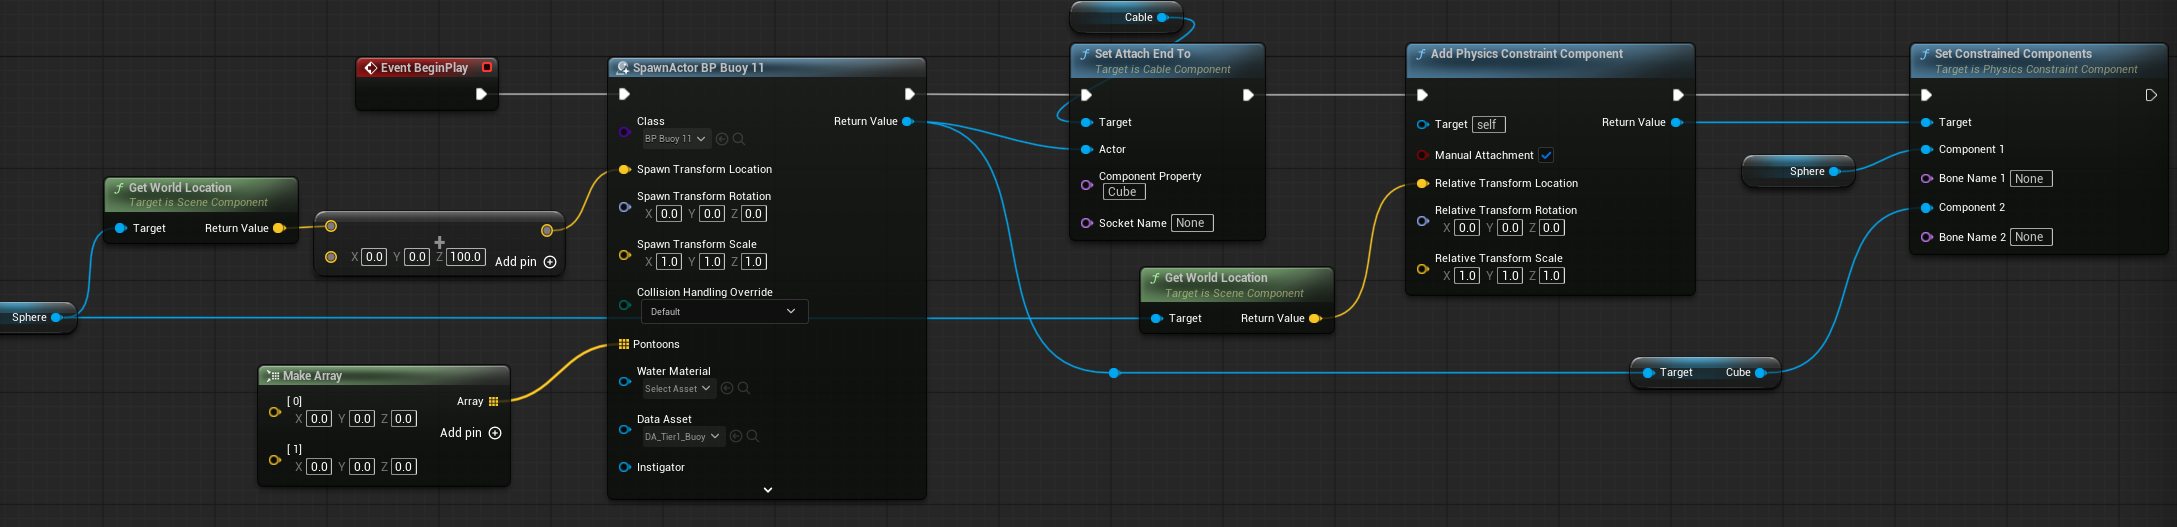
On Event Begin Play, the buoy actor is spawned and the end of the cable is attached to it. This cable serves purely as a visual connection and does not influence the physical behaviour of either object.
To create the physical interaction, I implemented a Physics Constraint Component. The constraint is positioned at the sphere and links both the sphere and the buoy together, allowing them to interact through Unreal Engine's physics system.
Using the Physics Constraint Component allows the motion limits of the connection to be configured, enabling the buoy to apply an upward pulling force while still permitting natural movement such as swinging, drifting, and reacting to the surrounding wave simulation. This results in a much more believable physical interaction while providing a solid foundation for the final gameplay mechanic.
Chain Connection Between Buoy and Object
Following the implementation of the Physics Constraint-based Connection, I explored ways to improve the visual and physical realism of the connection between the buoy and the attached object.
During this process, I researched techniques for simulating chains and decided to develop a custom chain system to replace the simpler single constraint setup.
Here is one of the videos I followed to get a start on this (YouTube Link)
I created a system to dynamically create a length of chain, with each having a Physics Constraint created between the links at the correct location. This allows us to have a more physically accurate simulation of the tension between each link, at the cost of performance from all the physics simulations happening depending on the length of the chain and the amount of chains being used at once.
Going forward I will have to balance the impact of this performance cost against the realism the chains give us. This gives us insight into what modern games have been struggling with as they try to push the boundaries while trying to keep players with older hardware apart of their ecosystem.
If this method of using chain links via Physics Constraint becomes too intensive, I will investigate other methods of connecting the Buoy to the Artifact, maybe going down the route of making the Cable Component look like a chain, but not with the same physics properties as displayed here.
Underwater Post Processing
To achieve a believable water environment, it is essential that the player can visually distinguish between being above and below the waters surface. Without this transition/difference the scene lacks depth and realism, as the player receives no visual difference when entering the water.
To address this I worked on implementing a underwater Post Processing Volume. I also inspected the approach used in Unreal Engine’s Water Plugin to better understand how underwater rendering is typically handled.
In this PPV I have to re-calculate the Wave Position Offset to ensure that when the player passes through the surface of the waves, the processing is only applied when they go below, other wise , if this is incorrect the player will see the post processing effect when not below the waves.
So we re-calculate the WPO, and compare it against the position of the camera.
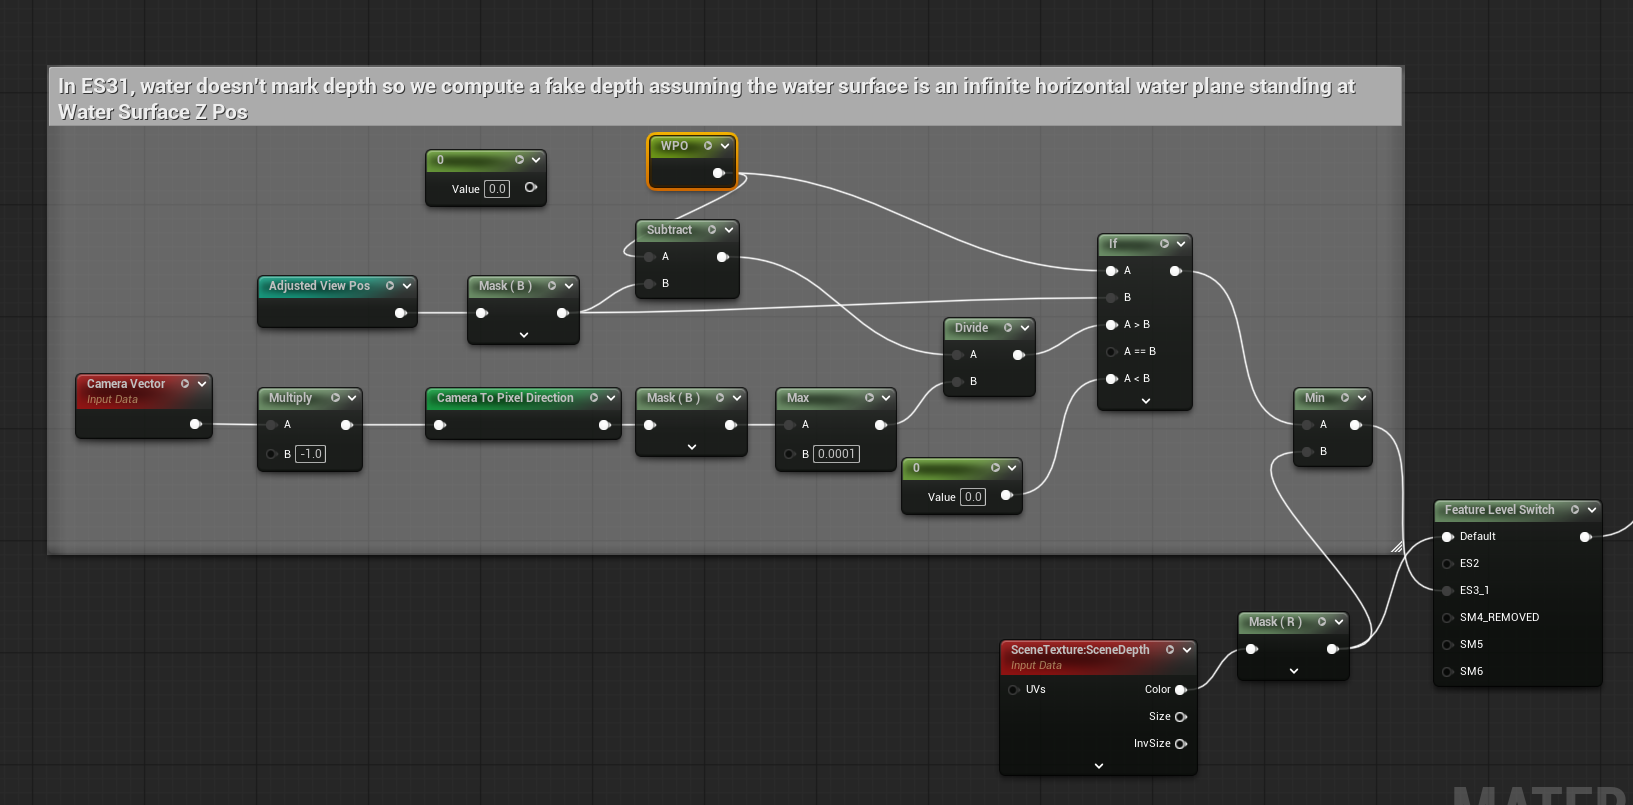
Once we get this working we get a pretty accurate transition between above and below the waves.
While this isnt 100% accurate, it is accurate enough that the player would only see a mistake for a split second while moving and bobbing up and down, as a result the current implementation is sufficitently accurate for gameplay purposes and does nto require further optimisation at this stage.
Artifacts Assets & Glow
To introduce one of the objectives I had mentioned at the start of this document, I created a new blueprint actor called “BP_Artifact”, representing collectible loot that will be scattered throughout the underwater environment. These Artifacts are intended to be remnants of a lost civilisation, reinforcing the projects narrative theme while also acting as player rewards/objectives.
During initial testing, I found that the default mass of the artifact meshes were too low, around 1kg to 50kg. This caused issues with the buoyancy system as even low tier buoys could lift all artifacts with little resistance.
To solve this problem, I multiplied the default mass of the static mesh on Begin Play by 50x to increase its weight. This gives the Artifacts a more believable physical behaviour and ensures that the heavy Artifacts cannot be pulled to the surface by the lowest Tier Buoy.
During initial testing with the artifacts underwater I identified a major issue. This being that the Artifacts were difficult to distinguish from the surrounding environment due to the Post Processing Effect from the Water Volume, and the terrain textures and assets. This negatively impacts the players ability to reliably locate the Artifacts, therefore impacting gameplay overall.
This made me realise that I would have to make some changes to ensure the gameplay loop was enjoyable.
To address this issue, I did some research on a scanning mechanic that would originate from the player. I did this by creating a new blueprint called “BP_Scanner”. In this blueprint I created a sphere, that has a new Material on it, which looks like a glowing ring. Overtime I increase the size of the sphere, so it overlaps the environment, this looks like its scanning the area. When it overlaps and Artifact it applies a highlight to the artifact.
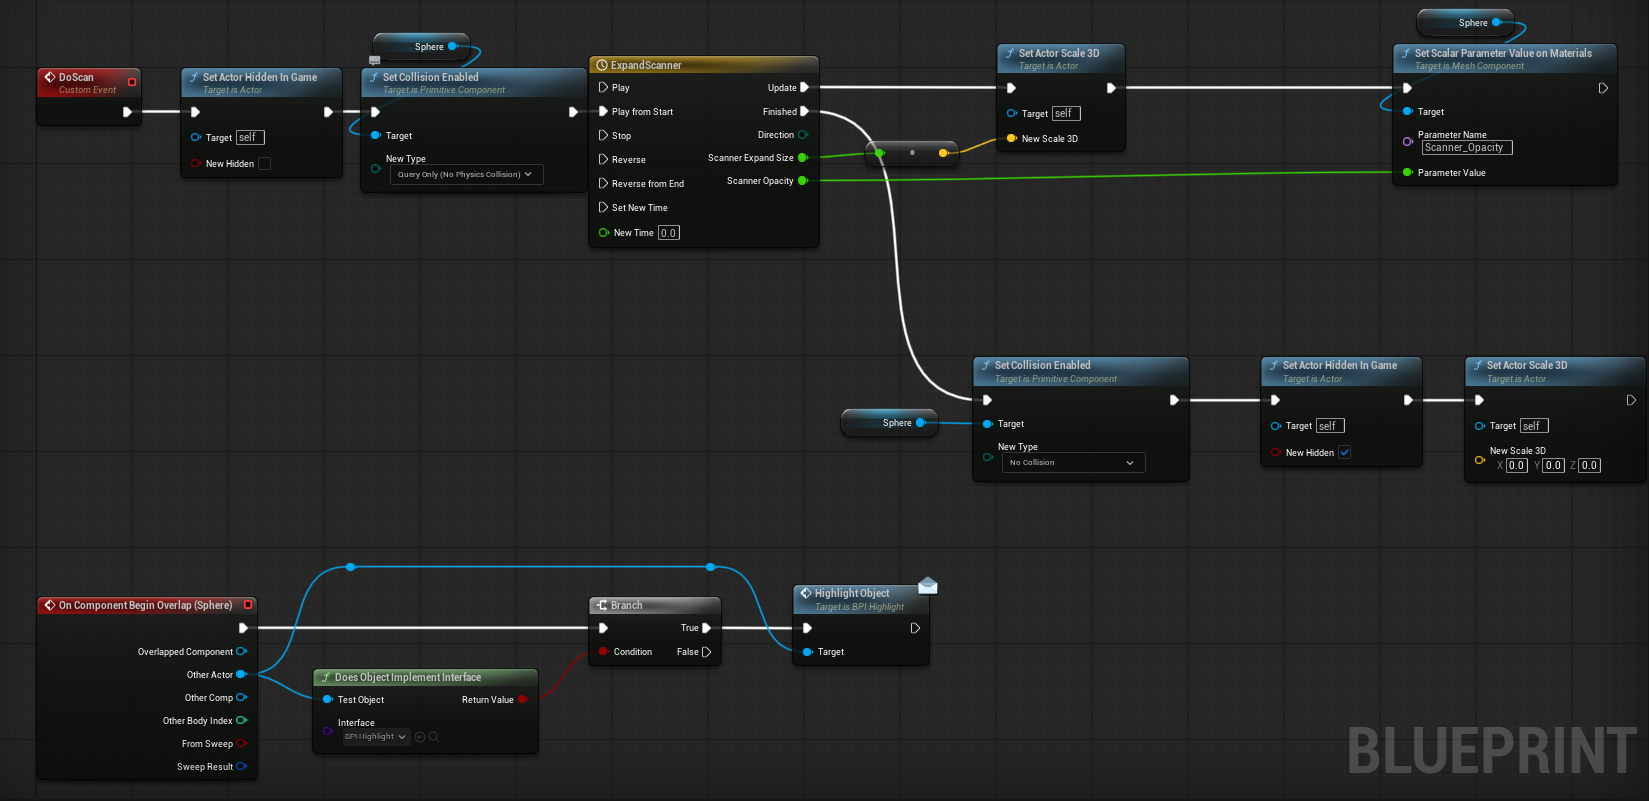

Originally this didn’t work very well since the Water Post Processing was overriding the glow material that was applied to the artifact causing it to work above water, but not below the surface where the Water Post Processing was applied. So, I had to create a separate Post Processing Material and custom depth stencil for the Artifact to use, therefore allowing the Highlight to work below the surface of the water.
Player Dragging Artifact
Another problem I thought of that would be an issue when I started creating buildings for the Artifacts to spawn in and around, is that the player cannot move the Artifacts besides using the Buoys to lift the Artifacts straight up. So, if the Artifacts spawn inside a building, the player has no way of getting the Artifacts out.
To solve this, I decided to take Inspiration from R.E.P.O. (2025), with their grab mechanic. I could have gone with a Physics Handle, to have it closer to how R.E.P.O. (2025) does it but I had an issue with trying to make the object have a “feel” of weight.
What I mean by this is that I could make the player lift the artifact, but not get a proper delay on the movement of the Artifact based on the weight of the artifact.
Instead, I decided to make a rope that attaches from the player to the Artifact and pulls it along behind them. To make it feel better I made it so the weight of the Artifact and the distance from the Artifact is used to decrease the speed of the player. The player’s speed is reduced based on the distance, and if the object is too heavy for the player, the players speed is set to 0. This makes the Tension of the rope connection believable.
Player Swimming
Next, I decided to create another core mechanic that the player would need to move around the world, their method of swimming.
Thankfully this was easy enough to implement as I could tweak my Buoyancy System Component to be added to the player, and report if the Buoy Point is above or below the water.
I do this by creating a couple Event Dispatchers which allow me to fire custom nodes from the component to the parent actor without casting. This helps with performance and scalability, while also allowing me to change the players movement state.
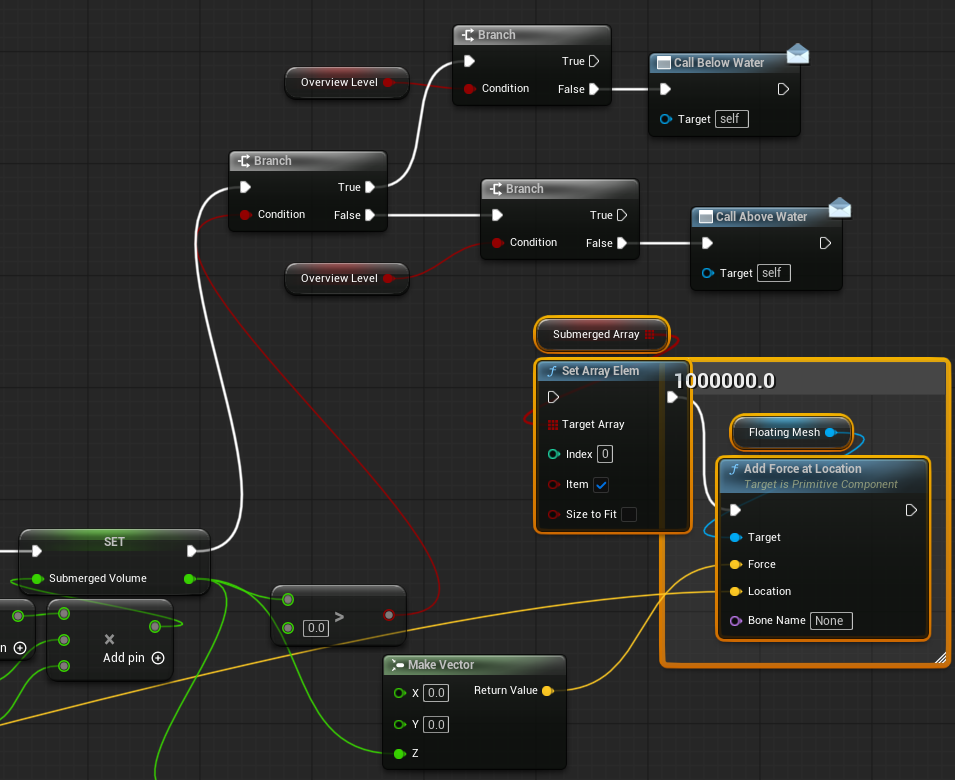
Instead of the Buoyancy system applying force to the parent mesh when below the waves, I have it instead going to call if its above or below the waters surface as the player doesn’t need the force applied to them.
The Call Above/Below Water then calls functions on the player to change the players movement state to either flying or walking.
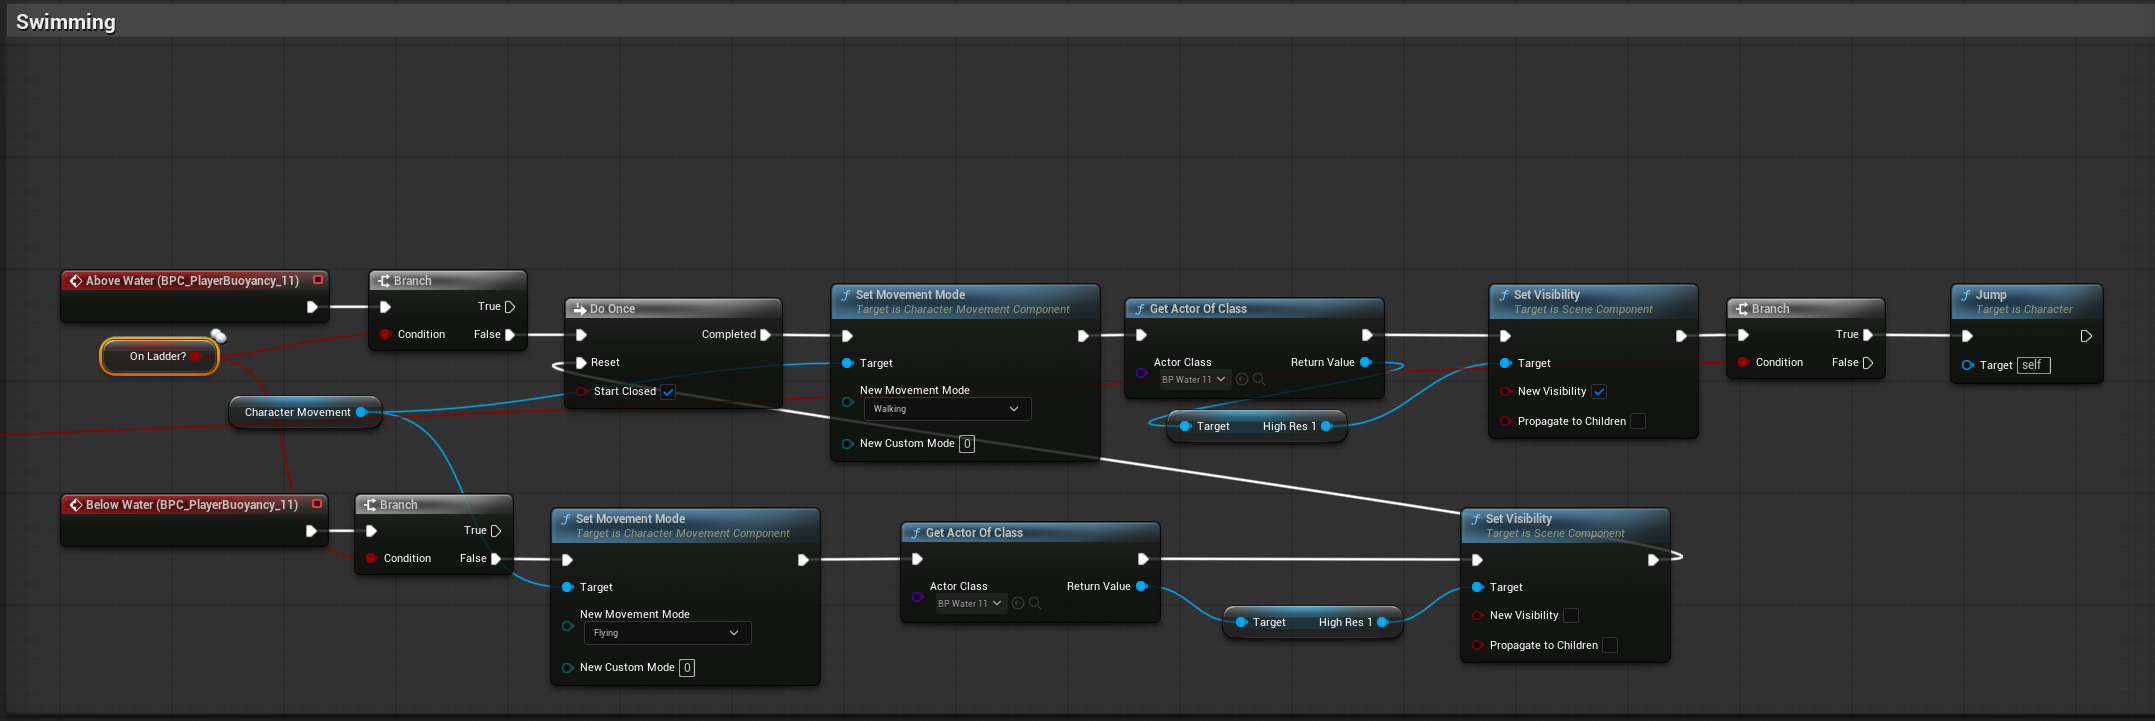
Player Using Ladder
After creating a swimming system, I realised there wasn’t a way for the player to get onto the ship, which is a necessary mechanic to have in a game where the player is required to jump into the water and exit the water frequently.
I began researching ladders in UE5 online, but most available solutions relied on applying upward or downward forces to move the player. While functional in static environments, this approach was not suitable for my use case as the ship is constantly moving and reacting to wave motion. As such using a force-based system would not be suitable for my use case.
To address this, I began exploring the use of spline-based movement instead. This approach allows the player to be guided along a predefined path via the spline points. This method also provides greater flexibility in design, unlike traditional vertical ladders these splines can be shaped to follow the curvature of the ships hull, resulting in a more visually accurate and adaptable solution.
During construction of the ladder, it checks if the Boolean variable that determines whether it should generate a default vertical ladder or allow for manual spline editing. When set to generate automatically, the system creates spline points dynamically to form a standard up and down ladder. When disabled, the spline can be manually adjusted within editor, allowing for custom shapes and more complex ladder designs.
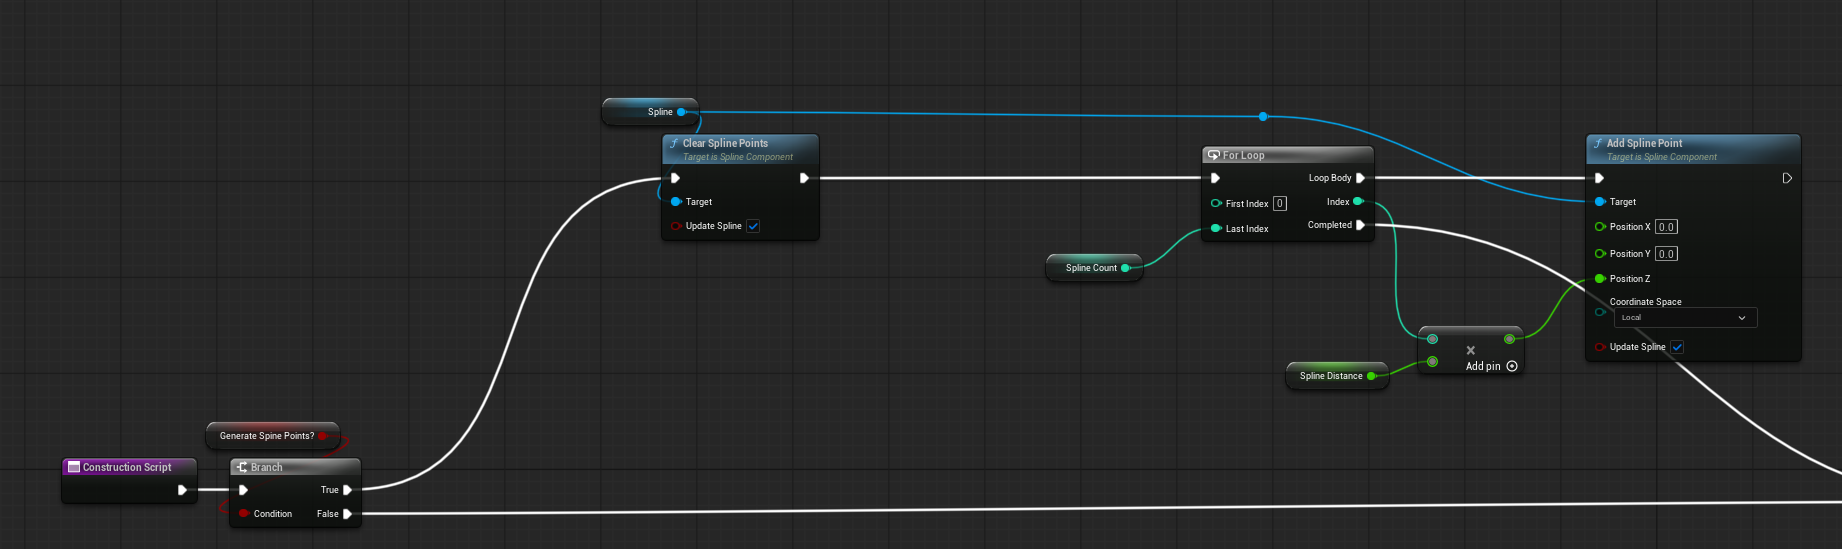
The spline also defines an exit point, represented by an arrow component. This is used to determine where the player should move once they reach the top of the ladder.
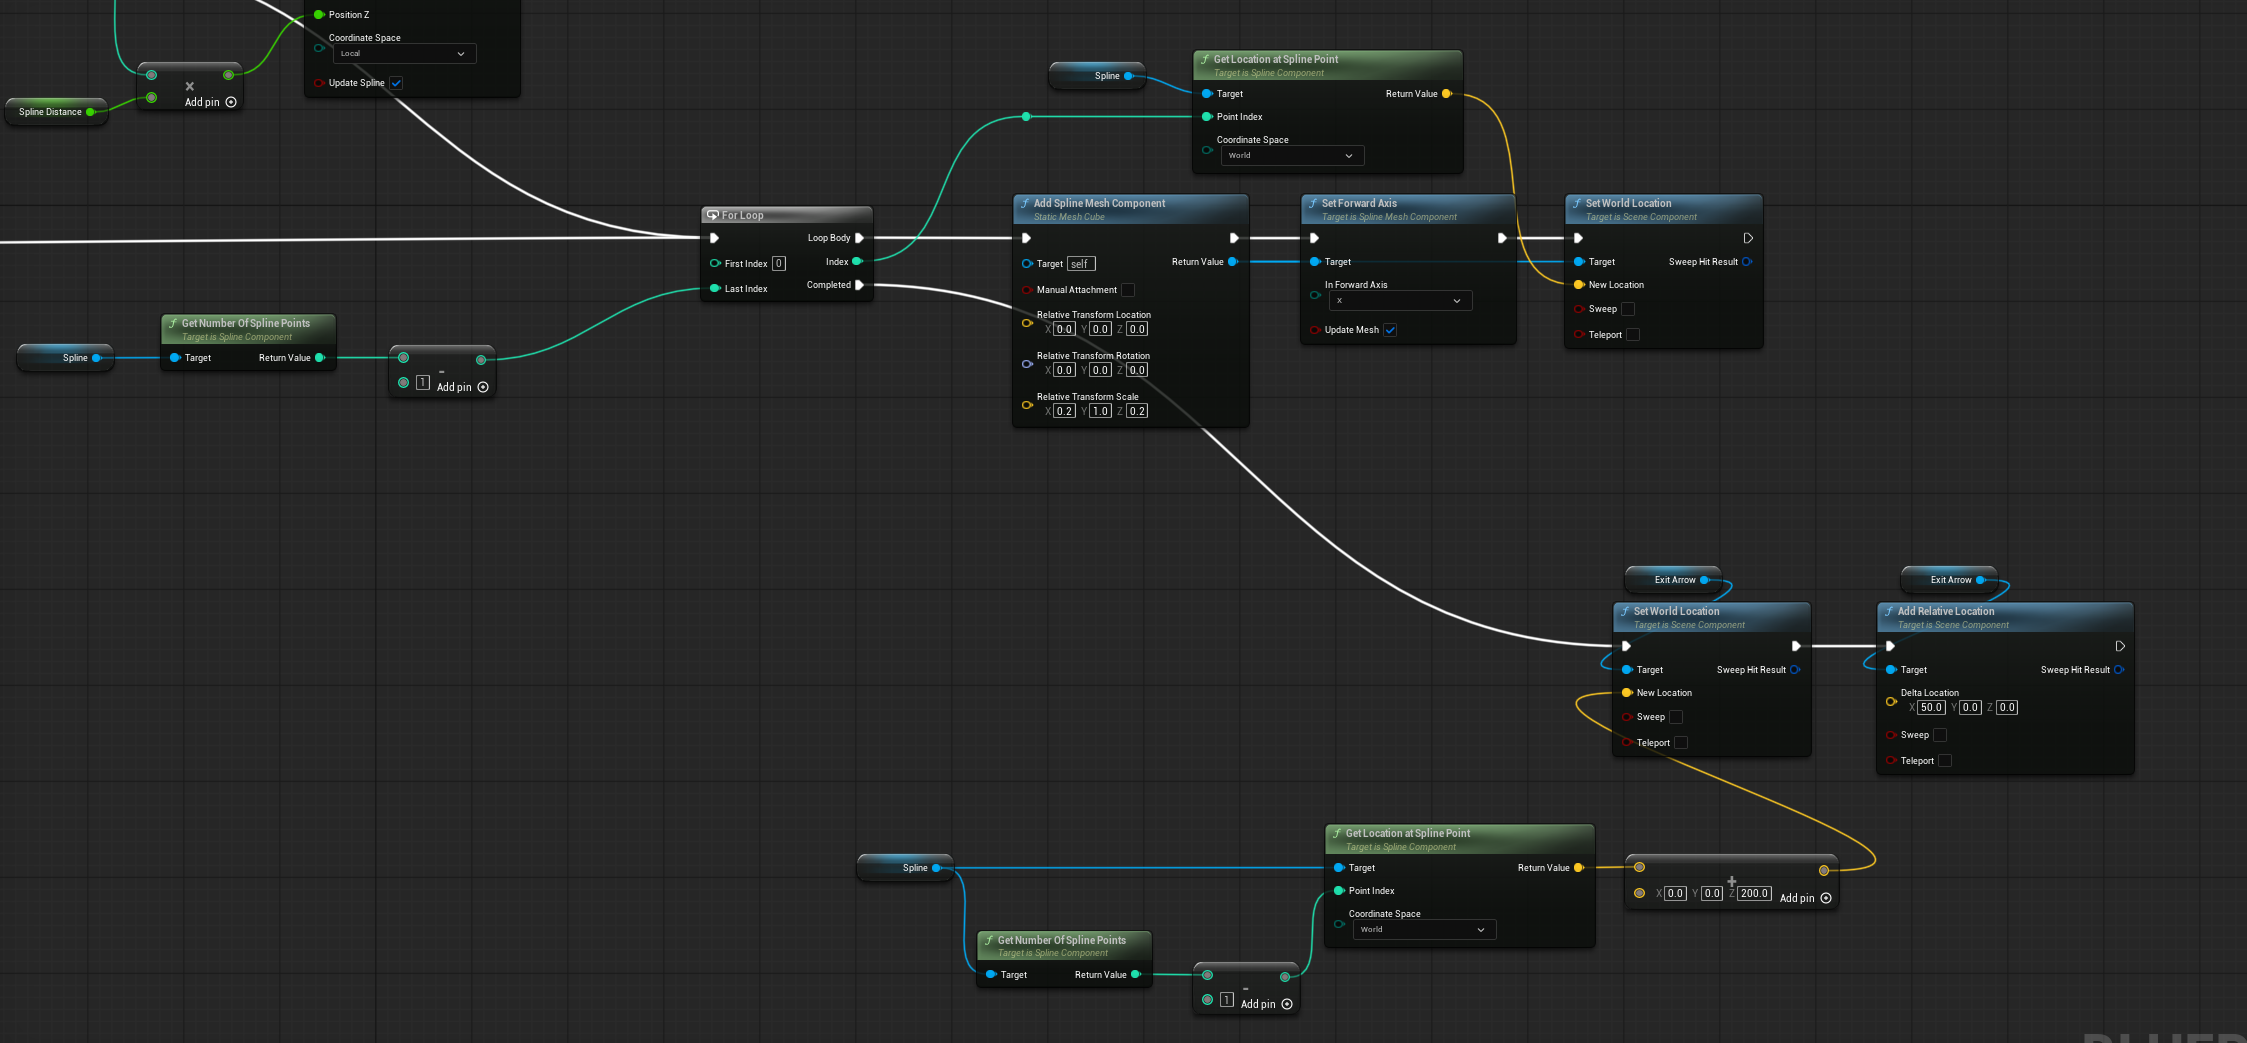
On BeginPlay the total length of the spline is stored, this value is going to be used to determine when the player has reached the end of the ladder.
When the player interacts with the ladder, they are first moved to the closest spline point along the spline. From this point onward, the players movement is constrained to the spline path and used to move them along it. Furthermore, since the ladder is attached to a moving ship, it is necessary to update the position of the player continuously to maintain proper alignment with the ladder. This is handled using Event Tick to keep the player in the correct position.
We then use the players movement to move the player up and down, checking if they are at the end of the ladder, if they are we use a timeline to lerp them to the exit arrow location.
I also put some work in to ensure that this works in multiplayer, using RepNotify variables to replicate the conditions for the players.
Here is the result of this.
Updated Ship
At this state of development, I introduced an updated ship model to better represent the intended final player vessel. This allows for more accurate testing of player interactions, buoyancy behaviour, and onboard systems within a more realistic context.
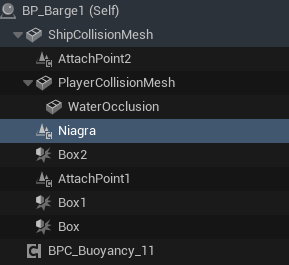
This is the updated blueprint layout. I also separated the collision into 2 different meshes, each with a separate purpose.
The first called “ShipCollisionMesh” is a low-poly collision mesh with simulated physics enabled. This mesh is used for ship-to-ship interactions and general physics simulation; by having it low poly and not complex, we are able to have physics enabled.
The second mesh is called “PlayerCollisionMesh”, this mesh has complex collision enabled, which cannot have simulated physics enabled otherwise I would be using 1 mesh instead of 2. This mesh allows for a more precise interaction when the player walks on the ship, or when smaller objects come into contact with it.
This allows for us to have a finer detailed collision for the player and small objects to use, while still being able to have simulated physics turned on.
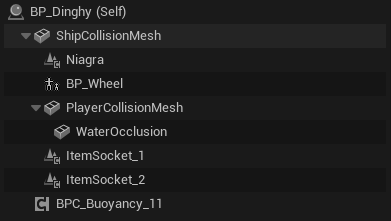
In addition to collision handling, the ship blueprint also includes predefined item socket locations. These sockets are used as attachment points for systems such as a barge, allowing objects to be consistently positioned and connected when spawned.
This ship also contains additional systems, including the Steering Wheel and Water Occlusion setup, which will be explored in later sections.
Another reason why I had to have separate collision meshes for player and ship collisions is because I have worked on a system for ship to ship collisions. This works by detecting ship to ship collisions and forcing them away from each other to make sure they don’t get stuck against each other, as I was having problems with this before.
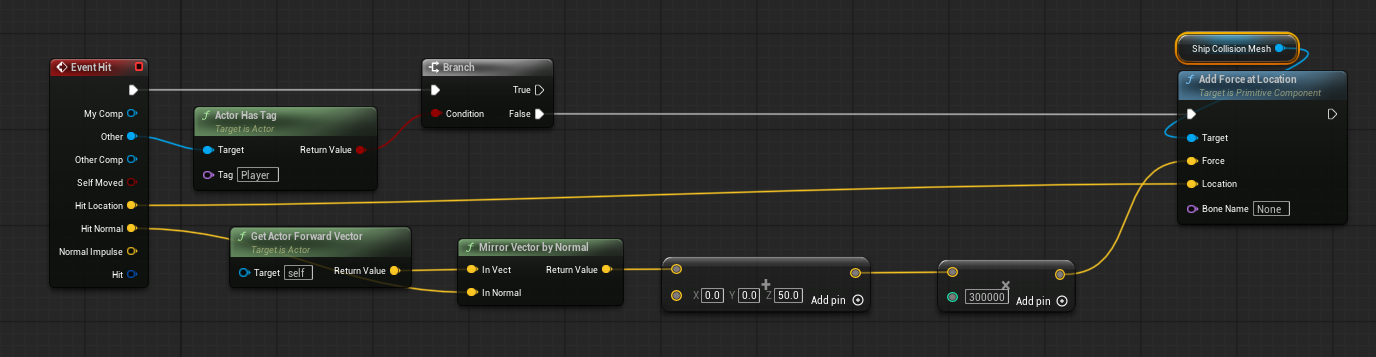
This takes the hit, gets the direction the hit was from, and makes an opposing direction vector with a slight difference, such as “away” from the collision normal.
Barge
After implementing artifacts, multiple methods of interacting with them, and the swimming system, the next step was to provide the player with a reliable way to store collected items while navigating the world. Without a dedicated storage area, artifacts would end up covering the ship leading to a cluttered walking area.
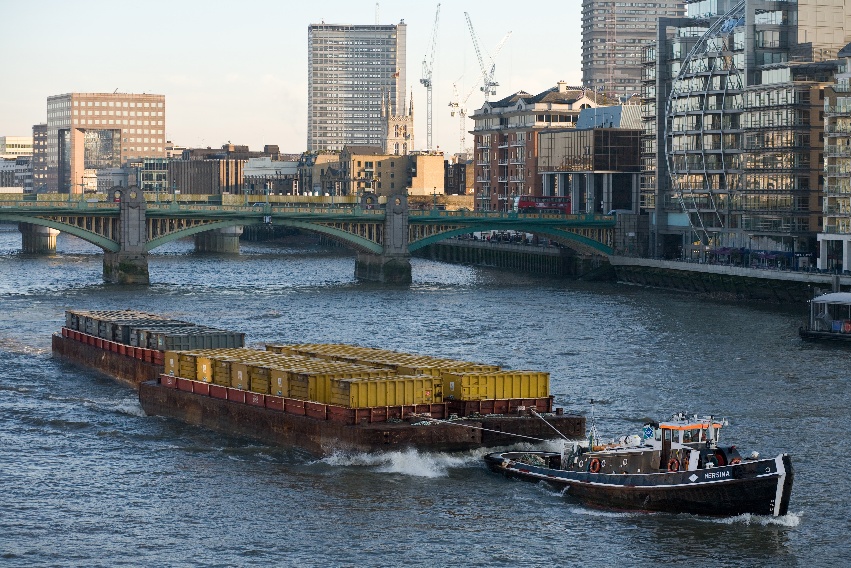
To solve this, I decided to create a barge blueprint that will be towed behind the player’s ship. For the initial implementation (Tier 1), I have chosen a skip styled container as a simple and practical solution for holding the Artifacts. This design fits the games’ theme of being in a world on the edge, where people would have to use anything, they can to survive.
This idea was implemented by using a new actor called “BP_Barge”, with its structure being set up similarly to the ship blueprint but adapted for its role as a towed storage unit. This was easily turned into a floating blueprint by giving it the BPC_Buoyancy component. This blueprint also had the appropriate collision setup and attachment points as the ship bp so it can be easily connected to the ship.
The Barge has some overlap boxes to make sure that when the Artifacts are inside, they wont be launched around while the ship is moving. This works by having them be attached to the actor, and having their simulated physics turned off. Otherwise, they could clip through the mesh and fall back into the water.
When they are removed from the barge, physics are re-enabled allowing the object to behave normally again.
Here is an example of me doing some limit testing to see if the system will correctly detect all the items and turn off their physics and attach them to the barge.
Next, I worked on attaching the Barge to the Ship.
My original approach was to use a fully simulated chain, like the one I used earlier in the project. While this provided a high level of visual and physical realism, it introduced instability and a significant performance cost, especially when combined with existing buoyancy and chain physics. Due to these limitations, I decided to move to a more controlled and robust system.
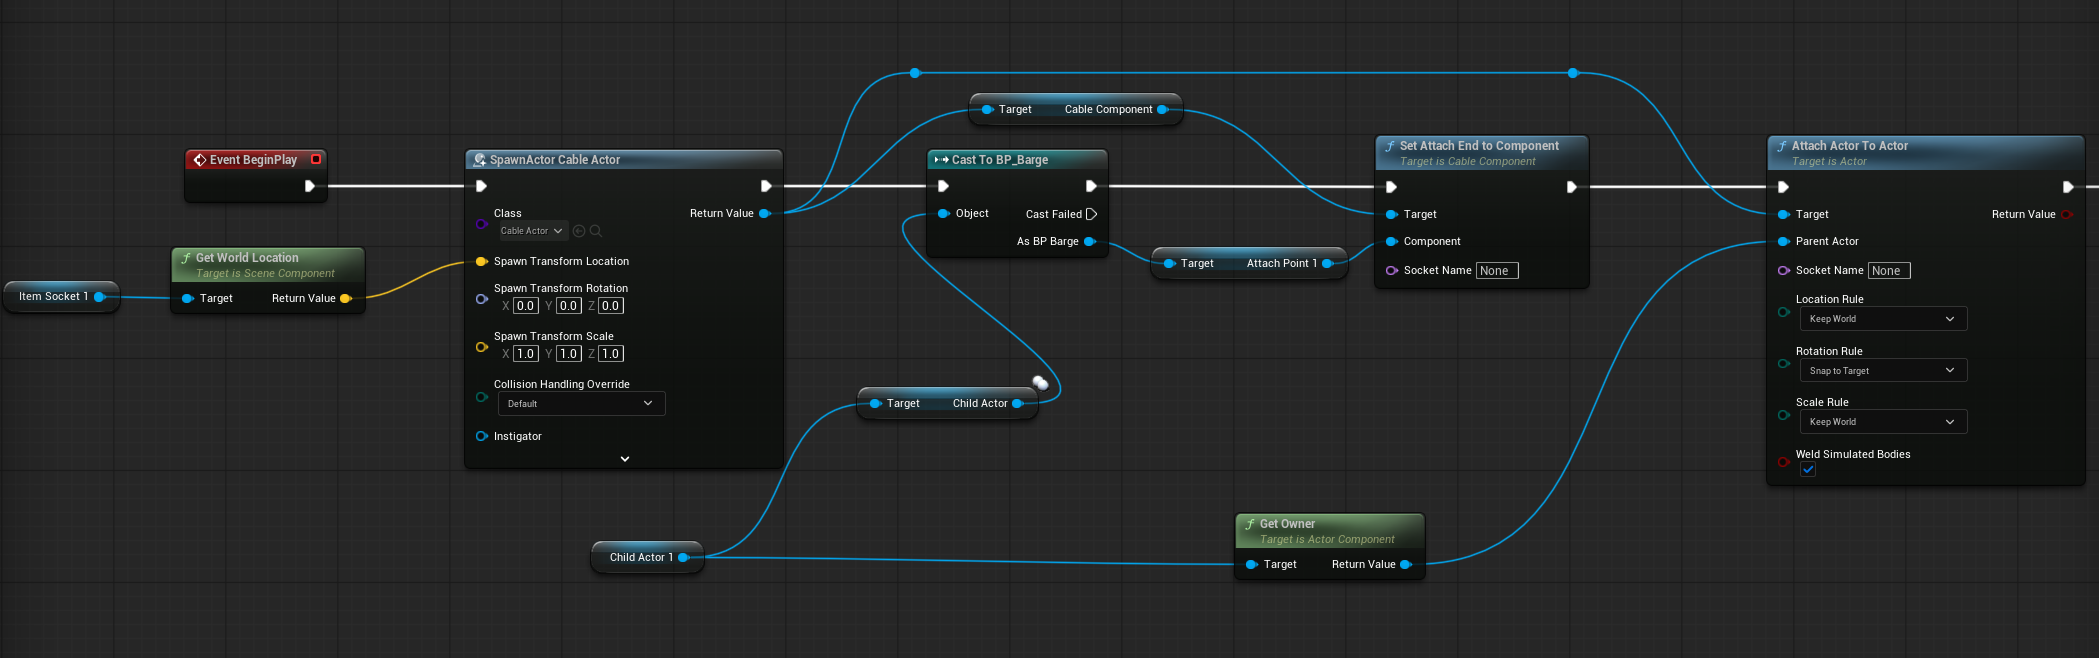
The final implementation uses a combination of Cable Components for visual representation and a single Physics Constraint to handle the physical interaction between the ship and barge.
The Physics Constraint is configured to allow a limited range of movement between the two actors. By adjusting its linear limits, I introduced a small amount of flexibility in the distance between the ship and the barge. This allows the barge to move slightly closer or farther away from the ship, simulating the natural slack and tension of a towing cable.
On BeginPlay the cable is dynamically created and attached between the predefined socket locations on both the ship and the barge. This ensures a consistent alignment and flexibility if I decide to have more tiers for the ship/barge, easily allowing for me to move the sockets to the correct locations. It is important to note that the cable is purely visual, while the Physics Constraint is responsible for maintaining the physical interaction between the two actors.
This is what I was thinking about when creating this in the first place, and what could be implemented for higher tiers of ship/barge.
Ship Wheel
To allow the player to control the ship, I implemented an interactive ship wheel mechanic. This was created as a dedicated blueprint that I will attach to the ship ensuring the control logic remained separate from the core ship movement system.
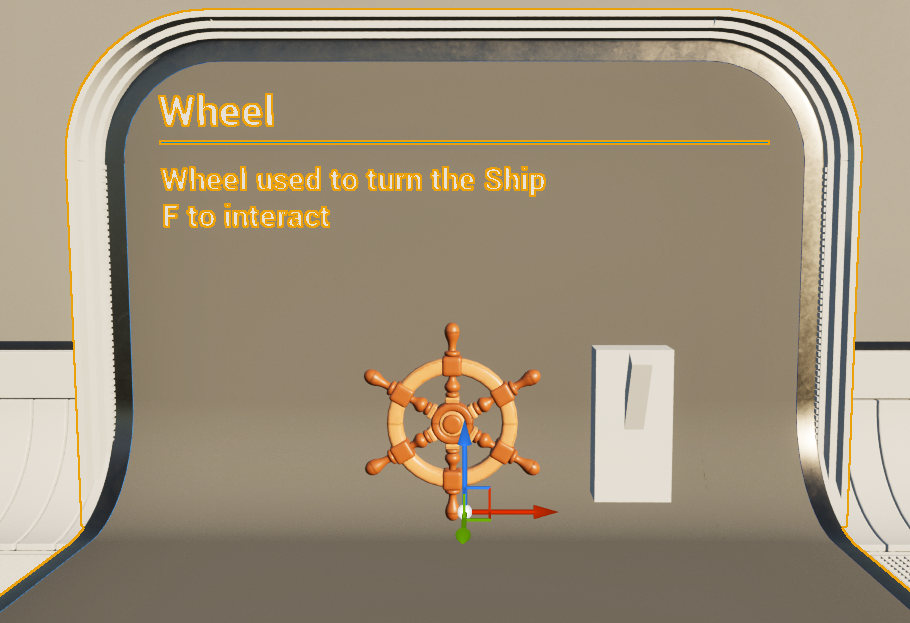
The wheel uses the same Blueprint Interface to handle player interaction as the ladder. When the player interacts with the wheel; control is transferred by having the player possess the wheel actor. While I could now use the player controls directly on the wheel, I instead replicate movement from the player controller to the ship.
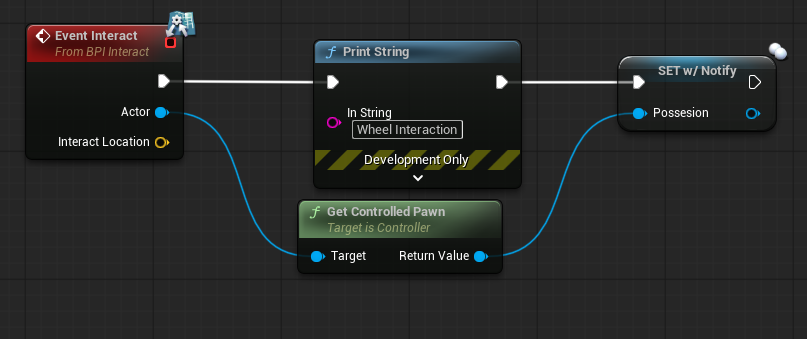
This then allows the player to control the direction of the ship by taking the players movement attempts and redirecting them to ship movement.
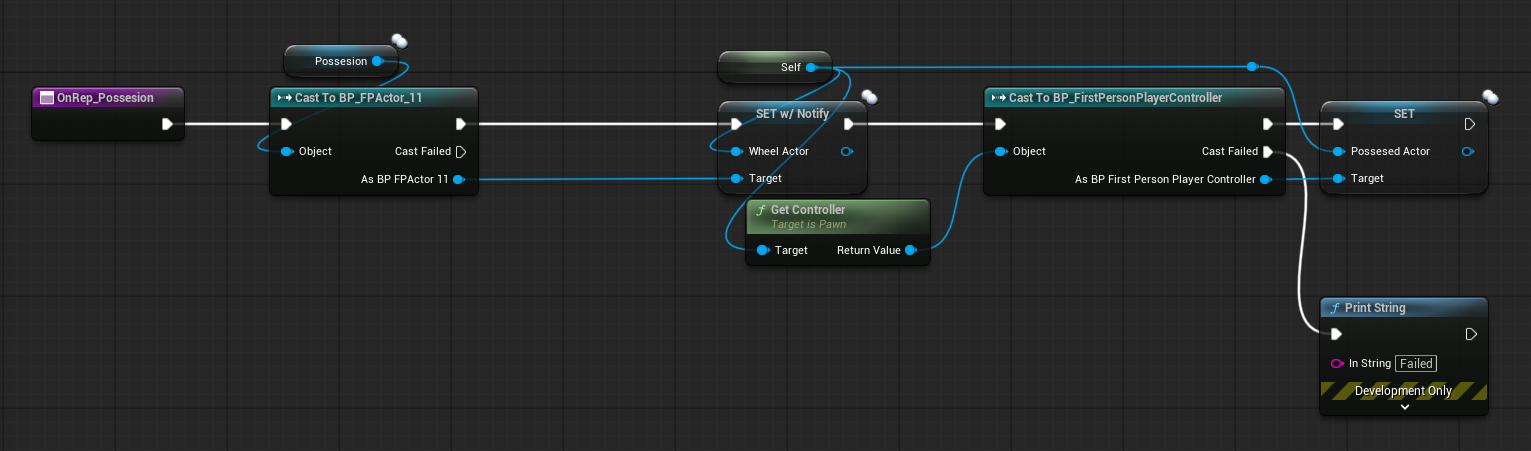
This entire system is replicated allowing for other players to see them moving the ship.
Occlusion Settings for Water in Barge/Ship
One of the issues I encountered during development was water clipping through the interior of the ship and barge. This unfortunately completely breaks the immersion, as the waters surface should not appear inside enclosed spaces.
As you can see from this clip, the water keeps moving through the ship.
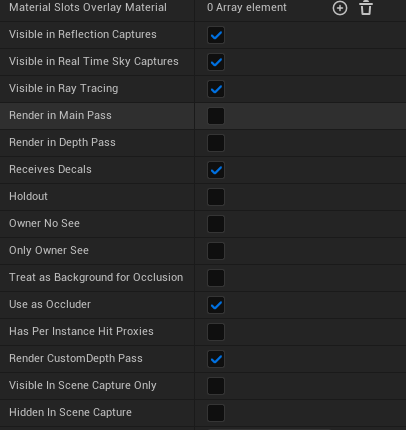
To resolve this, I implemented a custom occlusion system using a hidden mesh. This mesh is placed within the interior volume of the ship and barge and is configured with no collision. It is not rendered in the main or depth pass, making it invisible to the player.
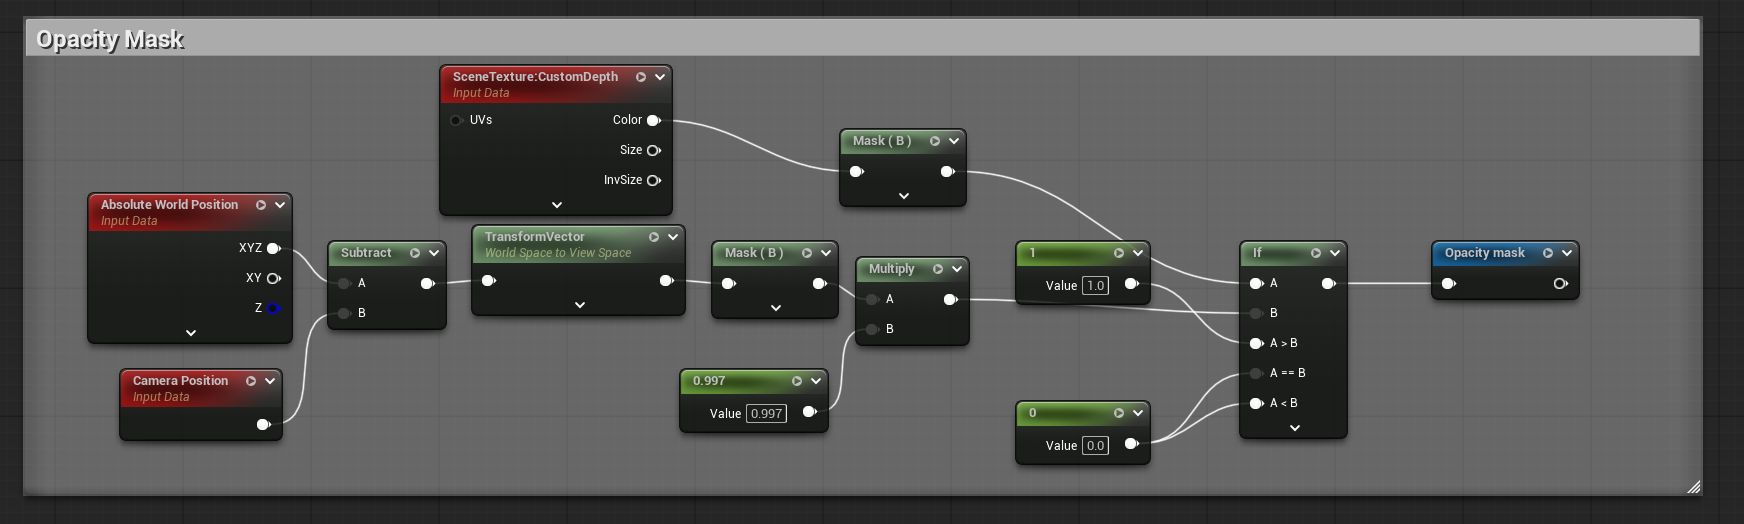
Instead, the mesh is rendered only in the Custom Depth Pass and used as an occlusion mask within the water material.
Within the water material an opacity mask is calculated by comparing the cameras position and angle against the custom depth pass mesh. Where the occluder is detected, the waters opacity is set to 0, therefore removing the water visibility from those regions.
This new clip shows the occluder volume being used on the ship. While it is not perfect it does what it needs to do.
However, the reason why this is not “perfect” is due to the water waves being taller than the ship, so realistically the waves would go over the ship anyway.
Self-Righting Ship and Barge
During testing I encountered scenarios where the ship or barge could flip over, either due to intense wave forces, or collision interactions with scenery. This would create situations where the player would be effectively soft locked and unable to continue progressing in the game.
To address this, I implemented a self-righting system that detects when the ship or barge has been overturned and applies a corrective force to return the ship to its upright position.
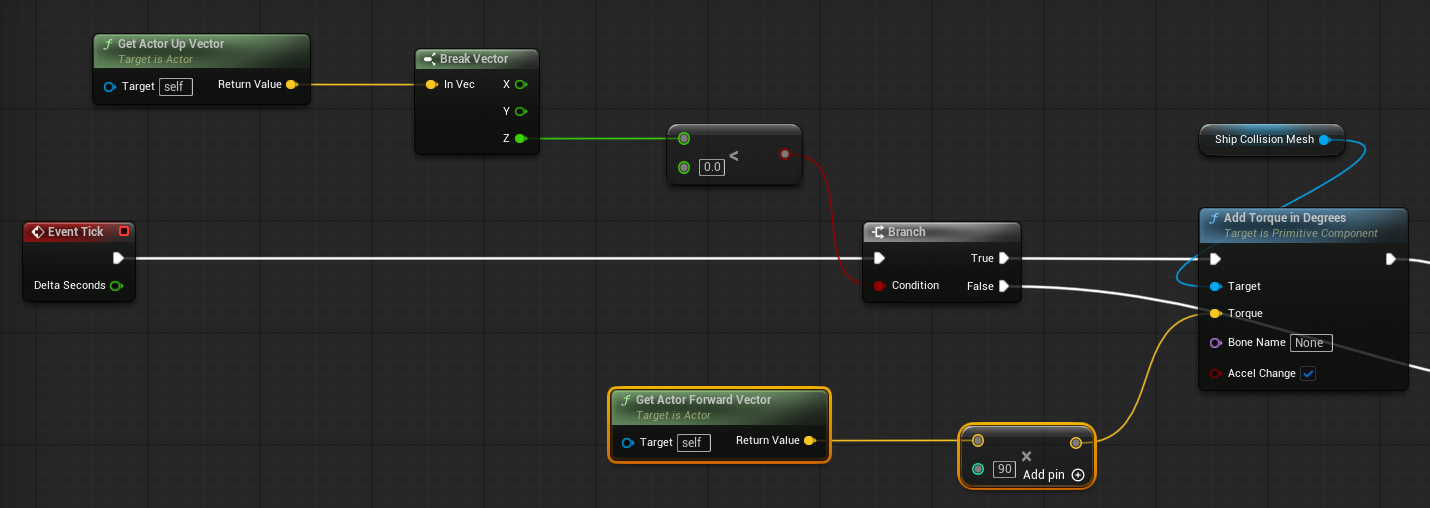
This mechanic is used on both the ship and the barge, ensuring that the player won’t have issues with either being stuck upside down. Furthermore, I have also applied the occlude volume to the Barge.
Net
After all the work I have put in for the game systems and player mechanics, I realised there wasn’t a proper way for the player to get the Artifacts into the Barge. The player could try connecting the cable to the Artifact and dragging it into the Barge, but this is inconvenient and unintuitive.
To solve this problem, I created a net that would hang behind the Barge and under the water, almost like Sea Trawling.
I implemented this idea, however I didn’t have it go along the surface of the ocean floor, and instead had it pulled behind the Barge like a big open Net.
The net has a gravity force that pulls nearby Artifacts into the centre of the net and then sets them as attached to the net to ensure they don’t move around too much when the ship moves, or the waves bob the barge around.
When the Net is activated, it will close over the top of the Barge. This will bring any Artifacts that are inside the Net up to the Barge and then deposit them inside the Barge.
I used skeletal meshes applied to a Net Mesh along with a sequence of actions to make the net move. The net also has collisions, so if the Artifacts were allowed to move inside the Barge, the net would work as a method to keep them inside.
Final Map Level
To create a playable environment, I developed a full-scale map for the player to explore. The initial landmass was generated using Gaea, node-based terrain generation software primarily used to create realistic 3D landscapes. This would be used for the main island the player would be visiting for the shop and starter location.
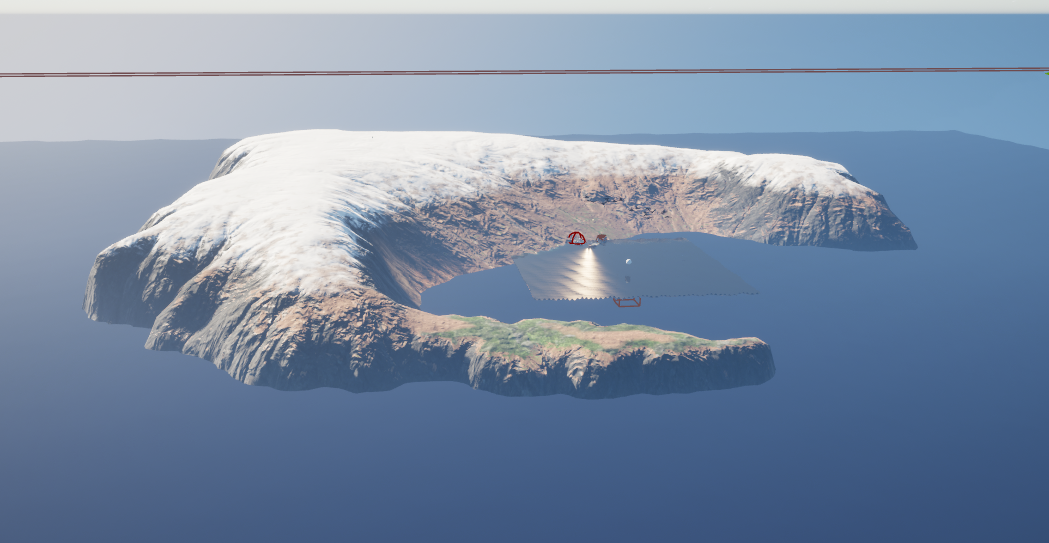
The terrain I generated in Gaea was imported into Unreal’s Landscape Editor, scaled to an appropriate size and aligned to where I wanted the water to line up against the landmass. Then I used a Landscape Material from UE5 FAB to set up the Snow, dirt, grass and rocks that would make the scene more realistic.
To expand the playable space, I used Unreal’s landscape editor again, but this time I created a large map with an approximated size of 8km by 8km, therefore providing sufficient space for the player to use.
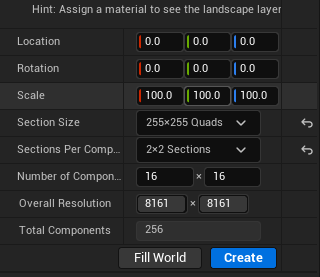
However, when I tried uploading this to GitHub I ran into some issues. This was caused by the massive file size of the landscape, which was over 100MB big. I did some research and eventually concluded that I would need to use World Partitioning.
This allowed me to set up a dynamic loading system that would only load in what was in a certain distance from the player, therefore optimizing the world and decreasing the 150MB file size down to 15MB.
Once this size issue was sorted, I began sculpting the map into what I would want the player to see. This started off with me creating islands and points of interest for the player to visit and then detailing the entire map with the noise tool, to make sure the bottom of the ocean wasn’t completely flat.
I did this faster by increasing the size of the Noise Tool Scale 8x its normal max size, otherwise it would have taken hours to detail the entire ocean surface.
This is the result.
Artifact Spawners
Now that I have a map set up, I needed a way for the Artifacts to Spawn in the map, so I created 2 new BP’s. One of these spawners will spawn the Artifacts, while the other will spawn the Volumes where the Artifacts will spawn.
These were labelled as “BP_Artifact_VolumeSpawner” and “BP_Artifact_Spawner”. The VolumeSpawner, spawns the “BP_Artifact_Spawner” along with birds for the player to know where to look under the water for the Artifacts.
The Artifacts Spawner will spawn Artifacts within the Volume and make sure that the Artifacts are not below the map. This process happens on begin play when the player starts the map.
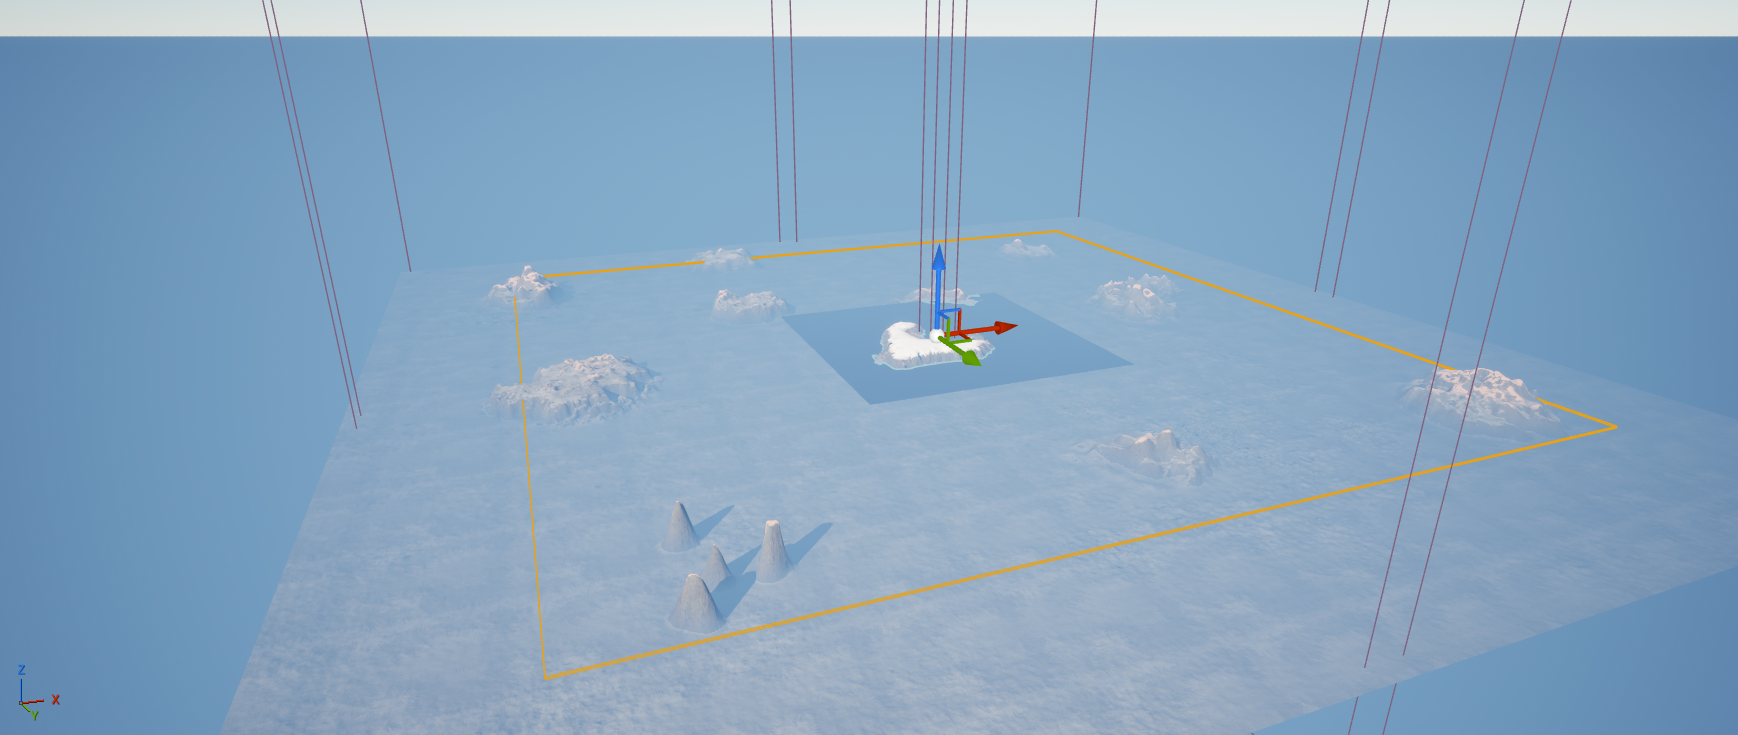
This massive volume is where the Volume Spawner can spawn the Artifact Spawners.
This is a quick example of what happens on Begin Play.
Store
To complete the gameplay loop I have implemented a store for the player, where they can sell their collected Artifacts.
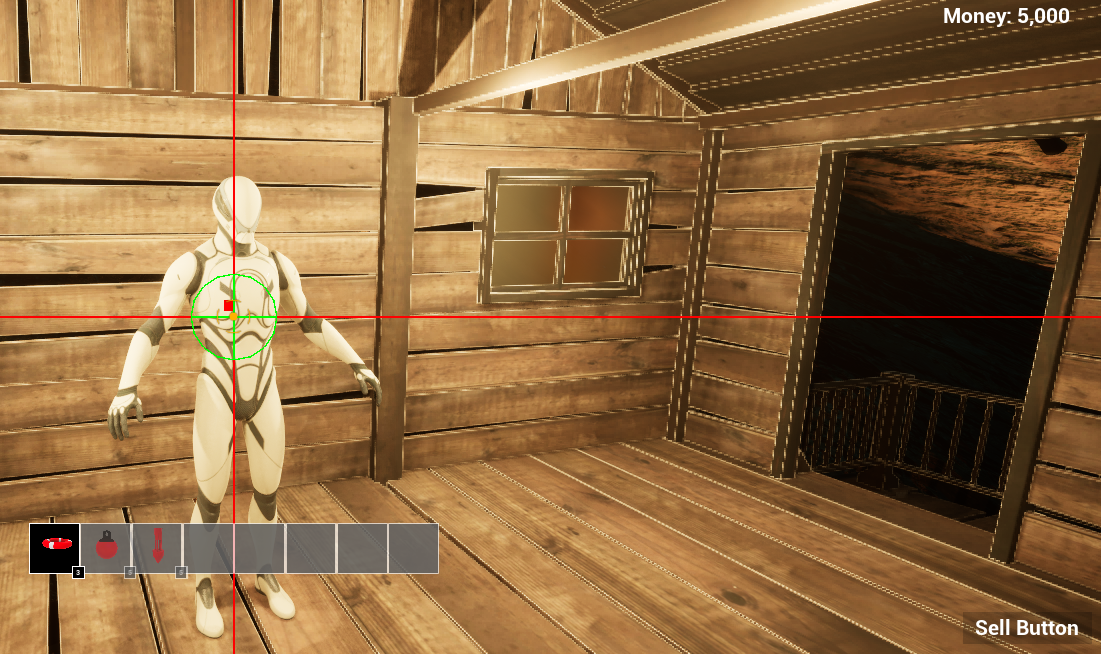
This takes the form of a small shack located on the main island. When the player interacts with the shopkeeper a user interface is displayed to them, allowing them to sell all the Artifacts currently stored in the Barge.
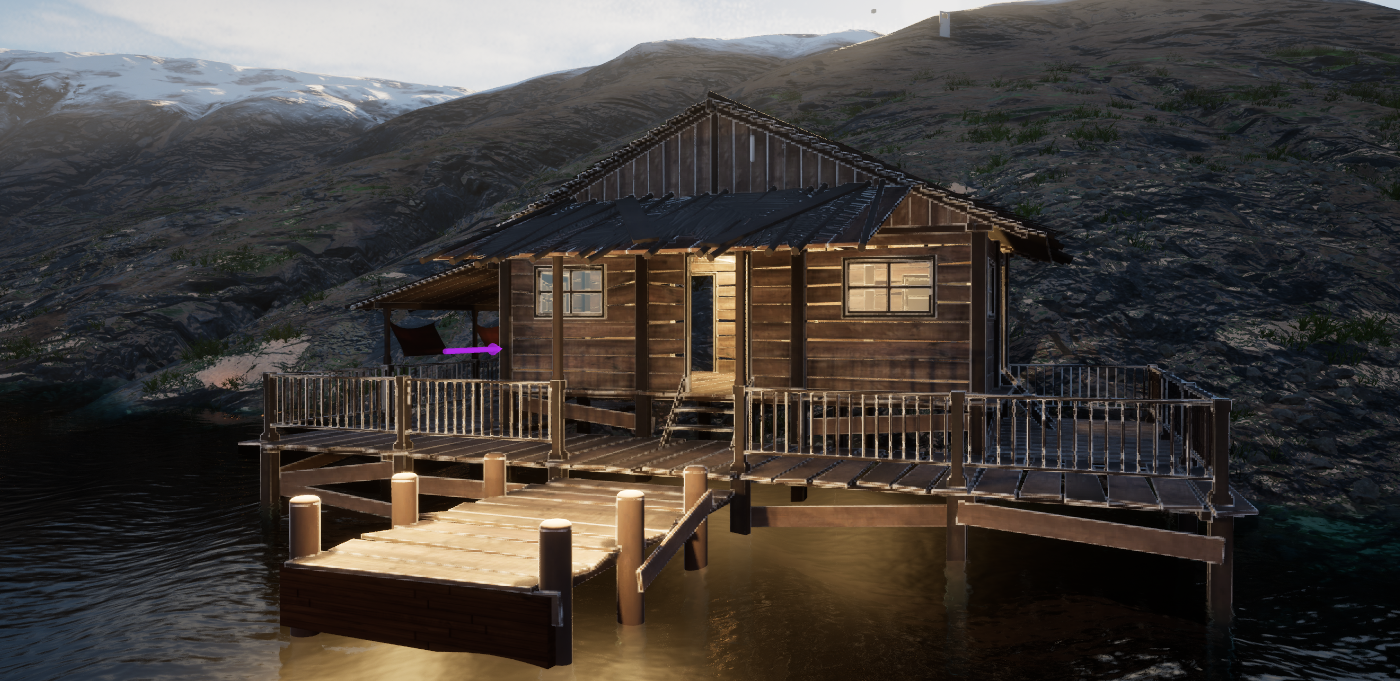
The value of each Artifact is determined by their weight, directly linking their value to their difficulty to move, the heavier the object the more it will sell for, this is then displayed in the UI.
This will encourage the players to take on more challenging retrieval tasks.
Ship Final Design
Following gameplay testing, I revisited the ship design to address usability issues, as I was not happy with the current state of the ships design. The previous version of the ship lacked a clear viewing position when utilizing the wheel and made it difficult to exit the ship due to the depth of the interior of the ship.
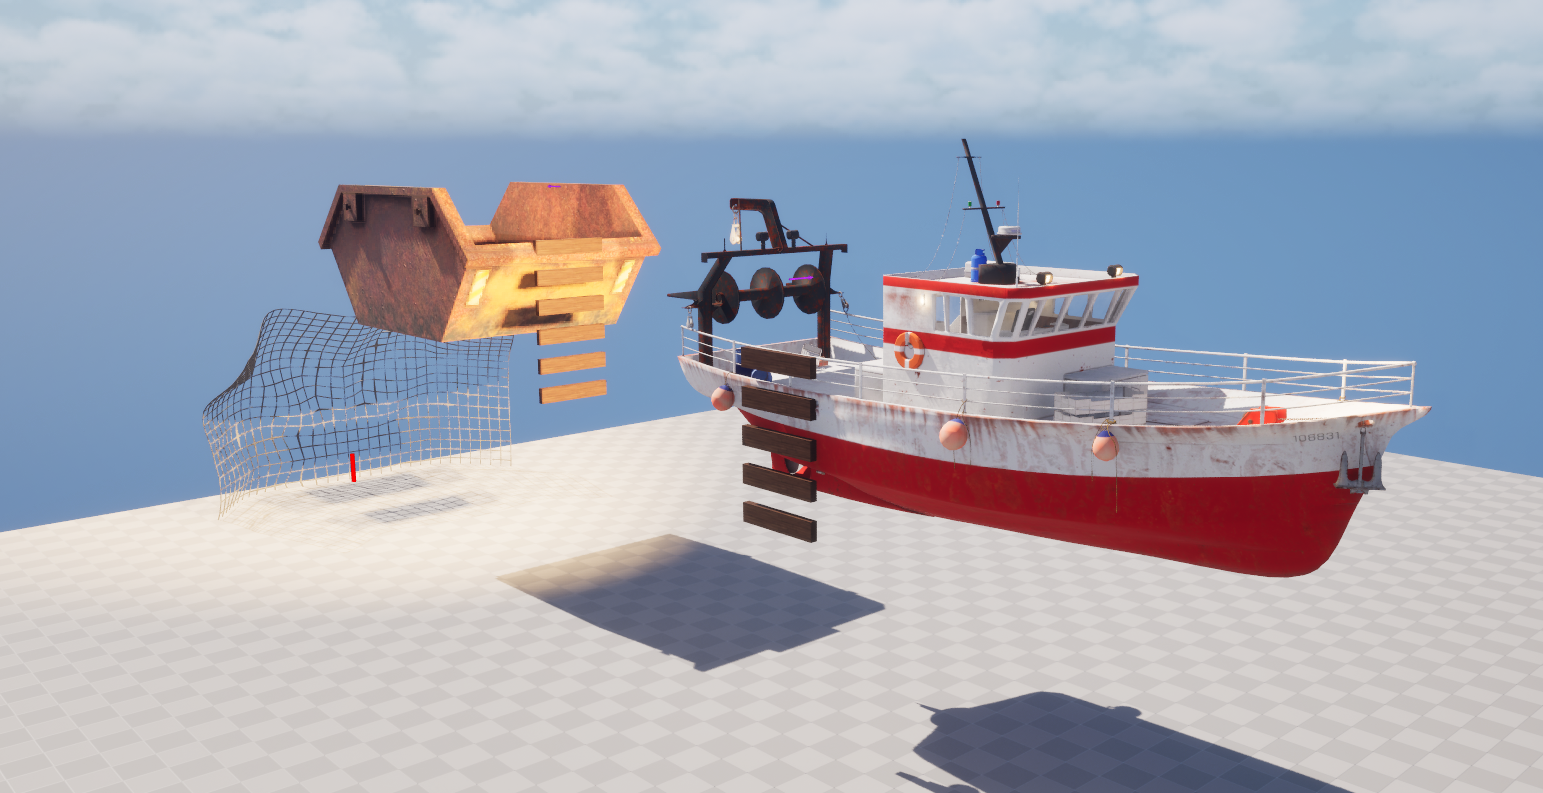
The updated model introduces a more practical layout, including a defined cabin space and improved deck accessibility. This ensures that the player can navigate, observe the environment, and interact with systems more effectively.
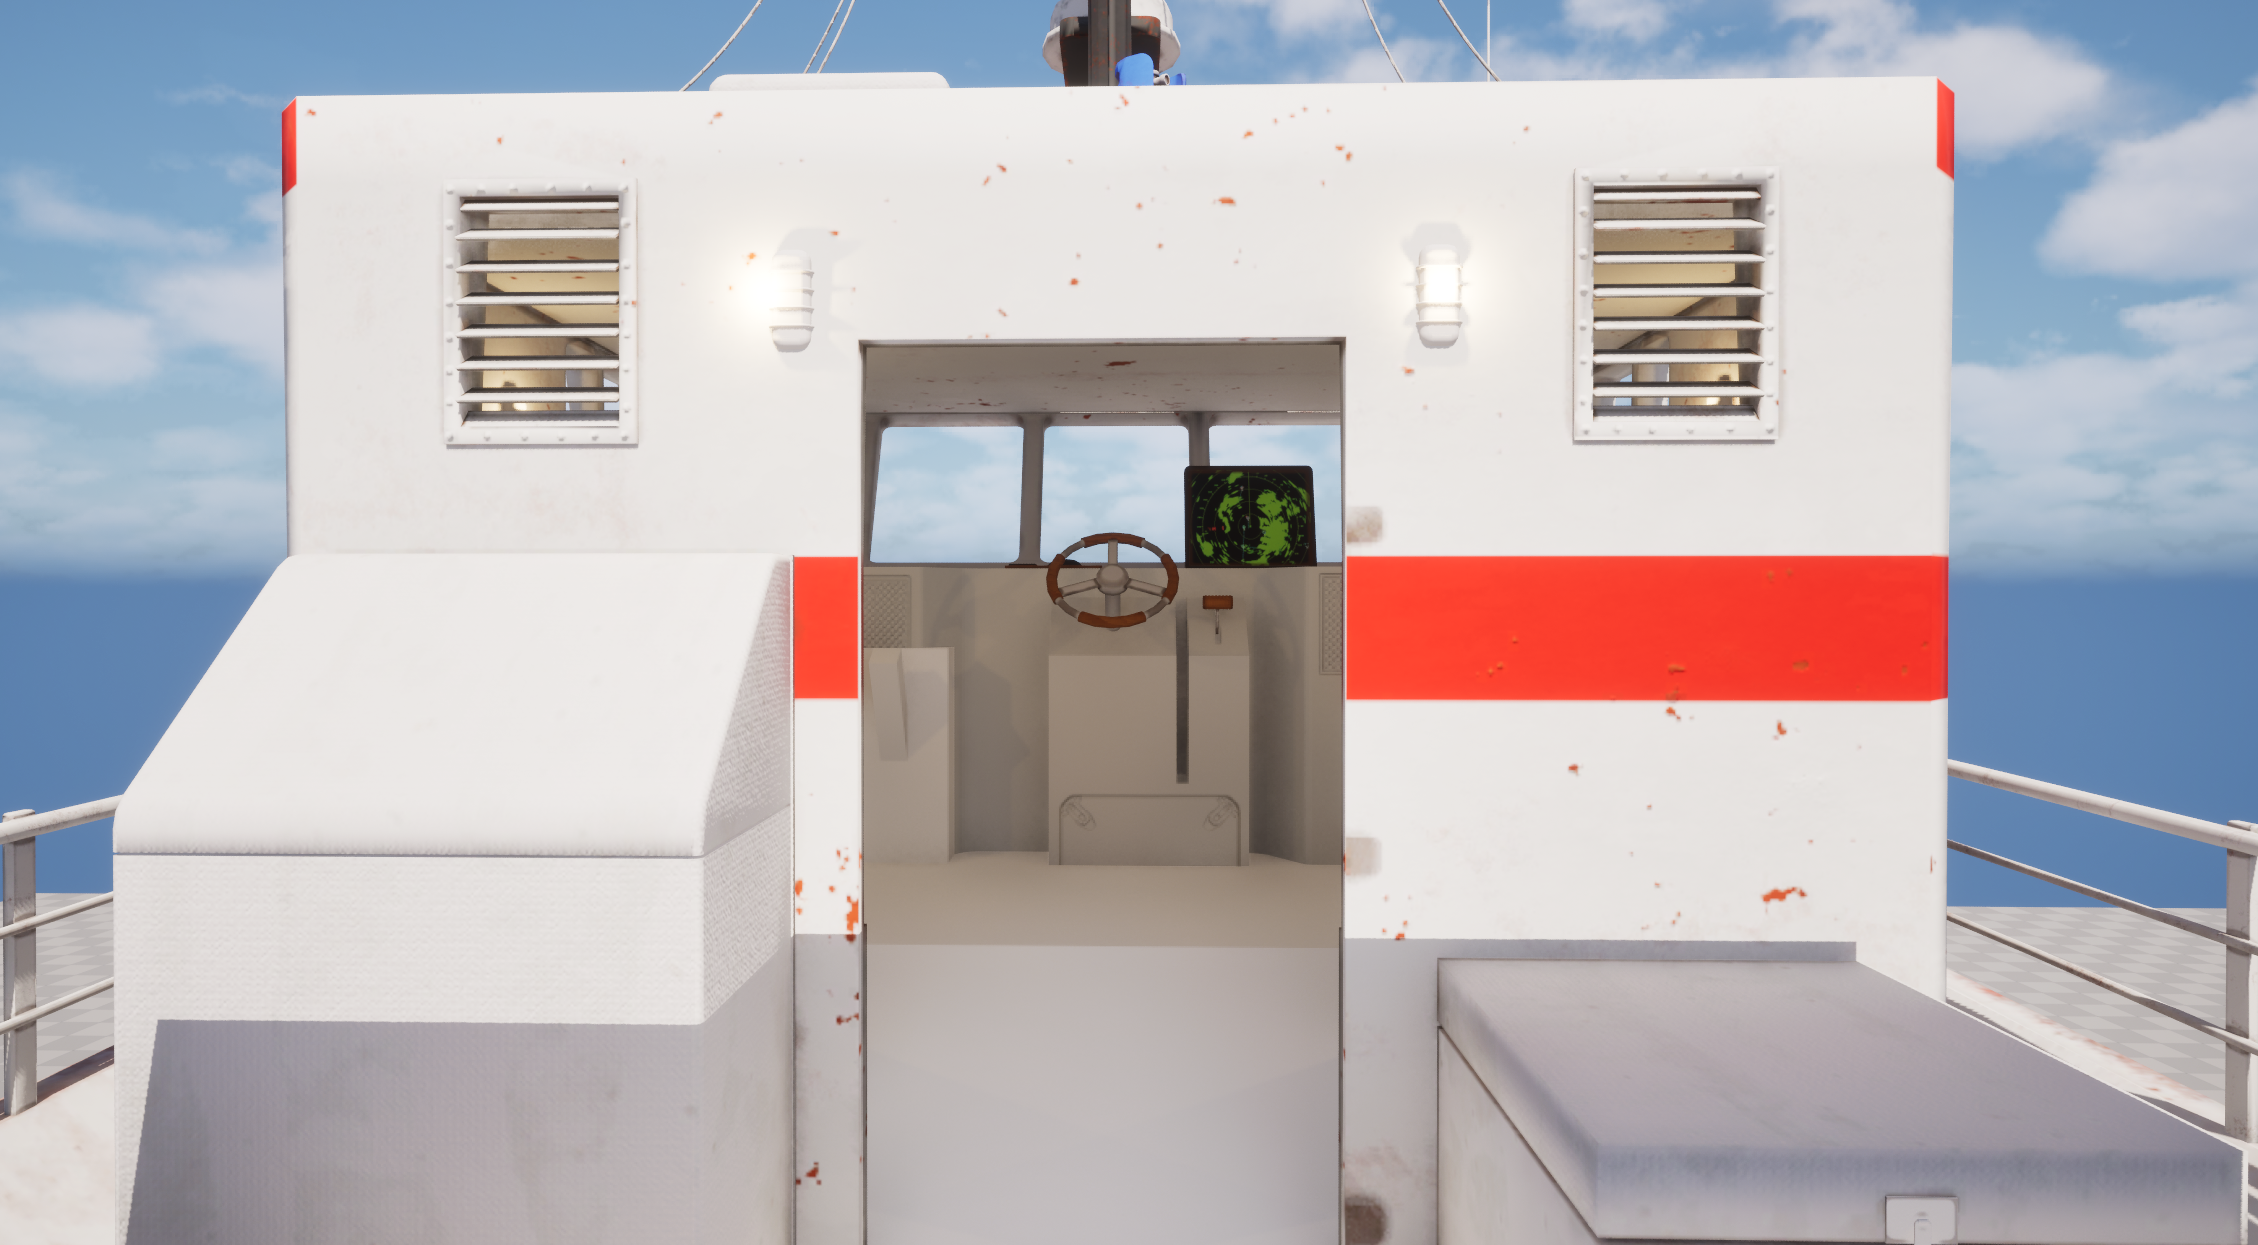
The wheel is now apart of the ship model and more inline with the rest of the model.
While working on this however I realised that I could fix the issues that I had with the previous model by using a mesh editing tool to remove undesired parts of the mesh. This would also allow me to create an upgrade path for the ship itself; by making you start in a wooden dinghy and progress to a more modern vessel.
The progression path would be these 3 vessels.
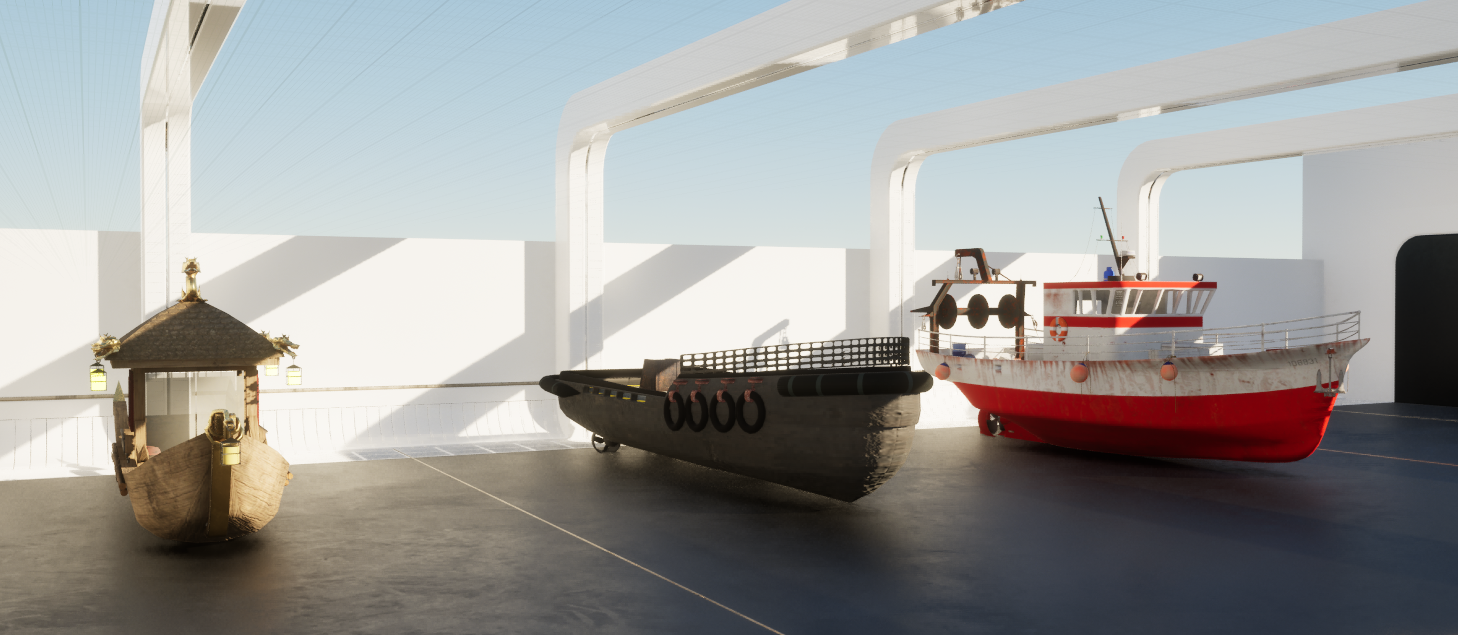
Ship Upgrades
Along with the new model I created some upgrades that can be bought from the shop, these upgrades show up in the shop UI.
The available upgrades are:
- Cameras
- Lights
- Engine Upgrades
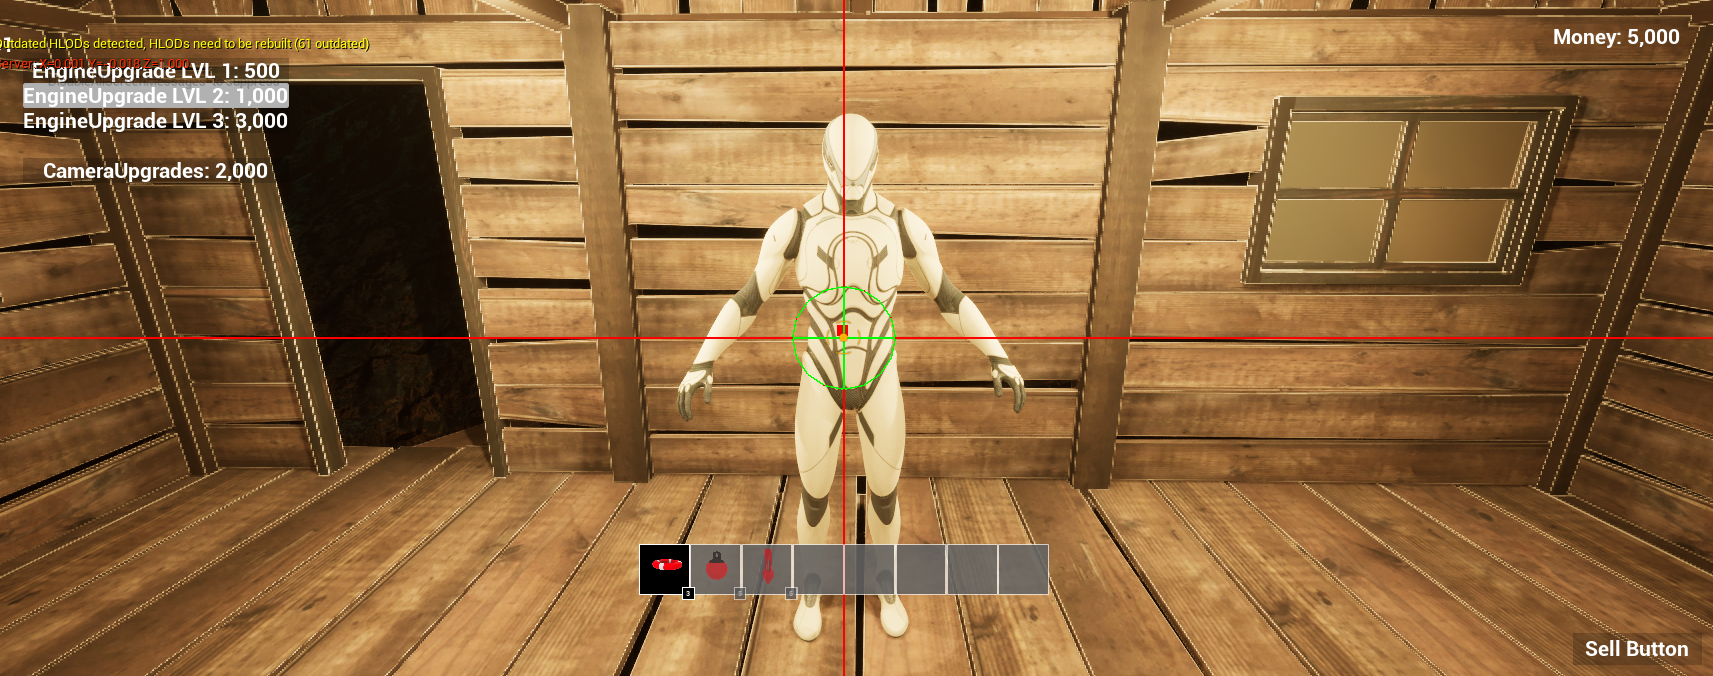
If the player doesn’t have enough money, they won’t be able to buy the upgrades.
The engine upgrades make the ship faster, the lights make it easier to see at night, and the Cameras allow the player to switch between different cameras while on the wheel to make it easier to align the ship with the Artifacts.
Daylight Cycle
To make the world feel more dynamic, I implemented a daylight cycle that progresses over a fixed duration. This cycle lasts 15 minutes and transitions from day to night, however, time progression pauses at night until the player returns to the store and ends the day.
Ending the day resets the Artifact spawners, generating a new distribution of items across the map. The cycle then returns to daytime allowing the player to begin a new session.
This is a quick time example of the daylight cycle.
Sounds
As a quick addition near the end of the project, I added some quick sounds to the game files.
This included: Underwater Sounds, Engine Loop Sounds, A variety of splashing sounds for the ship.

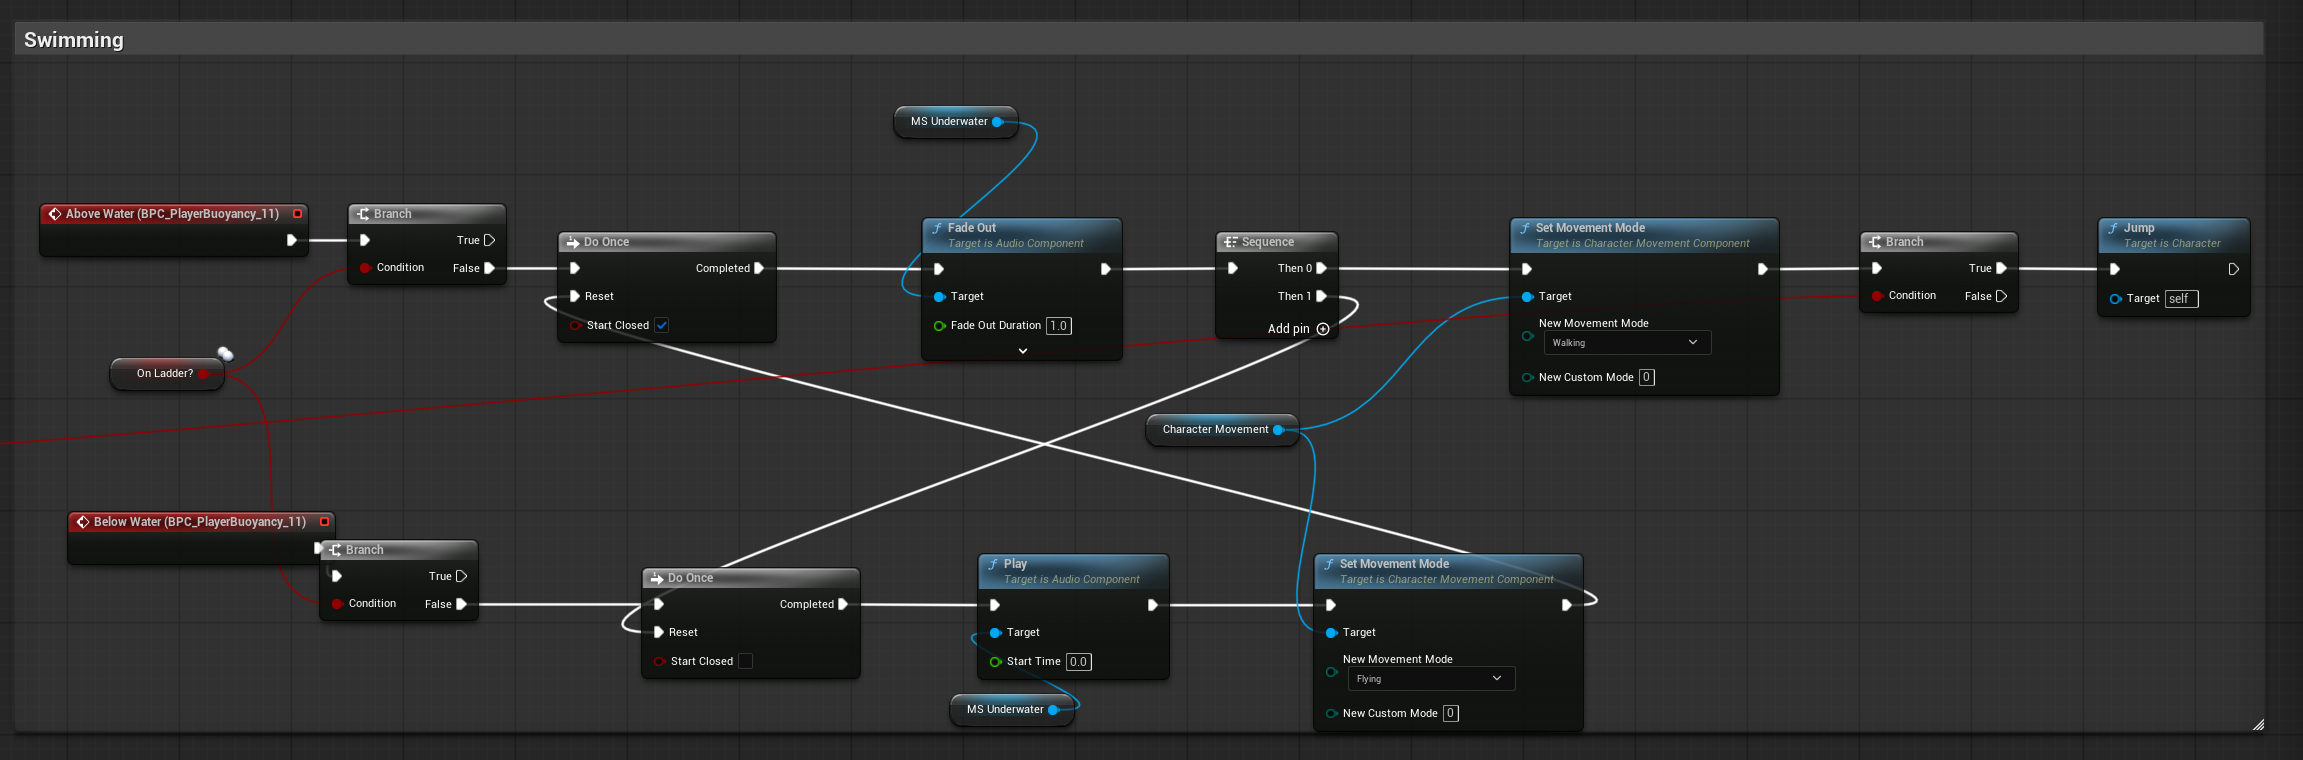
To add in the underwater sounds, I branched off from the players BPC_PlayerBuoyancy, I did this because this BPC already had a function that told the player if they were underwater or above water. So, all I had to do was attach an audio component to the player, set auto activate to False, and whenever the player went below the surface do “Play Audio”, and the opposite for if they went above the surface.
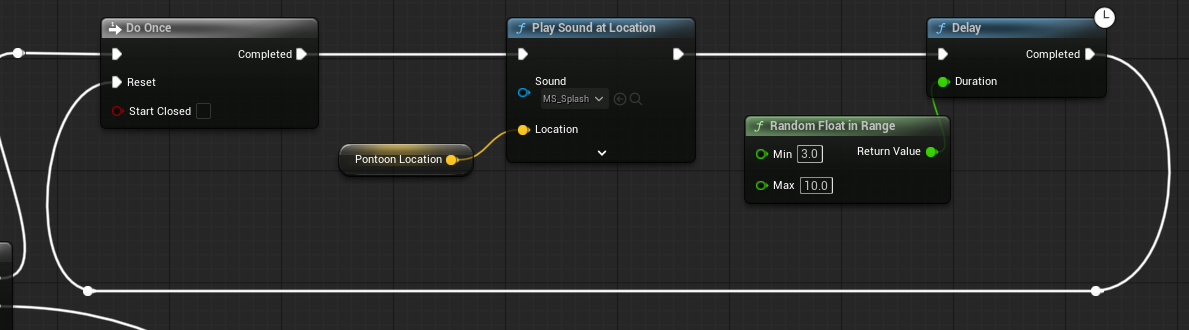
The ship sounds for hitting waves I attached to the normal BPC_Buoyancy, and had it play on a delay every time force was applied to the Buoyancy Points.
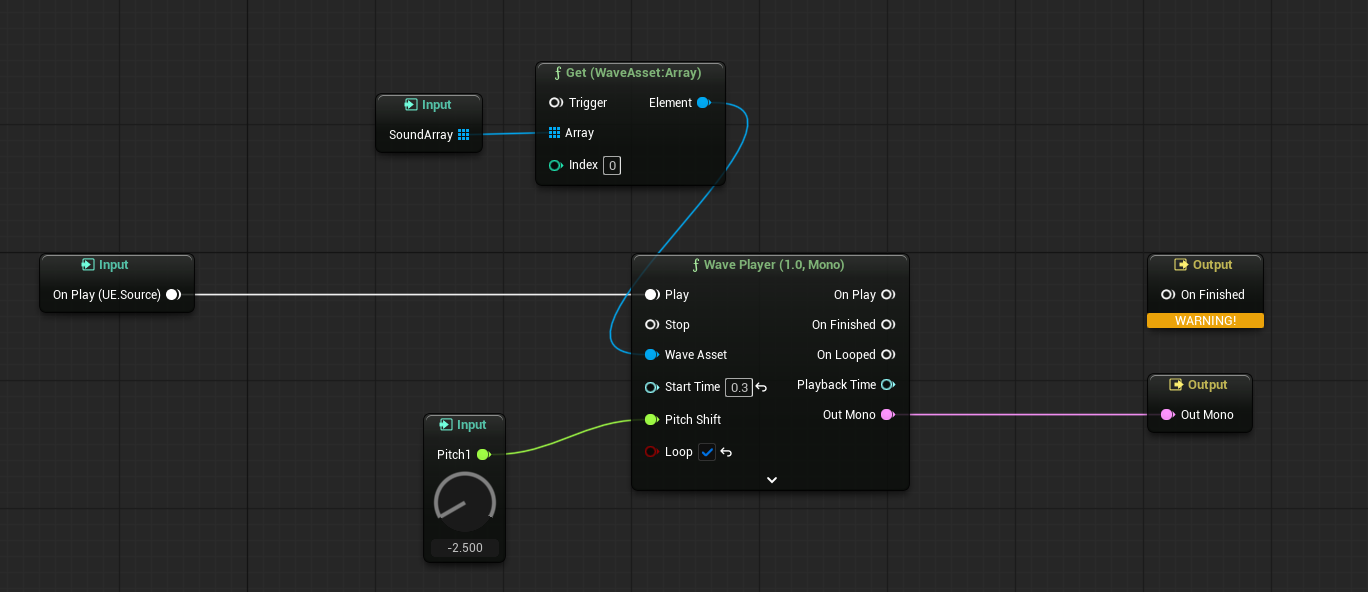
The Engine Looping sounds are attached to the Speed Controller as an audio component, and it loops the engine noise based on a supplied pitch.
Updated Ship Controls
One of the final things I decided to add to the game was a change to the ship controls. Since the start of the project I have been obsessed with the idea of having a variable speed for the ship based upon a ships engine throttle.
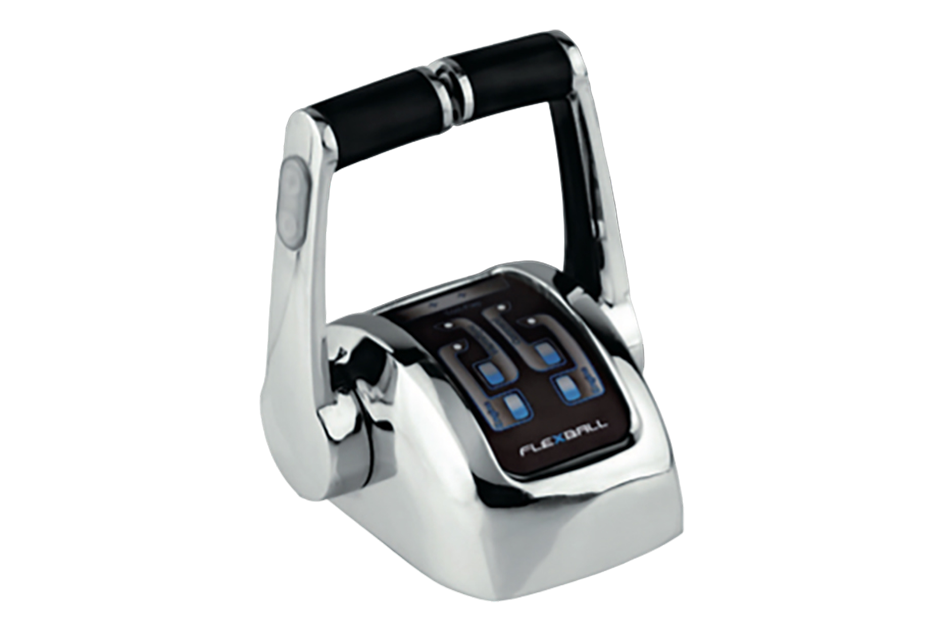
Due to the fact that the new ship model has a throttle just like this, I decided to have a go at getting it to work.
To do this I first had to separate the meshes of the Wheel and the Throttle controller, then make a new combined mesh of the lever and its components, this would allow me to move it around with its pivot point at the bottom of the lever, therefore, making the movement more believable and easier to program.
After this I made a new blueprint titled “BP_SpeedController” and put the static meshes inside.
Inside the panel of where the lever would be placed, I created a spline, with the start at the bottom and the end at the top of the panel.
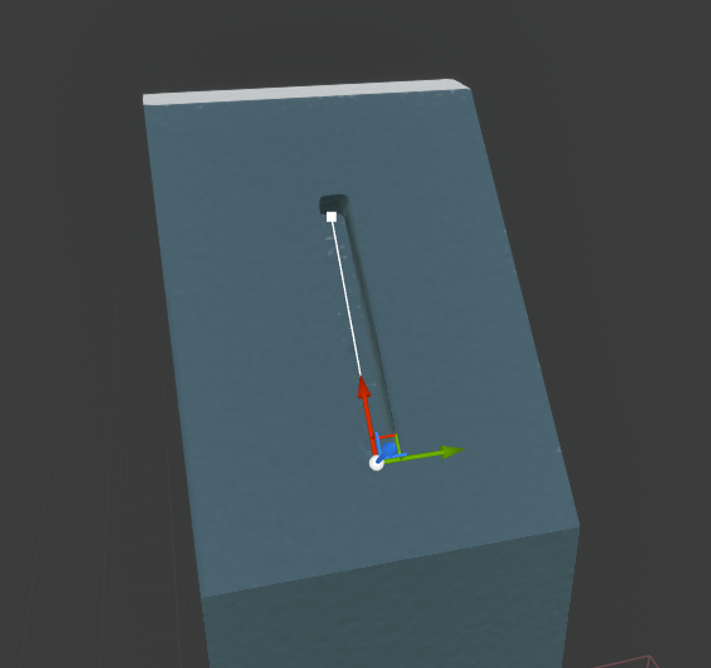
This will work as the limits for how far the throttle lever can go.
Next, I added the lever to the same Artifact Highlight material and made the lever glow whenever the player looked at it, to make sure the player knew that it could be used.
After this I started working on making it so the player could move the lever up and down while holding left click.
This takes a line trace hit location that is taken from the player when they are holding left mouse button down, then calculates where on the spline that hit location is closest to. This then outputs to where the location of the static mesh should be set to and since its in a RepNotify node it is replicated.
The clamped float output, from 0 to 1, is then cast to the ship to be used as a speed multiplier. This means that if the lever is at the very top, 1, the ship speed will be at its fastest, and if its at the bottom, 0, it will not move.
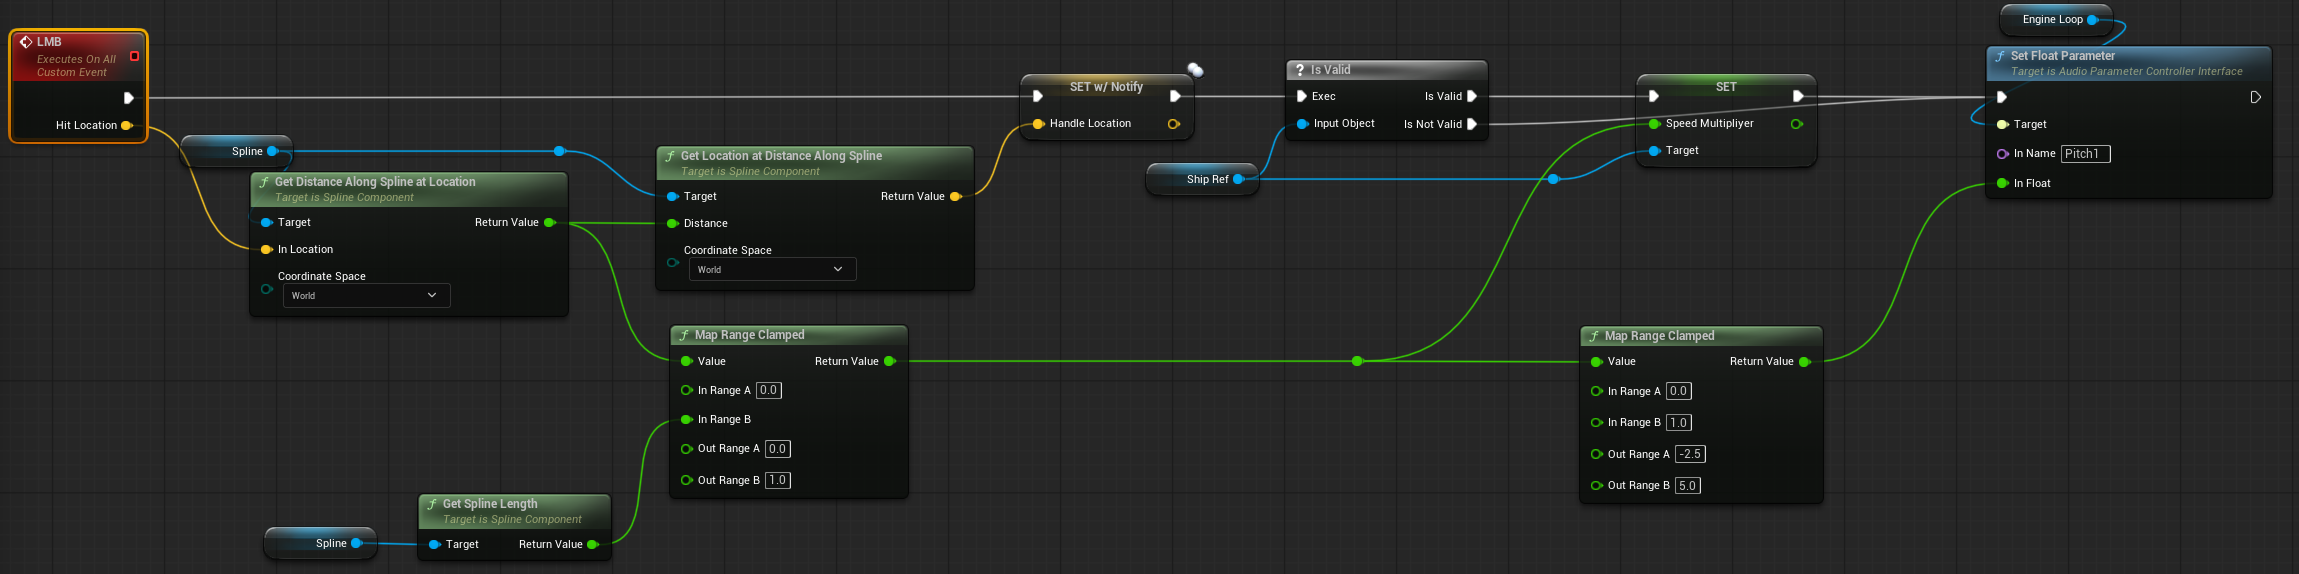
This float is also used to increase the pitch multiplier of the Engine noise, improving the immersion of the game.
Note, the LMB Custom Node does not need to be multicast for the movement of the handle, however due to the audio at the end of this line, if it is not replicated no audio changes will occur on clients.
Multiplayer
Due to most of my mechanics in this game already being multiplayer ready, I decided to try and give the player the option to join other players in this game.
While this won’t be a fully fleshed out feature, it is something I would be leaving out if I didn’t try and get some features working in multiplayer and have the ability to join other players.
Throughout my project I have been designing most of my features with the key feature of having Multiplayer in mind, this means that each feature has had extra thought put into it to make sure they can be replicated and shown from client to server and server to client.
To start the process of having the players be able to connect to each other I started off by including the Plugin Advanced Sessions. This plugin exposes more steam utilities to me in the editor which can be used to connect players in a more advanced manner.
To use this plugin, I created a Plugin folder, put its files inside and restarted the engine. This exposed the Blueprints nodes which I could use in my editor.
Next, I began setting up session creation and join session logic in the main menu, along with a game instance which would store the multiplayer logic.
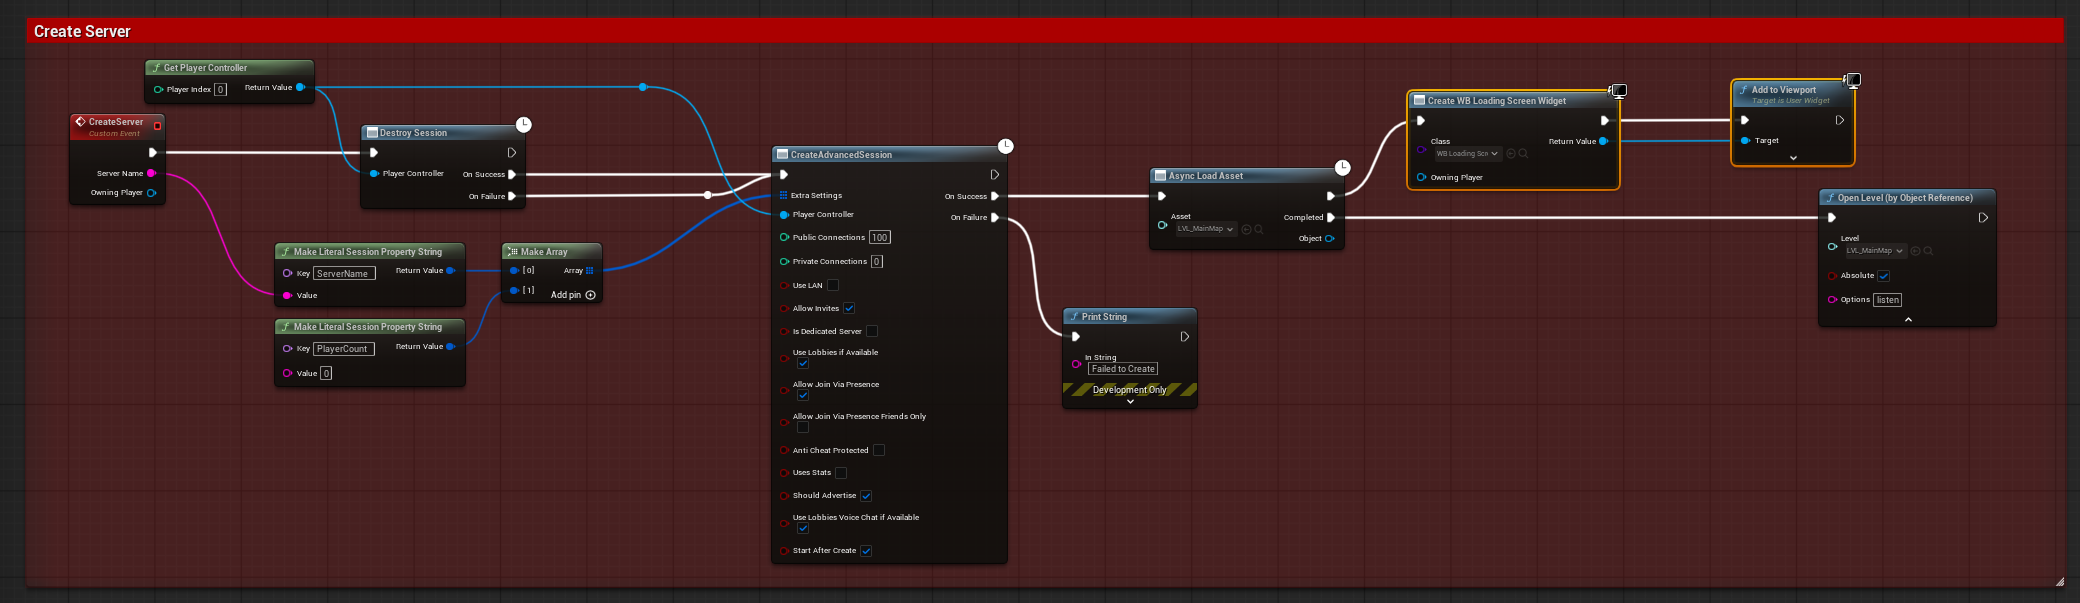
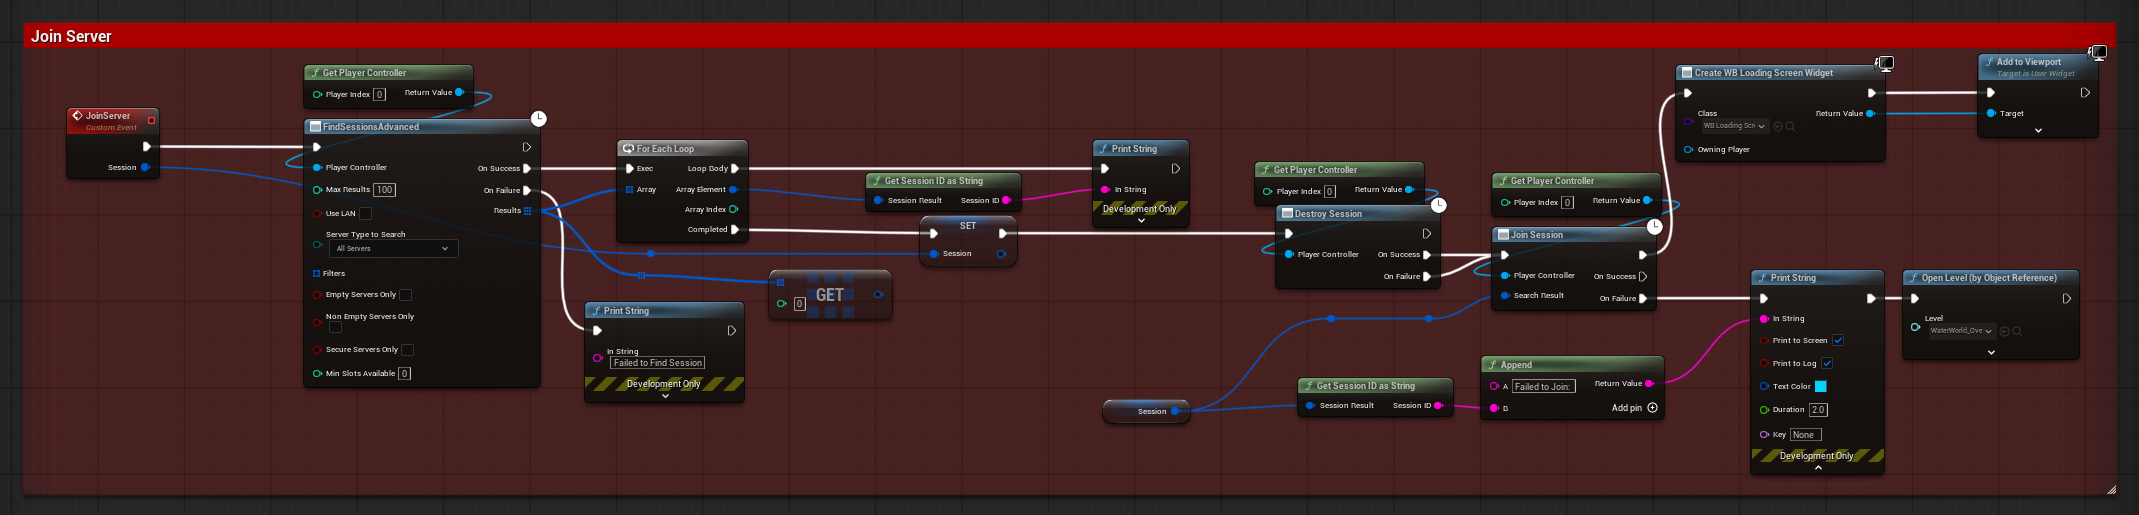
These custom nodes will be called from the UI set up im doing next.
To create a session the same button is used from the Original main menu UI, but instead of just creating the level, it is instead re-routed to this “Create Server” custom node.
I have also added a few more buttons to the main menu.
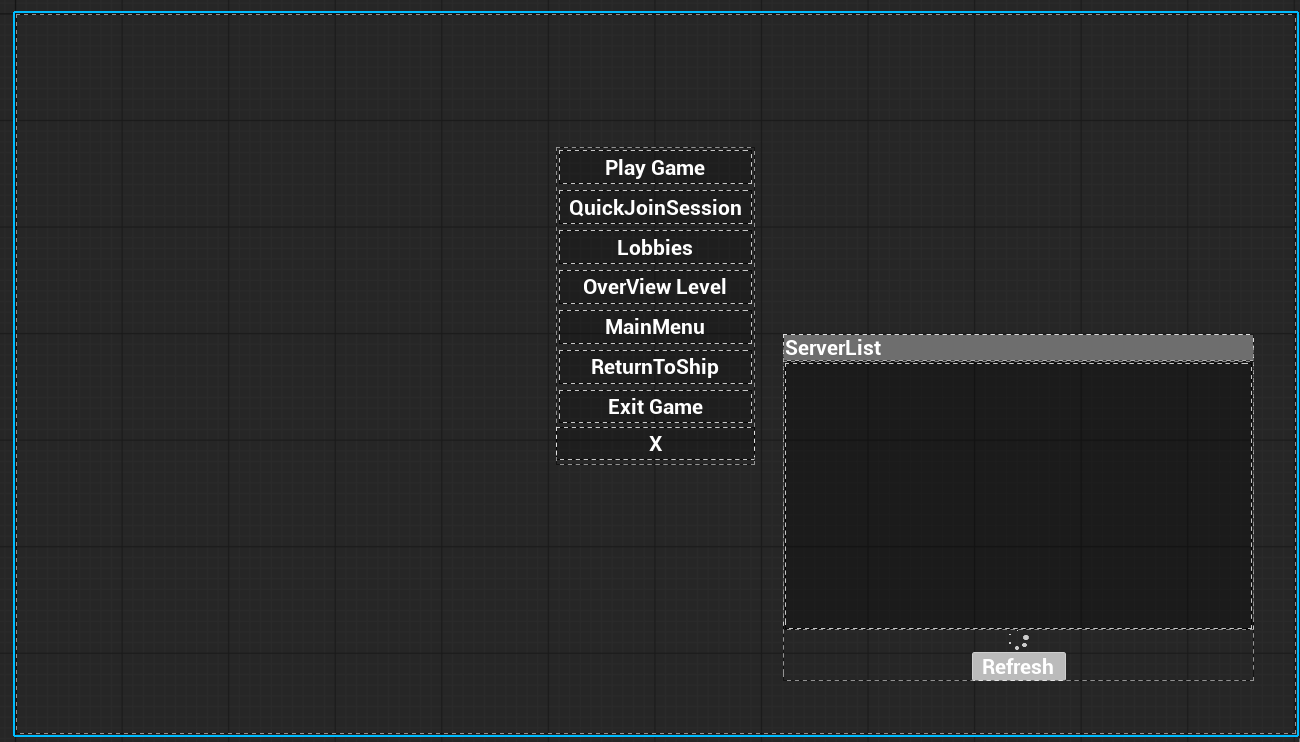
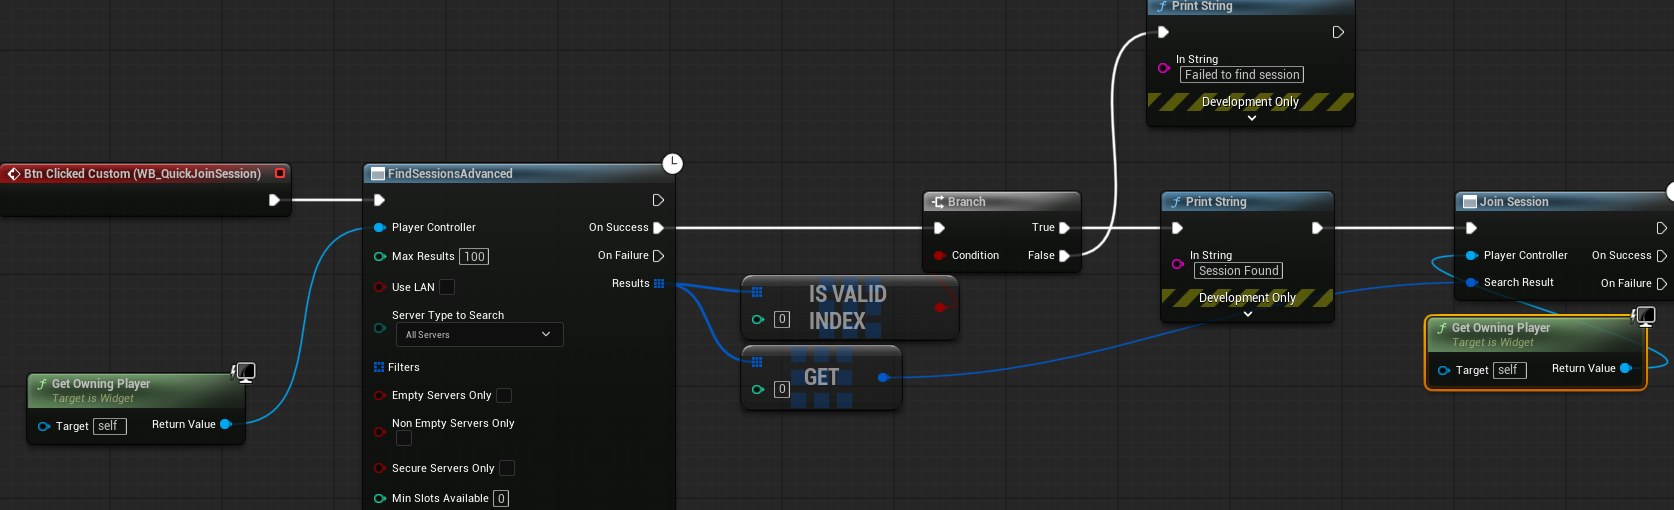
Quick Join Session will just find the first Session it can find and join it straight away.
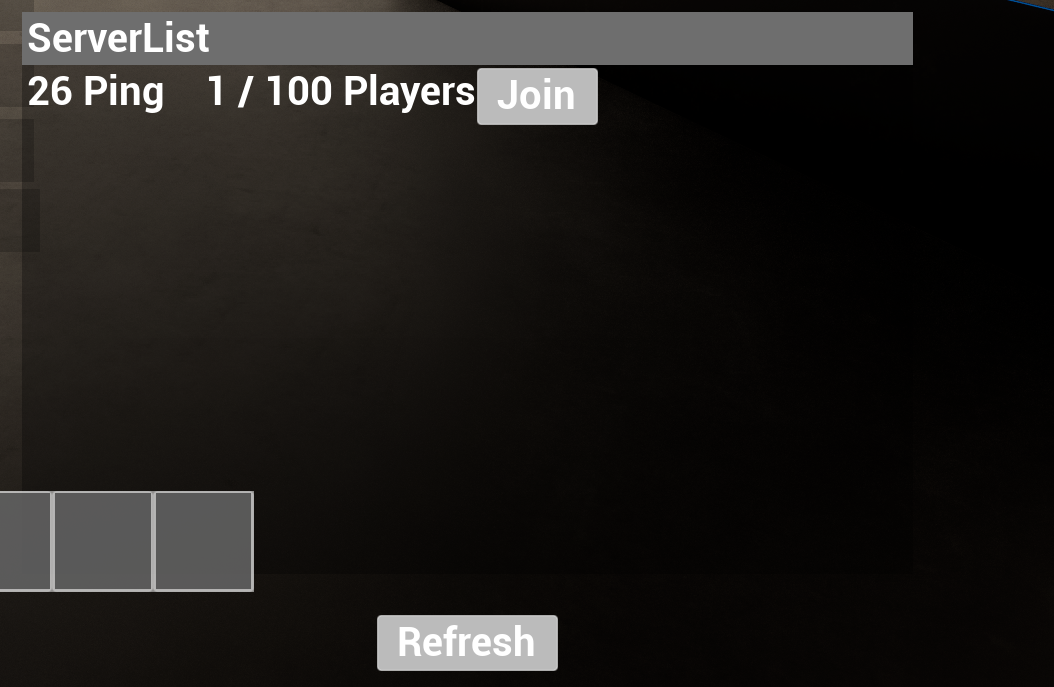
Next, we have the lobbies button, this will bring up the server list and refresh the list to try and find any currently active servers.
If a server is found it should display the Ping, player Count and player name if they are connected to steam. The join button then routes the session data to the Join Server Custom node in the Game Instance.
Bibliography
- Cuemath. (2021). Volume of Section of Sphere - Formula, Examples, Definition. [online] Available at: https://www.cuemath.com/measurement/volume-of-a-section-of-a-sphere [Accessed 28 Oct. 2025].
- Finch, M. and Worlds, C. (2004). “Chapter 1. Effective Water Simulation from Physical Models”. [online] NVIDIA Developer. Available at: https://developer.nvidia.com/gpugems/gpugems/part-i-natural-effects/chapter-1-effective-water-simulation-physical-models [Accessed 15 Oct. 2025].
- PrismaticaDev (2021) “Single Layer Water | 5-Minute Materials [UE4/UE5]” [Online Video]. Available at: https://www.youtube.com/watch?v=KLl3PZeupFM [Accessed 4 Nov. 2025].
- R.E.P.O. (2025) Developed by Semiwork. Available at: Steam (Early Access, released 26 February 2025).